
Move - Move your image within the app
Pastello - Info Page Desktop
Buttons
Top Bar Buttons

- Get Photo - Load a photo from your hard drive
- Save Photo - Save your image to your hard drive
- Crop - Cut out an area of your image hiding the rest
- Undo - Undo the last edit
- Zoom In - Zoom in to examine small details
- Zoom Out - Zoom Out to view a larger proportion of your image
- Redo - Redo the last edit that was undone
- Original Button - Hold down to view the original image for a quick comparison.
- Info Button - Opens up this page
- Website - Takes you to our website
- Randomize - Randomizes the effect on the image.
Tools


Brush Tool - Add back sections of the layer that were erased with the Erase Tool

Erase Tool - Erase parts of the layer allowing layers beneath it to be seen

Smudge Tool - Smear the media for a softer appearance (Not available when using Pastel)

Erase Smudge Tool - Remove smudging from the Smudge Tool (Not available when using Pastel)
Brush Size - Increase the size of the brush for the Paint and Erase Tools
Opacity - Changes the opacity of the brush
Mask - Fill: resets the image adding back any parts of the layer that were erased. Clear: Erases the whole layer allowing you to paint back parts of the layer. Invert: Reverses sections of the layer that were erased with sections of the layer that were not erased
Menu

- Get Photo - Load a photo from your or hard drive
- Save Photo - Save the image to your or hard drive
- Save Preset - Once you've created an effect you can use this option to save all the attributes and reuse them on another picture
- Preferences - Change where the application will save your image, turn off tooltips and rebuild presets that came with the product
- Undo - Undo your last edit
- Redo - Redo your last edit that was undone
- Zoom In - Zoom in on areas of the image
- Zoom Out - Zoom Out to view a larger proportion of the image
- Fit In Window - Fill the window with the image
- Actual Size - Changes the images size to its original size
- About - View information about the app
- Jixipix Info - Brings you to this page
- Check for Updates - Checks for any available updates for the app
- Jixipix Products - Takes you to our website where you can view all our apps
File
Edit
Window
Help


Adjustments
You can use the Adjust Tab to customize your image. The Adjust Tab changes depending on which style is chosen.
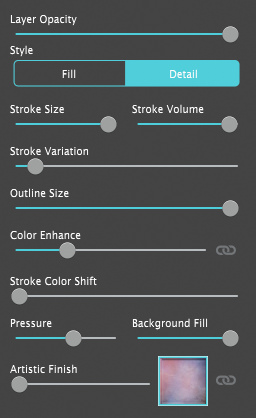
Pastel Adjust Tab

- Layer Opacity - Adjust to blend layers
- Stroke Size - Move left for small detailed strokes and right for large thick strokes.
- Stroke Volume - Adjust the overall thickness of the strokes
- Stroke Variation - Move this slider to give the strokes an overall different look
- Color Enhance - Increase the saturation of the image making the image more bright and colorful. Use the link icon
 to link all layers to this setting
 - Stroke Color Shift - Controls how much the strokes will vary their overall hue
- Artistic Finish - Adds mottled light and color to the image. Use the link icon to link all layers to this setting
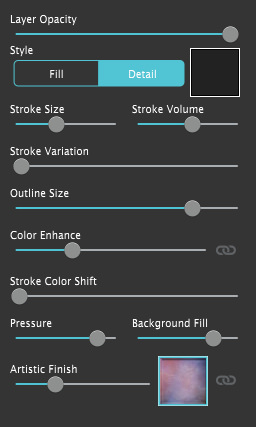
Chalk and Crayon Adjust Tab
- Layer Opacity - Adjust to blend layers
- Style - Choose to fill the whole image or just the details
- Stroke Size - Move left for small detailed strokes and right for large thick strokes.
- Stroke Volume - Adjust the overall thickness of the strokes
- Stroke Variation - Move this slider to give the strokes an overall different look
- Outline Size - Adjust the thickness of the outline (Only available when Detail is chosen for the Style)
- Color Enhance - Increase the saturation of the image making the image more bright and colorful. Use the link icon to link all layers to this setting
- Stroke Color Shift - Controls how much the strokes will vary their overall hue
- Pressure - Increase to deepen the chalk color allowing less of the layers below to show through
- Background Fill - Add the colors from the original image to uncovered areas in the layer
- Artistic Finish - Adds mottled light and color to the image. Use the link icon to link all layers to this setting
Charcoal Adjust Tab
- Layer Opacity - Adjust to blend layers
- Style - Choose to fill the whole image or just the details
- Color - Choose a color for the effect
- Stroke Size - Move left for small detailed strokes and right for large thick strokes.
- Stroke Volume - Adjust the overall thickness of the strokes
- Stroke Variation - Move this slider to give the strokes an overall different look
- Outline Size - Adjust the thickness of the outline (Only available when Detail is chosen for the Style)
- Color Enhance - Increase the saturation of the image making the image more bright and colorful. Use the link icon to link all layers to this setting
- Stroke Color Shift - Controls how much the strokes will vary their overall hue
- Pressure - Increase to deepen the chalk color allowing less of the layers below to show through
- Background Fill - Add the colors from the original image to uncovered areas in the layer
- Artistic Finish - Adds mottled light and color to the image. Use the link icon to link all layers to this setting
Conte Adjust Tab
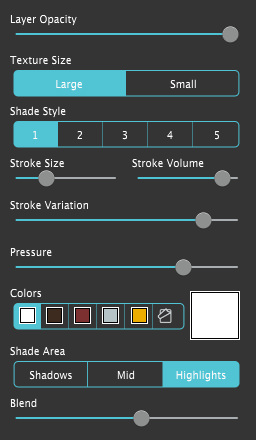
- Layer Opacity - Adjust to blend layers
- Texture Size - Choose large or small for the texture size
- Shade Style - Choose to Fill the area or use crosshatch, hatch, scribble or scumble shading styles
- Shade Direction - Control the overall direction of the strokes
- Stroke Size - Move left for small detailed strokes and right for large thick strokes.
- Stroke Volume - Adjust the overall thickness of the strokes
- Stroke Variation - Move this slider to give the strokes an overall different look
- Pressure - Increase to deepen the chalk color allowing less of the layers below to show through
- Colors - Choose one of our hand picked colors for the effect or use the color box to pick a custom color
- Shade Area - Choose which area of the image is shaded in
- Blend - Blend the shading effect with the layers below
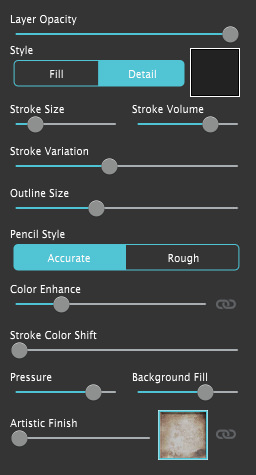
Colored Pencil Adjust Tab
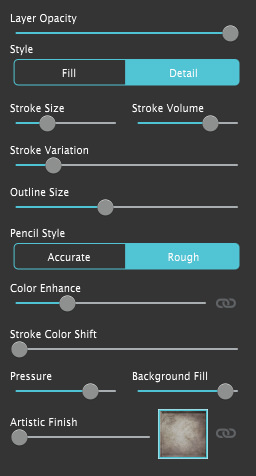
- Layer Opacity - Adjust to blend layers
- Style - Choose to fill the whole image or just the details
- Stroke Size - Move left for small detailed strokes and right for large thick strokes.
- Stroke Volume - Adjust the overall thickness of the strokes
- Stroke Variation - Move this slider to give the strokes an overall different look
- Outline Size - Adjust the thickness of the outline (Only available when Detail is chosen for the Style)
- Pencil Style - Choose between an accurate or rough pencil outline (Only available when Detail is chosen for the Style)
- Color Enhance - Increase the saturation of the image making the image more bright and colorful. Use the link icon to link all layers to this setting
- Stroke Color Shift - Controls how much the strokes will vary their overall hue
- Pressure - Increase to deepen the chalk color allowing less of the layers below to show through
- Background Fill - Add the colors from the original image to uncovered areas in the layer
- Artistic Finish - Adds mottled light and color to the image. Use the link icon to link all layers to this setting
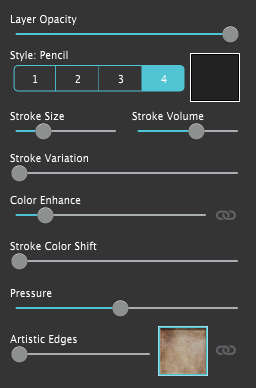
Pencil Adjust Tab
- Layer Opacity - Adjust to blend layers
- Style - Choose to fill the whole image or just the details
- Color - Choose a color for the effect
- Stroke Size - Move left for small detailed strokes and right for large thick strokes.
- Stroke Volume - Adjust the overall thickness of the strokes
- Stroke Variation - Move this slider to give the strokes an overall different look
- Outline Size - Adjust the thickness of the outline (Only available when Detail is chosen for the Style)
- Pencil Style - Choose between an accurate or rough pencil outline (Only available when Detail is chosen for the Style)
- Color Enhance - Increase the saturation of the image making the image more bright and colorful. Use the link icon to link all layers to this setting
- Stroke Color Shift - Controls how much the strokes will vary their overall hue
- Pressure - Increase to deepen the chalk color allowing less of the layers below to show through
- Background Fill - Add the colors from the original image to uncovered areas in the layer
- Artistic Finish - Adds mottled light and color to the image. Use the link icon to link all layers to this setting
Fill Brush Adjust Tab
- Layer Opacity - Adjust to blend layers
- Style - Choose to use chalk, charcoal, colored pencil or pencil on the layer
- Color - Choose a color for the effect (Only available when using Pencil or Charcoal as a style)
- Stroke Size - Move left for small detailed strokes and right for large thick strokes.
- Stroke Volume - Adjust the overall thickness of the strokes
- Stroke Variation - Move this slider to give the strokes an overall different look
- Color Enhance - Increase the saturation of the image making the image more bright and colorful. Use the link icon to link all layers to this setting
- Stroke Color Shift - Controls how much the strokes will vary their overall hue
- Pressure - Increase to deepen the chalk color allowing less of the layers below to show through
- Artistic Finish - Adds mottled light and color to the image. Use the link icon to link all layers to this setting
Signature Tab
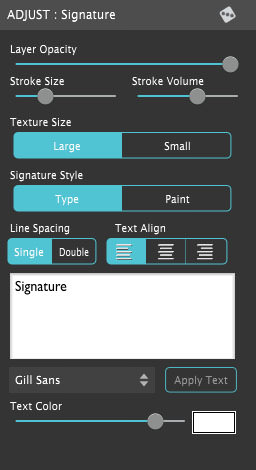
- Layer Opacity - Adjust to blend layers
- Stroke Size - Move left for small detailed strokes and right for large thick strokes. The smaller the strokes the more accurate the drawing.
- Stroke Volume - Adjust the overall thickness of the strokes
- Texture Size - Choose between a large or small texture size
- Signature Style - Choose to type the signature with your keyboard or draw the signature
- Line Spacing - Switch between single and double spacing between lines of text
- Text Align - Aligns the on-document text to the left, center or right (does not show change to the text editor)
- Text Box - Type text here. Highlight the sample text and type over it.
- Font Style - Browse through the font styles installed on your computer.
- Text Color - Use the slider to adjust the colors opacity.
- Color Box - Bring up the color picker to choose a color.
Paper Adjust Tab
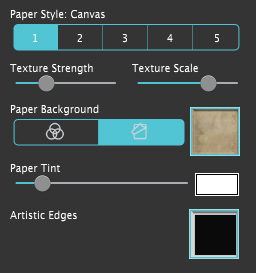
- Paper - Choose to use the Canvas, Sketch, Charcoal, Chalk or Smooth Canvas texture for the background
- Texture Strength - Change the opacity of the paper texture
- Texture Scale - Change the scale of the paper texture
- Paper Background - Choose the first icon to use a solid color for the background or choose the second option to use a background paper
- Papers - Select a background paper (Only available when paper background is set to option 2)
- Paper Tint - Change the color of the paper, use the slider to change the colors opacity
- Artistic Edges - Add an Artistc Edge
- Edge Blend - Add brush strokes to the edge of your drawing
- Edge Stroke Size - Move left for small detailed strokes in the edge or right for large thick strokes.
- Stroke Direction - Control the overall direction of the strokes in the edge
Presets
Style Browser

Click to hide the Style Browser

Randomize the effect using the chosen preset style

Create a Preset using your current settings

Permanetly delete a Preset
Saving Presets
Once you have applied a preset and modified it using the adjust tabs, you can save your own custom preset by clicking the Plus Symbol in the bottom right corner.
Favoriting and Deleting Presets
Favorite a preset to move it to the front of the presets list for quick access. To favorite or delete a preset click down on a preset thumbnail and hold until an X and heart appears, click the heart to favorite it or click the X to delete it.
