
Move - Move your image within the app
Impresso Pro - Info Page Desktop

Tutorials
How to Use the Background Paint, Soft Paint & Painted Edge Layers
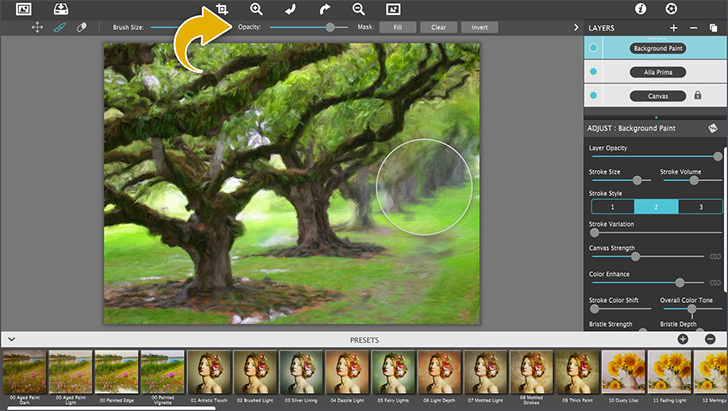
In this tutorial, we will show you how to use Impresso Pro’s New Paint Layers and teach you techniques to bring out detail in the foreground paintings, create distances, and colorize paint cracks.
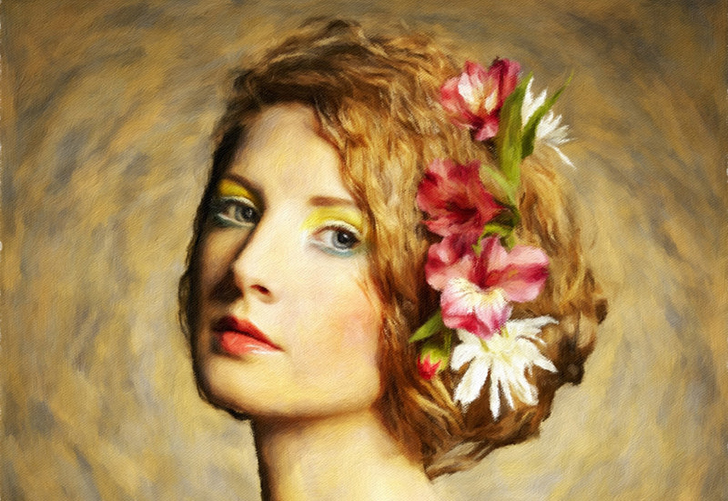
Create a Realistic Portrait with Impresso Pro
In this video we will demonstrate how to automatically transform a photo into a painting, then combine paint effects with layers and brushes to create a colorful print-worthy portrait.
Buttons
Top Bar Buttons

- Get Photo - Load a photo from your hard drive
- Save Photo - Save your image to your hard drive
- Crop - Cut out an area of your image hiding the rest
- Undo - Undo the last edit
- Zoom In - Zoom in to examine small details
- Zoom Out - Zoom Out to view a larger proportion of your image
- Redo - Redo the last edit that was undone
- Original Button - Hold down to view the original image for a quick comparison.
- Info Button - Opens up this page
- Website - Takes you to our website
- Randomize - Randomizes the effect on the image.
Masking Tool


Brush Tool - Add back sections of the layer that were erased with the Erase Tool

Erase Tool - Erase parts of the layer allowing layers beneath it to be seen

Ellipse Tool - Reveals the Ellipse Tools
Brush Size - Increase the size of the brush for the Paint and Erase Tools
Opacity - Changes the opacity of the brush
Mask - Fill: resets the image adding back any parts of the layer that were erased. Clear: Erases the whole layer allowing you to paint back parts of the layer. Invert: Reverses sections of the layer that were erased with sections of the layer that were not erased
Detail Ellipse Tool

- Detail Tool - Hide/Show the detail spotlights
- Add Detail - Add a detail spotlight
- Delete Detail - Removes the selected detail spotlight
- Detail Brush Size - Increase the size of the brush strokes in the spotlight
- Apply - Click this button after moving the detail spotlight to apply the adjustments
Menu

- Get Photo - Load a photo from your or hard drive
- Save Photo - Save the image to your or hard drive
- Save Preset - Once you've created an effect you can use this option to save all the attributes and reuse them on another picture
- Preferences - Change where the application will save your image and rebuild presets that came with the product
- Undo - Undo your last edit
- Redo - Redo your last edit that was undone
- Zoom In - Zoom in on areas of the image
- Zoom Out - Zoom Out to view a larger proportion of the image
- Fit In Window - Fill the window with the image
- Actual Size - Changes the images size to its original size
- Jixipix Info - Brings you to this page
- Jixipix Products - Takes you to our website where you can view all our apps
File
Edit
Window
Help
Layers


Hide and show the sidebar

Add a layer using one of the included effects

Delete the selected layer


Duplicate Layer - Duplicate the chosen layer
Reset Layers - Removes all added layers and resets the settings
Save Layer Preset - Save the chosen layer or layers as a preset

Click to hide or show the chosen layer

Click to change the layers name
Adjustments
You can use the Adjust Tab to customize your image. The Adjust Tab changes depending on which style is chosen.
Alla Prima Adjust Tab

- Layer Opacity - Adjust to blend layers
- Stroke Size - Move left for small detailed strokes and right for large thick strokes.
- Stroke Volume - Adjust the overall thickness of the strokes
- Conform Strokes - Conforms the brush strokes on the edges of the image. Higher values will keep the strokes looking more realistic and lower values will be more abstract
- Stroke Variation - Move this slider to give the strokes an overall different look
- Brush Style - Choose between 11 different brush stroke styles
- Canvas Strength - Adjust the amount of canvas seen in the paint. Use the link icon
 to link all layers to this setting
 - Color Enhance - Increase the saturation of the image making the image more bright and colorful. Use the link icon to link all layers to this setting
- Bristle Style - Choose between 3 styles: Textured - Bristles follow the painting flow and are well defined. Thick - Thick smooth buildup. Smooth - Smoother bristles that are semi-consistent
- Bristle Strength - Increase the amount of bristle textures seen on the edges of the brush strokes
- Bristle Depth - Controls the amount of bristle pattern seen in the painting.
- Artistic Finish - Adds mottled light and color to the painting. Use the link icon to link all layers to this setting
En Plein Air Adjust Tab

- Layer Opacity - Adjust to blend layers
- Stroke Size - Move left for small detailed strokes and right for large thick strokes.
- Stroke Volume - Adjust the overall thickness of the strokes
- Conform Strokes - Conforms the brush strokes on the edges of the image. Higher values will keep the strokes looking more realistic and lower values will be more abstract
- Stroke Variation - Move this slider to give the strokes an overall different look
- Brush Style - Choose between 11 different brush stroke styles
- Canvas Strength - Adjust the amount of canvas seen in the paint. Use the link icon to link all layers to this setting
- Color Enhance - Increase the saturation of the image making the image more bright and colorful. Use the link icon to link all layers to this setting
- Bristle Style - Choose between 3 styles: Textured - Bristles follow the painting flow and are well defined. Thick - Thick smooth buildup. Smooth - Smoother bristles that are semi-consistent
- Bristle Strength - Increase the amount of bristle textures seen on the edges of the brush strokes
- Bristle Depth - Controls the amount of bristle pattern seen in the painting.
- Artist Palettes - Choose to fill your whole image or only parts of your image with the palette colors
- Strength - Increase the opacity of the palette colors
- Limited - Randomly replaces the painting color with the 5 selected below in the palette color boxes
- Full - Replaces the painting color with the closest match to the 5 selected below in the palette color boxes
- Palette Colors - Customize the Color Palette with custom colors. (0) Gold Tones (1) Blue Tones (2) Red Tones (3) Gold & Red Tones (4) Blue & Gold Tones (5) Green & Pink Tones (6) Orange & Brown Tones (7) Pink Tones
- Randomize Colors - Randomize the Color Palette using colors in your image
Tache Adjust Tab

- Layer Opacity - Adjust to blend layers
- Stroke Size - Move left for small detailed strokes and right for large thick strokes.
- Stroke Volume - Adjust the overall thickness of the strokes
- Conform Strokes - Conforms the brush strokes on the edges of the image. Higher values will keep the strokes looking more realistic and lower values will be more abstract
- Stroke Variation - Move this slider to give the strokes an overall different look
- Brush Style - Choose between 11 different brush stroke styles
- Canvas Strength - Adjust the amount of canvas seen in the paint. Use the link icon to link all layers to this setting
- Color Enhance - Increase the saturation of the image making the image more bright and colorful. Use the link icon to link all layers to this setting
- Bristle Style - Choose between 3 styles: Textured - Bristles follow the painting flow and are well defined. Thick - Thick smooth buildup. Smooth - Smoother bristles that are semi-consistent
- Bristle Strength - Increase the amount of bristle textures seen on the edges of the brush strokes
- Bristle Depth - Controls the amount of bristle pattern seen in the painting.
- Artistic Finish - Adds mottled light and color to the painting. Use the link icon to link all layers to this setting
- Stroke Angle - Move left to make strokes follow image closer and right for abstract ones
Soft Paint Adjust Tab

- Layer Opacity - Adjust to blend layers
- Canvas Strength - Adjust the amount of canvas seen in the paint. Use the link icon to link all layers to this setting
- Color Enhance - Increase the saturation of the image making the image more bright and colorful. Use the link icon to link all layers to this setting
- Soft Paint - Move left to see original image and right to add small amount of brush strokes
- Artistic Finish - Adds mottled light and color to the painting. Use the link icon to link all layers to this setting
Background Paint Adjust Tab

- Layer Opacity - Adjust to blend layers
- Stroke Size - Move left for small detailed strokes and right for large thick strokes.
- Stroke Volume - Adjust the overall thickness of the strokes
- Conform Strokes - Conforms the brush strokes on the edges of the image. Higher values will keep the strokes looking more realistic and lower values will be more abstract
- Stroke Variation - Move this slider to give the strokes an overall different look
- Brush Style - Choose between 11 different brush stroke styles
- Canvas Strength - Adjust the amount of canvas seen in the paint. Use the link icon to link all layers to this setting
- Color Enhance - Increase the saturation of the image making the image more bright and colorful. Use the link icon to link all layers to this setting
- Bristle Style - Choose between 3 styles: Textured - Bristles follow the painting flow and are well defined. Thick - Thick smooth buildup. Smooth - Smoother bristles that are semi-consistent
- Bristle Strength - Increase the amount of bristle textures seen on the edges of the brush strokes
- Bristle Depth - Controls the amount of bristle pattern seen in the painting.
- Artistic Finish - Adds mottled light and color to the painting. Use the link icon to link all layers to this setting
Aged Paint Adjust Tab

- Layer Opacity - Adjust to blend layers
- Crack Style: Linear - Aligns cracks to nearly straight
- Crack Style: Angle - Fractures cracks
- Crack Direction - Aligns crack in degrees by moving around the circumference of the circle
- Spacing - Increases width between cracks
- Branch Length - Increases crack amount and connects them
- Irregularity - Offsets the angle of the crack
- Align - Controls the consistency of the angle
- Paint Sensitivity - Recesses the cracks into darker areas
- Variation - Changes the crack placement
- Crack Strength - Move right to add depth to the crack
- Crack Color - Colorizes the crack and adjusts the opacity. Use the colorbox to change the color
Signature Adjust Tab

- Layer Opacity - The overall strength of the layer. Move this to the left to make this layer more transparent and show the layers below. Great for blending layers together.
- Stroke Size - Move left for small detailed strokes and right for large thick strokes. The smaller the strokes the more accurate the drawing.
- Stroke Volume - Adjust the overall thickness of the strokes
- Signature Style - Choose to type the signature with your keyboard or draw the signature
- Line Spacing - Switch between single and double spacing between lines of text
- Text Align - Aligns the on-document text to the left, center or right (does not show change the text editor)
- Text box - Type text here. Highlight the sample text and type over it.
- Font Style - Browse through the font styles installed on your computer.
- Text Color - Use the slider to adjust the colors opacity.
- Color box - Bring up the color picker to choose a color.
Canvas Layer

- Canvas Style - Choose between Canvas or Linen for the texture of the canvas.
- Canvas Strength - Adjust the amount of canvas seen in the paint
- Canvas Color - Choose a color to use for the canvas background
- Painted Edge - Add brushstrokes to the edge
- Edge Stroke Size - Move left for small brush detail or right for thick ones
- Edge Blend - Blends the edge with the canvas
Detail Elipse Tool
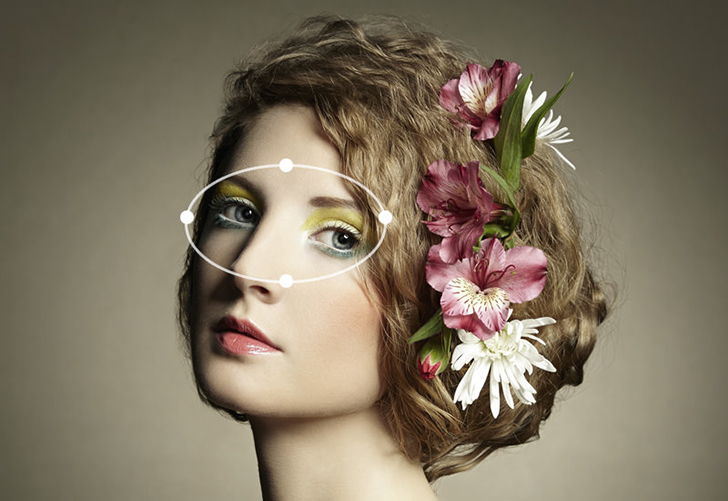
Use the Detail Elipse Tool to render finely painted brush strokes on eyes and faces
Impresso automatically transforms a photo into a painting—Alla Prima style

The Detail Tool can also be used as a focal point in your landscape
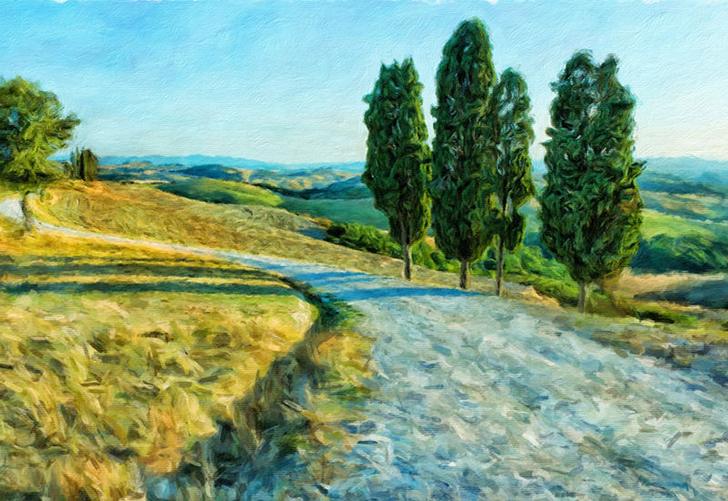
Voilà your painting is now a beautiful brush-filled impressionism—En Plein Air style
Presets
Style Browser

Click to hide the Style Browser

Randomize the effect using the chosen preset style

Create a Preset using your current settings

Permanetly delete a Preset
Saving Presets
Once you have applied a preset and modified it using the adjust tabs, you can save your own custom preset by clicking the Plus Symbol in the bottom right corner.
Saving and Loading Layer Presets
To save the settings for a specific layer as a preset select the layer and click the layer button in the top right corner of the app and select Save layer Preset
Once saved the preset will appear with the other presets with a layer icon in the corner of the preset, select the preset to load the Layer Preset

Favoriting and Deleting Presets
Favorite a preset to move it to the front of the presets list for quick access. To favorite or delete a preset click down on a preset thumbnail and hold until an X and heart appears, click the heart to favorite it or click the X to delete it.
