Colorize your photo with tint and tone. Choose from an unlimited combination of effects to transform a full color photo into Black and White, Luminescent, or a Vintage style effects. Then quickly and easily restore the colors or paint on tints or hues.
Hand Tint - Info Page Mac
Color Selection
Color selection works by selecting a hue in the image then constrians the selection to allow painting in only that area. This method is a very quick and easy way to paint all the reds in an image (or any specified color) without getting the red paint into other areas. For example, in the image below I'm going change the color of the bridal flowers from yellow to purple while keeping the greenery around the flowers untouched.
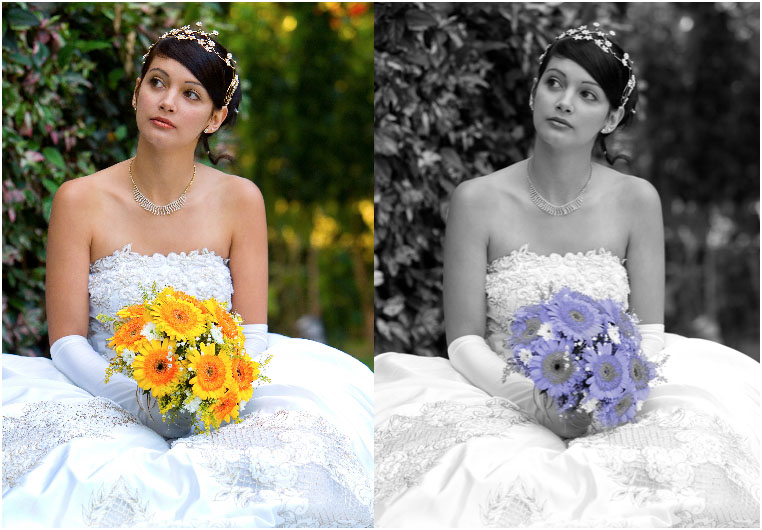
How To Use Color Selection
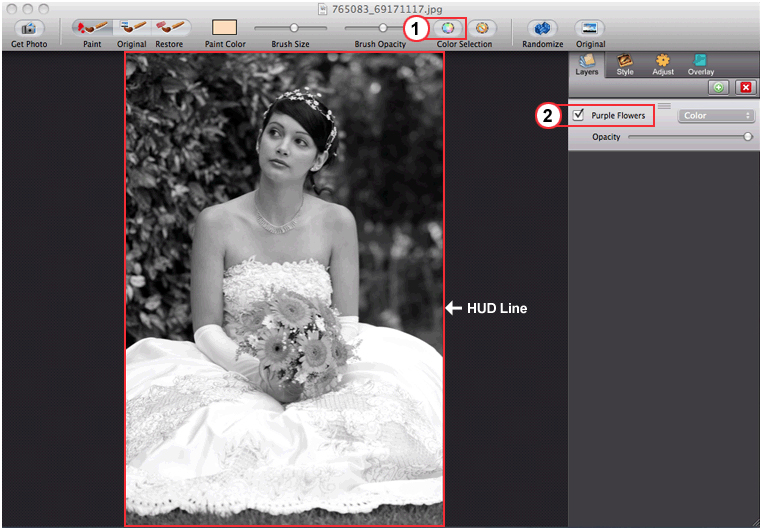
(1) Choose "Color Section" Button
When the color selection button is choosen a box will slide down (shown on step #3 in more detail). On it will be the original image and two sliders: Color Area and Color Tolerance. Use the sliders to pick a color (hue) and paint a new color in its place. When your finished selecting a color, "close" the window then paint the selected area. There will not see marching ants (selection line), instead you will know the area is selected and ready to paint when a red "HUD Line" displays around the image. NOTE : This is the only indication that the area is selected and ready to paint. This is called the "color selection" mode. While in this mode you will not be able to paint outside the selected area. To paint outside the selected areas, clear the selection by using the icon next to the "color selection" tool (you will know it's cleared when the red HUD line disappears).
"Color Selection" and "Clear Color Selection" buttons
(2) Rename the" Layer"
On the right is the "Layers" panel - the first layer was created when the photo was imported. To keep organized rename the layer your tinting, in this instance it's the flowers, so I'll rename the layer to "Purple Flowers". When you select the next color to paint add a new layer and then name it to reference the new color.
Rename "Layer"
"Add" Layer and "Delete" Layer Buttons

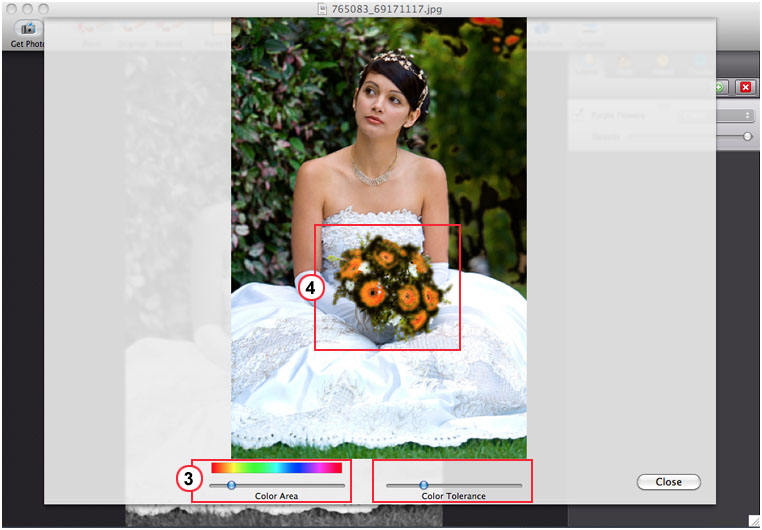
(3) Use the "Color Area" and "Color Tolerance" Sliders to Select Paint Areas
On the color selection box, use the "Color Area" slider to choose the color area you want to tint. On the image above I want to change the yellow parts of the flower to purple. To do this I'll align the color area slider under the yellow part of the rainbow colored line. As you move the slider back and forth, you will notice areas in your photo will begin to blacken (blackened areas indicate what color is selected). In this example, the yellow on the flowers blackened, this means the area is ready to be tinted purple. To increase or decrease the blackened areas use the "Color Tolerance" to grow or shrink the color selection. Close the box when your ready to paint. Repeat these steps to select additonal colors.
NOTE: When using the color selection feature, the original image is revealed to make selecting colors (hues) easy. The image will revert back to grayscale when the box is closed.
"Color Area" and "Color Tolerance" Sliders

(4) About the Selected "Color Area"
You can see the yellow areas of the bridal flowers are selected because they are blackened. When you close the box and return to your grayscale image the only indication that this area is selected is the red HUD line around your image will be displayed. Select the color you wish to paint and quickly brush it over the flower. The beauty of the color selection feature is it allows quick painting without getting paint into areas you don't want them in. If paint does get into areas the "Color Tolerance" may be set too high - if this happens correct it by using the "Restore" brush to remove unwanted paint; or completely start over by going to the "Edit" menu to "Reset" the image to the very beginning. WARNING: "Reset" removes all paint - use the "Restore" brush to touch up areas or delete layer.

(5) Use "Paint" brushes and "Paint Color"
To start hand tinting your image, go to the three "Brush" tools on top to select the "Paint" brush and choose a "Paint Color" off the color picker then start painting. To adjust the brushes use "Brush Size" to increase/decrease brush diameter and "Brush Opacity" to lighten or darken the paint. NOTE: If the paint is too dark once it's painted, use the "Opacity" slider on "Layers" as another option to lighten or darken it.
Brush Tools

- Paint - Use this to brush on new color.
- Original - Use this to brush original color back into the image.
- Restore - Use this to erase paint that overlaps into other areas during the painting process (brush restores area back to grayscale.)
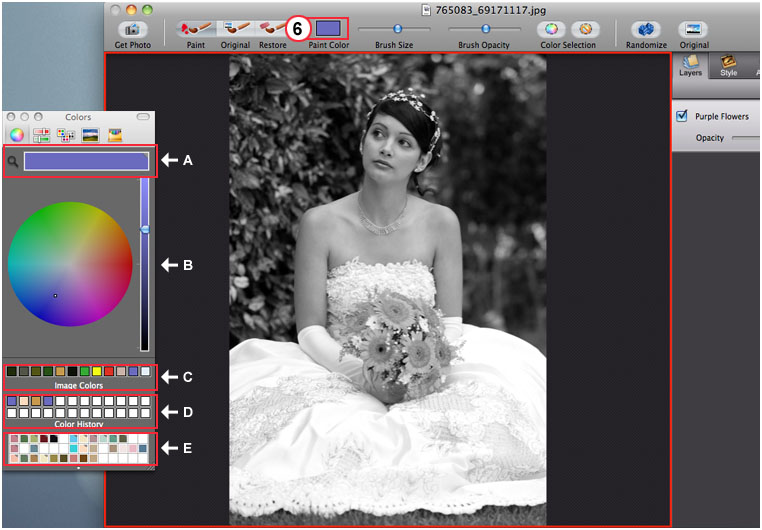
(6) About the Color Picker
To get to the color picker use the "Paint Color" box. The color picker has several ways to pick color:
- (A) - Use this tool to select color from an opened image outside of the Hand Tint App or from your desktop.
- (B) - Use the color wheel to choose a new color, then use the verticle slider on the right to change the tone of that color.
- (C) - This row is color imported from your image. This great feature allows you to tint using the original colors.
- (D) - Each color you use is stored here in the "color history" palette.
- (E) - Use palette to create your own custom one. To create a custom palette, drag the color from the color box on "A" down to the custom palette on "E".
Layers
Use "Layers" to add and organize up to eight different paint areas. You can turn on or off each of these layers, or you can change the tint mode and the opacity for each of the layers.
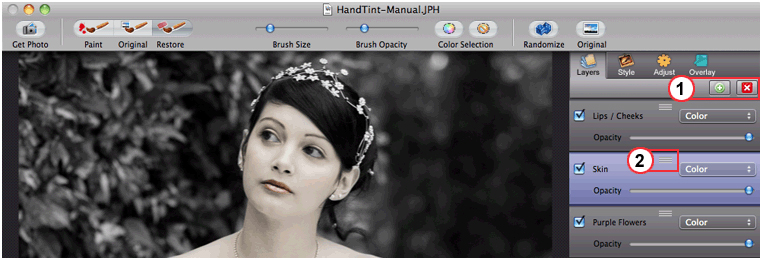
(1) Add or Delete Layers
Use the green button to "Add" a layer. To remove a layer, first select the layer then use the red "Delete" button.
"Add" Layer and "Delete" Layer Buttons
(2) Reorder Layers
Find the three lines on top of the layer, hold until the layer turns purple and then move the layer up or down.

Rename Layers
Rename your layer by double clicking here ( * ) until an edit box drops down, then type the new name.
Tinting Modes
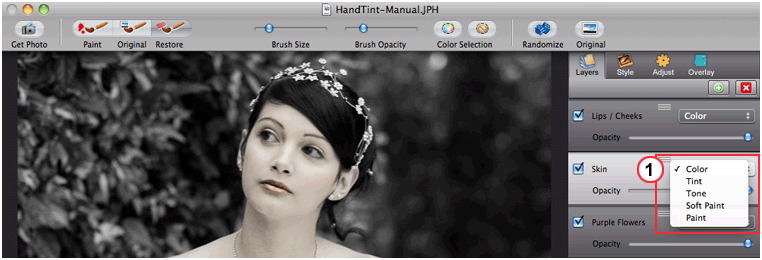
(1) Tinting Modes
Use the color menu on "Layers" to change the "Tinting Modes". See examples of each mode below:

Each mode will give a different level of color, tint, tone or paint - experiment by changing the mode on each layer. Various levels of paint can be brushed on using the "Brush Opacity" slider. On the examples I had the brush opacity slider set to the middle for a softer look. Move the slider to the right to apply more color, tint, tone or paint.
Tips
KEYBOARD COMMANDS
- Decrease Brush Size - " [ " (bracket key)
- Increase Brush Size - " ] " (bracket key)
- Pan - (space bar)
- SAVE PROJECT - allows you to open and continue tinting the image or to make modifications later.
Use seperate layers for skin, lips and hair to allow combining of tinting modes and easy touch-ups.


