Watercolor Studio uses Artificial Intelligence and image recognition to naturally create realistic watercolor paintings. No artistic skill needed.
Watercolor Studio renders the initial watercolor then gives you the ability to create an infinite number of variations quickly and easily. Change your painting into an ink wash, add a beautiful artistic finish, brush in details, and even spatter it with liquid spots for an ultra wet appearance. Control everything from details-to-shades-to-negative space-to-coloring. Watercolor Studio is super simple to use and takes just a few minutes to understand the full power of this incredible application.
Watercolor Studio
When you first launch Watercolor Studio you will be presented with a familiar JixiPix UI.
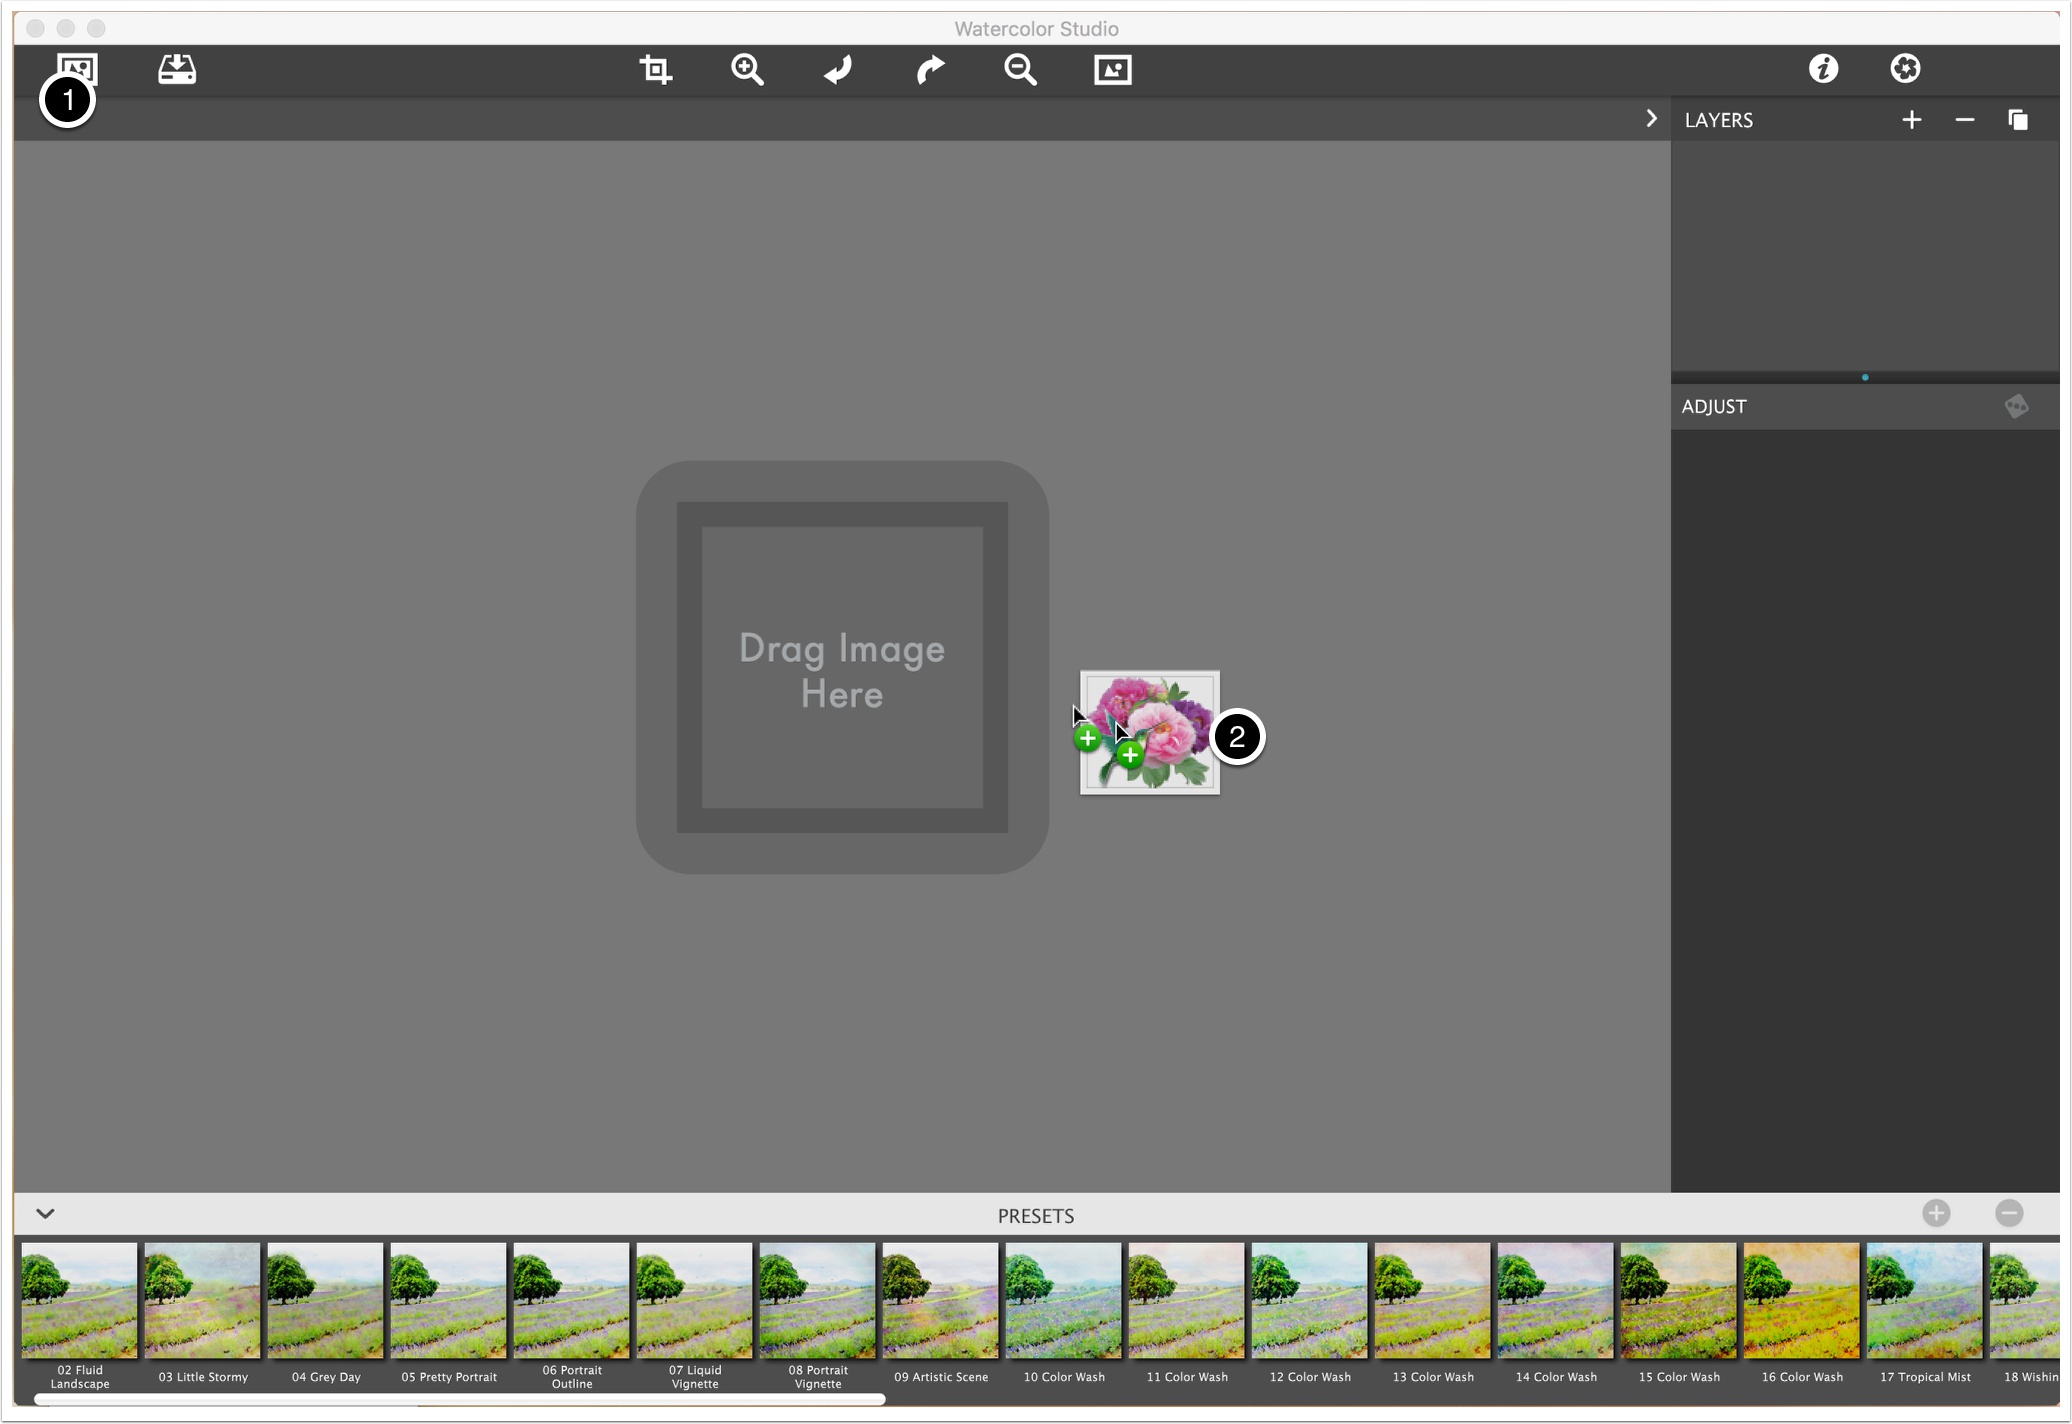
This is the screen that will be presented when first launching Watercolor Studio. You have 2 choices to load an image.
- Click on the "Get Photo" button in the upper left
- Drag and drop and image onto the main window
Once an image is placed in the application it will auto-create the initial watercolor for you using the landscape default settings. These initial settings consist of two layers: A canvas layer and a Watercolor layer.

Initial User Inteface
This next screen shows the initial user interface when the first image is opened inside the application. The following items are general, however, once your familiar with them they will apply to all the JixiPix applications.
1) Get Image Button. Used to load in an image to process inside of Watercolor Studio. You can also drag and drop an image into Watercolor Studio at any time and the document will switch to that current Photo. (Be careful when doing this as your process will start over).
2) Save Image Button. This will bring up a small menu where you can choose to Save Photo, Save Preset, Bring up this Info page, and get info on other JixiPix Products, etc. This menu will be described in detail in another section.
3) Crop Button. Use this dialog to crop your photo. This is very useful to cut out areas you do not want in your final images.
4) Zoom In Button. Zoom In on your image, or use keyboard Cmd + or Ctrl + on Windows.
5) Undo Button. Undo to your previous step, or use keyboard Cmd Z or Ctrl Z on Windows.
6) Redo Button. Redo to a previous step forward. This only works after hitting Undo at least once, or use keyboard Cmd Shift Z or Ctrl Shift Z.
7) Zoom Out Button. Zoom Out on your image (Cmd - or Ctrl -). You can also use keyboard Cmd 0 or Ctrl 0 to quickly make your photo fit into the window.
8) Original Button. Click on this button and hold it down to see your original loaded photo. This is very useful when doing minor changes to a watercolor and lets you compare the before photo to the rendered one. Click and release to get a view of before and after.
9) Info Button. Will bring up this Info page inside of the app.
10) Product Button. Shows other great JixiPix products :-)
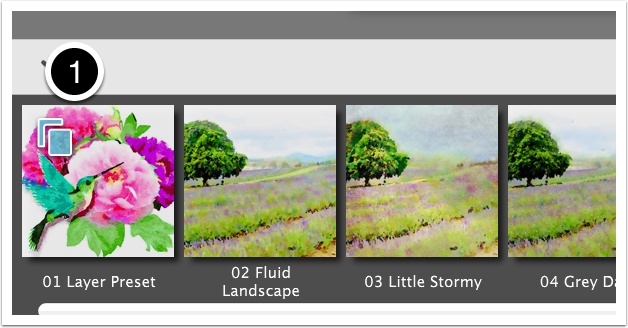
11) Preset Browser. For a quick start this is where you will begin. Click through the Presets on the bottom of the app after an image is placed in the app. We refer to this section as the 'Browser' or 'Preset' section. Presets are a quick way to load in pre-defined 'looks' for your image and includes everything you need to recreate this 'look' at the point you saved it.

Presets
Watercolor Studio has a very powerful preset system. A preset is a 'snapshot' of everything you are working on except your initial image. You can play back this presets on any new image you load. This gives you the ability create a fabulous look once, then play it back (or use it as a starting point) for future images. When you save a preset everything you have been working on is captured like settings, layers, brushed areas and more, into put in a nice tidy package represented as thumbnail that you will find in the browser or preset section at the bottom. You also have the ability to name your presets when you save them, delete existing presets, save 'layer' presets, and mark some of your presets as favorite to move them up to the beginning of the 'Preset' section.
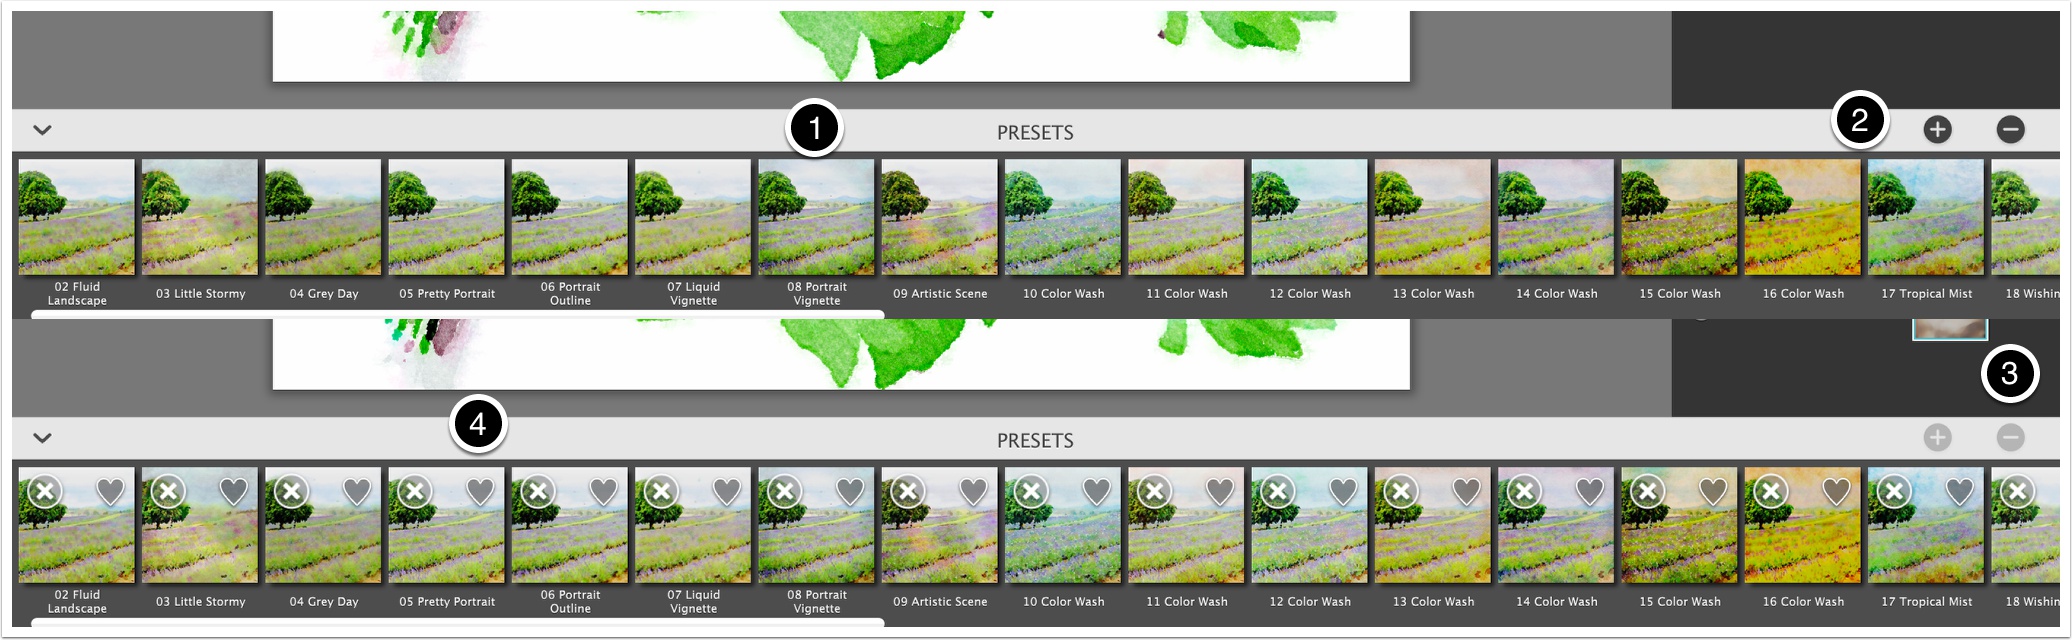
1) Once you load in an image you can click through presets to playback your settings, or test out the ones included with Watercolor Studio. Doing this is simple, just tap on one of the thumbnails at the bottom. Once you do this the system will apply that preset and render your image into a painting.
2) If you have a great look that you want to save as a painting just hit the '+' button and then give it a name. (Names have to be unique and the system will ask if you want to replace an existing one.)
3) To delete a preset you can either tap the '-' button or hold down on a preset for a second. Once you do this a series of 'X's will show up over top of the thumbnails and you can tap this to delete the preset. Clicking anywhere else on the document will then turn off the 'delete' mode.
4) To favorite a preset, hold down on any preset and keep holding until you see the hearts. Selecting a heart will move that preset to the front of the list. Super useful if you create a preset you use often. Again, tapping anywhere will disable this mode to continue work as normal.
Layer Presets
Layer Presets are very similar to regular presets except for a couple of notable exceptions. First is that only the currently selected layers will be saved as a preset. Second, a 'Layer Preset' that is tapped on in the 'Preset' section is added into the layer system rather than replacing everything. And third, a 'Layer Preset' has a custom icon (1) in the 'Preset' section to signify that it is a layer preset.
Layers
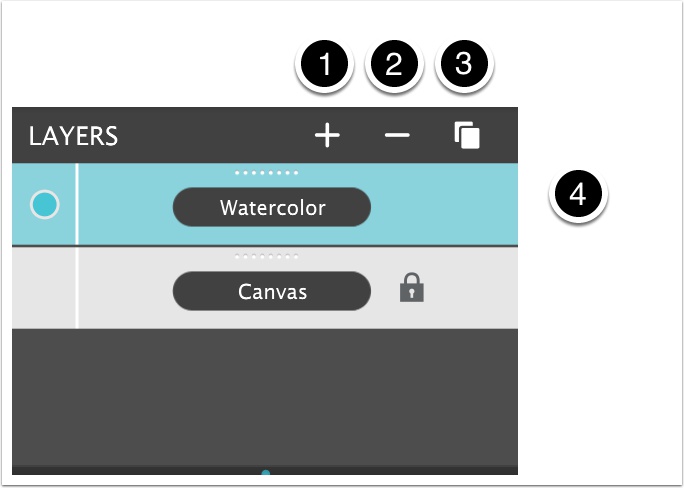
The power of Watercolor Studio is it's smart layer system. For you to get custom looks you will utilize this layering system adding and stacking multiple layers. This system allows you to combine these layers to make your watercolor unique.
1) Add Layer. This will bring up a menu of all layer types available in Watercolor Studio. Selecting one will add the layer above the currently selected layer.
2) Delete Layer. This will delete the currently selected layer(s). To delete multiple layers hold the keyboard Cmd/Ctrl key while selecting each layers you want to delete, then delete.
3) Layer Menu. This menu has a few fun things in it which will be described shortly.
4) Active Layer. To select a layer just click or tap on it. To move the layer use the drag dots (top of each layer), hold for a second, then move. This will allow you to drag layers above or below the current one(s). Tapping on the name will allow you to rename the layer (very useful to keep track of layers when you get multiple involved).
Add Layer Menu
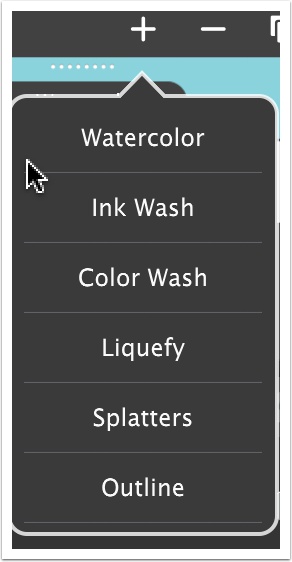
Tapping on the "+" button will bring up the available layer types. Tapping on any of these will add a layer above the currently selected layer. In Watercolor Studio the layer types are as follows:
Watercolor: This is the main Watercolor Studio layer type. It creates magnificent watercolor out of your current image.
Ink Wash: Similar to Watercolor but creates a limited palette watercolor using the power of shades and colors.
Color Wash: This layer is an 'addition' layer type that will be used on top of other layers to add color and interest.
Liquefy: This layer allows you to add liquid to areas of your image using brush strokes. If you want areas in your image to be washed out or de-focused this would be the layer.
Splatters: This unique layer adds colorful splatters that can moved and resized. Very realistic liquid algorithm is associated with these splatters that will bleed edges where splatter is placed.
Outline: Useful for adding wispy details to your photo. Great for creating architectural drawings, adding details, or to just give emphasis to areas in your watercolor.
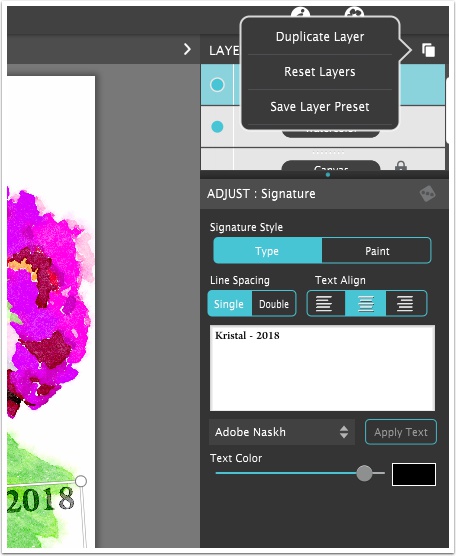
Layer Menu
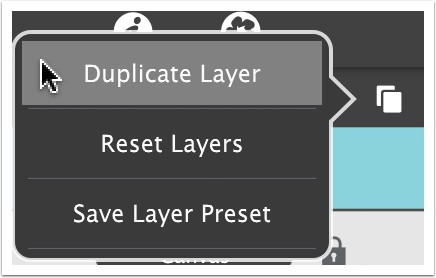
This menu has a few useful features available.
Duplicate Layer: Choosing this duplicates the currently selected layer(s) and stacks it above the currently selected one.
Reset Layers: Resets all layers back to their defaults. Using this will delete all layers and reset them back to the default settings. Useful when you are just playing around and want to get back to the start.
Save Layer Preset: This will save the current selected layer(s) as a "Layer Preset". This layer preset is similar to a regular preset except that when you play it back it will only 'add' to your existing layers rather than replace them. (See more in the Preset description below.)
Layer Settings
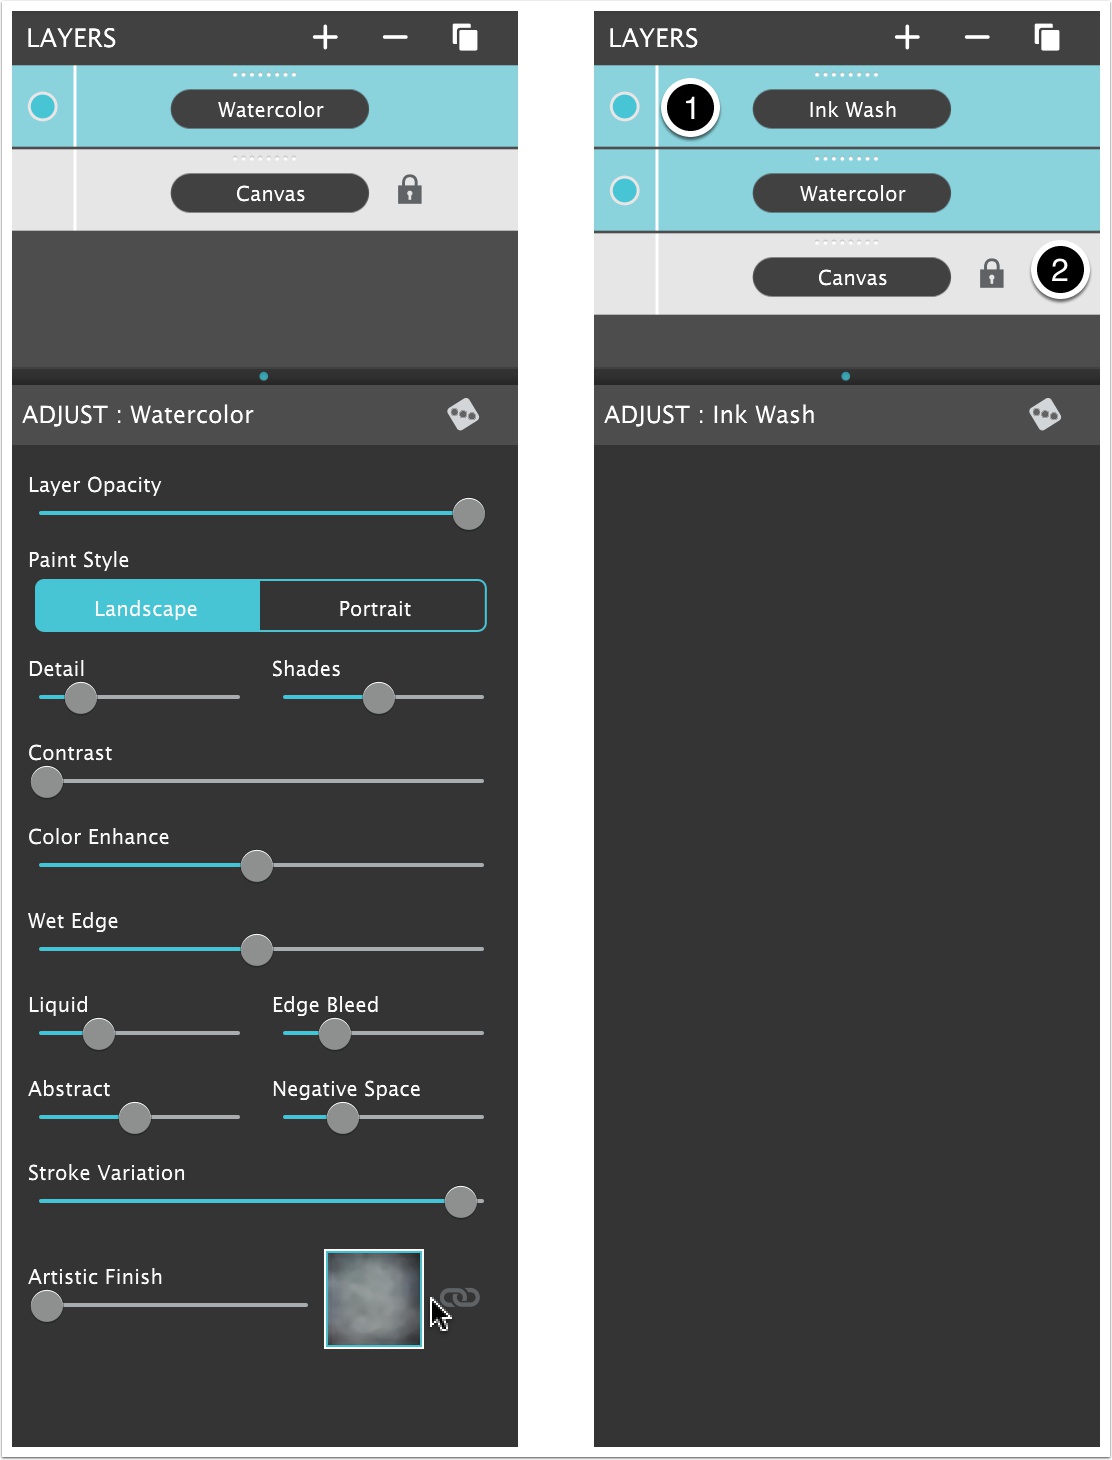
You can get to Layer Settings by selecting a single layer. Doing this will load a control panel below the layer palette with all the settings that pertain to this layer. Here is where you will adjust settings and customize the painting to your own preference. (Please note, if you choose multiple layers the settings will hide.)
On the layer(s) you will also find several layer features:
1) Visible Button: Layer(s) can be hidden or shown by using this circular button. Invisible layers are quite useful when you want to see lower layers look without having an upper layer obstructing the view.
2) Locked Layer: A lock icon has been placed on the Canvas Layer to prevent it from being moved or deleted.
Watercolor Layer
Each layer type has it's own controls to help you achieve a masterful painting (explained in detail in the next section), and a Toolbar area where layer specific controls can be found.
1) Pan Tool: Use this to pan around on the image. Useful when you are zoomed in. Also hitting the Space Bar at any point to temporarily select this tool.
2) Paint On: By default Watercolor layer is fully active. However if you erase something, use this tool to paint back in those areas. Very useful if you have multiple Watercolor layers and you just want to paint in certain areas of the painting.
3) Erase: Use this tool to erase part of the watercolor paint to allow the layer below to be seen.
4) Detail Tool: Use this tool to add ellipses where you need some extra detail in your image.
5) Brush Size: This slider is active when you have the Paint tool or Erase tool active. Use it to control the size of the brush you will be using on the document. Ctrl [ and Ctrl ] are key commands to change the size of the brush without having to select the slider.
6) Brush Opacity: Controls how opaque the brush will be. Values to the left will create a very transparent brush that softly adds to the painting.
7) Fill: If you have erased areas, this button restores the layer back to it's default filling all areas back in.
8) Clear: This clears the current layer. Once you hit this you will have to brush on to see anything on this layer.
9) Invert: Reverses the brushing. What was painted on becomes erase and what was erased becomes painted on.
Keep in mind that you are not painting watercolor. You are making certain areas of it visible or not. This way you do not have to be an artist since the layer does all the hard rendering the watercolor. You choose how much or what parts of the watercolor you want to show or hide.

Watercolor Layer Controls
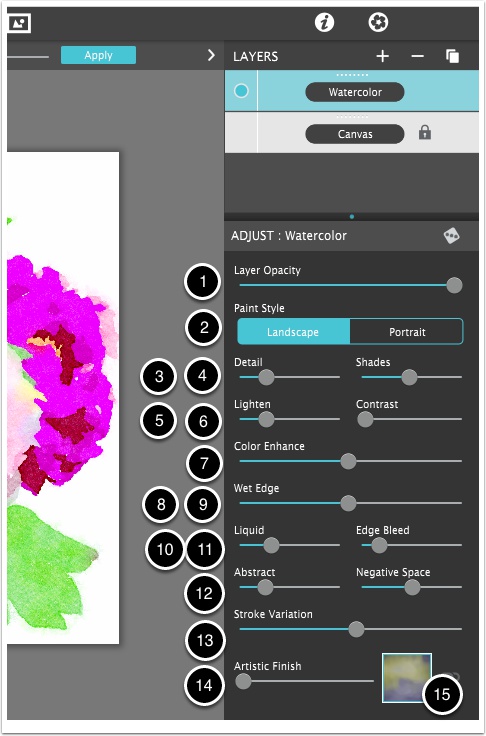
The layer controls are the main area where you control the overall 'look' of your painting. Each layer has unique controls that pertain to the layer type.
1) Layer Opacity: Controls the overal opacity of this layer. Use this to cut back on the overall strength of the layer. Hint: Use it to make the layer semi-transparent for a more washed out look or to blend with other layers.
2) Paint Style: This controls the overall 'style' of the painting. Landscape is an 'abstract' style with rougher edges, bleeding liquid and less detail. Portrait is used to control details in an image by utilizing less liquid. Changing this between 'Landscape' and 'Portrait' will set some of the lower sliders to a semi-default setting. If at any point your painting gets off from looking like a 'Landscape' you can always toggle this to 'Portrait' and back to reset them.
3) Detail: Controls the overal detail. Moving the Detail to the left will give a very abstract painting and farther to the right will give more detail.
4) Shades: Controls the overal number of shades. In a watercolor painting you are limited to the number of 'pigment colors' you have in your image. Think of this as your tray of colors created for you before starting your painting. Values to the left of the slider will have few color pigments than the values on the right. Depending on whether you choose 'Landscape' or 'Portrait' will vary how many overall colors there are. 'Portrait' has more colors available than 'Landscape'.
5) Lighten: Lightens up the image. This can help achieve a more washed look or lighten up an image that is too dark. Watercolor Studio can enhance the colors slightly better with a lighter image.
6) Contrast: Adds overall contrast to the painting. A stronger setting will increase the difference between the light to dark transition and may bring out details previously missing. Too strong of a value could make the watercolor too harsh and defined, so be careful when turning this up.
7 Color Enhance: This will increase the overall color in your painting. Before the watercolor algorithm starts painting it will apply this setting which in turn will help the algorithm decide what shades to pick. Too high of a value will give the painting more of a filled in look.
8) Wet Edge: Controls how 'wet' the edge of each shade becomes. Stronger values creates the look of color pigment dried darker along the edges.
9) Liquid: This controls how much liquid is added to strokes. The higher the value the more colors will 'bleed' into other colors. Lower values will have less 'bleed' from one color to the next. The value for this can be a little dependent on the 'Shades' setting, the more 'Shades' there are the easier the bleed between colors.
10 Edge Bleed: Controls how far and how smooth the bleed is on the edge of a color area. Lower values will bleed into other colors less but at the same time you will be able to see it closely follow the paper texture. Higher values will bleed more by overflowing the valleys of the paper texture.
11) Abstract: Controls how closely the algorithm follows the patterns in the image. Values to the left will keep areas more defined and values to the right will create more abstract ones. Think of this as if you were painting a rose. Move the slider to the left and it will follow the shape of the rose more closely and values to the right would create a non-perfectly shaped petal.
12) Negative Space: Controls how much 'white' area shows throughout the image. This control along with 'Abstract' desides how much of the canvas shows through the watercolor painting. If you put 'Abstract' to none and 'Negative Space' to none then the algorithm follows the image shape as close as possible. Setting both of these to the right will give the algorithm freedom to do a more natural free flowing painting. For 'Portrait' areas it may be best to keep 'Abstract' and 'Negative' space to smaller values.
13) Stroke Variation: Super basic way to see different 'looks' in the painting. This will tell the algorithm to not take the same path as the previous attempt when painting the areas in an image. If you see something you do not like sometimes you minutely adjust this control to get a slightly different look.
14) Artistic Finish: This control includes a 'Strength' slider and a box for you to choose an artistic finish from a library. As the algorithm applies the finish, it will use these colors and combine them with the color pigments and shades in the current watercolor to create a mix of the two. This control can give vast changes in the color areas of your final painting.
15) Link Icon: The link icon when turned on will unify all the artstic finishes globally. To use, find the layer with an Artistic Finish you like best then click it on to change all the other layers using finishes to the same one. Using it saves time so you don't have to go from layer to layer to change them all. Clicking off the the link restores finishes to how they were before.
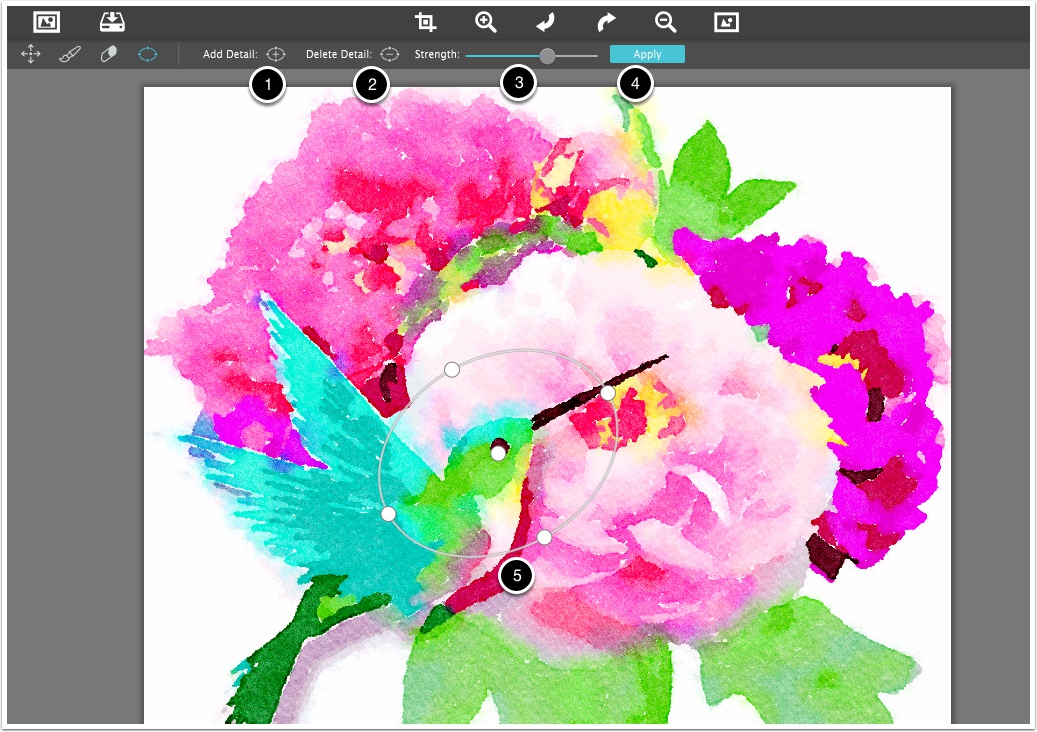
Watercolor Detail Tool
Watercolor is somewhat an abstract style. However there may be areas that you want more detail. These areas could be a persons face, a building sign, or in this case the birds face. By using this tool and adding Ellipses (5) in the important parts of your image you can achieve greater detail in the areas you give importance to.
1) Add Detail: Use this to add a detail ellipse to your image. By default it shows up in the center but can be adjusted by grabbing one of the corner areas (5)
2) Delete Detail: Delete the actively selected ellipse from the document.
3) Strength: This slider controls how strong the detail is. A value to the left will give a very subtle detail and a value to the right will add more detail to the image.
4) Apply: When you move around an ellipse, or add one using the "Add Detail" by default Watercolor Studio does not cause a render to happen. This is so you can get things adjusted just how you want them before waiting on the render. Hitting "Apply" will cause this render to happen. You can also make a change to anything in the "Adjust" section of Watercolor layer to cause a render to happen as well. An example would be that you move the ellipse around and either hit "Apply" to cause the app to render your changes, or go over into the layer adjust section and changing "Color Enhance" (or anything really) will cause a render to happen.
5) Ellipse: this is the area where the detail will be shown up as. Typically you want to keep this smaller as the smaller the ellipse is the more accurate the detail will be. However a larger ellipse can be more gradual in applying the detail. Play around to see the subtle differences between a larger and smaller ellipse. And remember to hit "Apply" when you are doing moving the ellipse.
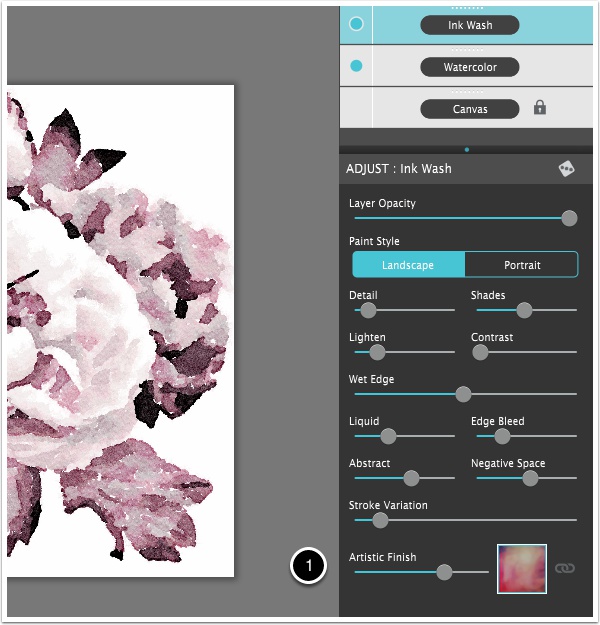
Ink Wash Layer
Ink Wash is the technique of applying diluted ink to wet paper, normally consisting of one or two colors. Use Ink Wash by itself or as a base to overlay Color Wash and Outline Layers. You can add an Ink Wash layer using the '+' sign at the top of the Layer Palette.
When you add an Ink Wash layer you will find the settings for it below. You know you have the right controls for this layer when you see 'Adjust: Ink Wash' at the top.
All of the controls for 'Ink Wash' are the same as the 'Watercolor' layer and will work nearly identical with exception to the 'Color Enhance' control that is missing as there are rarely any colors to work with.
To add additional color to an ink wash use Artistic Finish. This is critical to this paint style giving it a unique style which adds to the painting.
1) To use 'Artistic Finish' move the slider up in value to blend the finish into the ink wash, and to change the finish use the box to load up a library of them. The link icon when turned on will change finishes used on other layers to this one. This is a great feature for unifying color, light and movement globally.
Color Wash Layer
Color Wash applies semi-transparent watercolor paint to wet paper. Use one or several Color Washes in combination with Watercolor, Ink Wash and Outline Layers. This layer can be used to add a lot of definition to your painting and can be combined with multiple washes to give a stronger overall look.
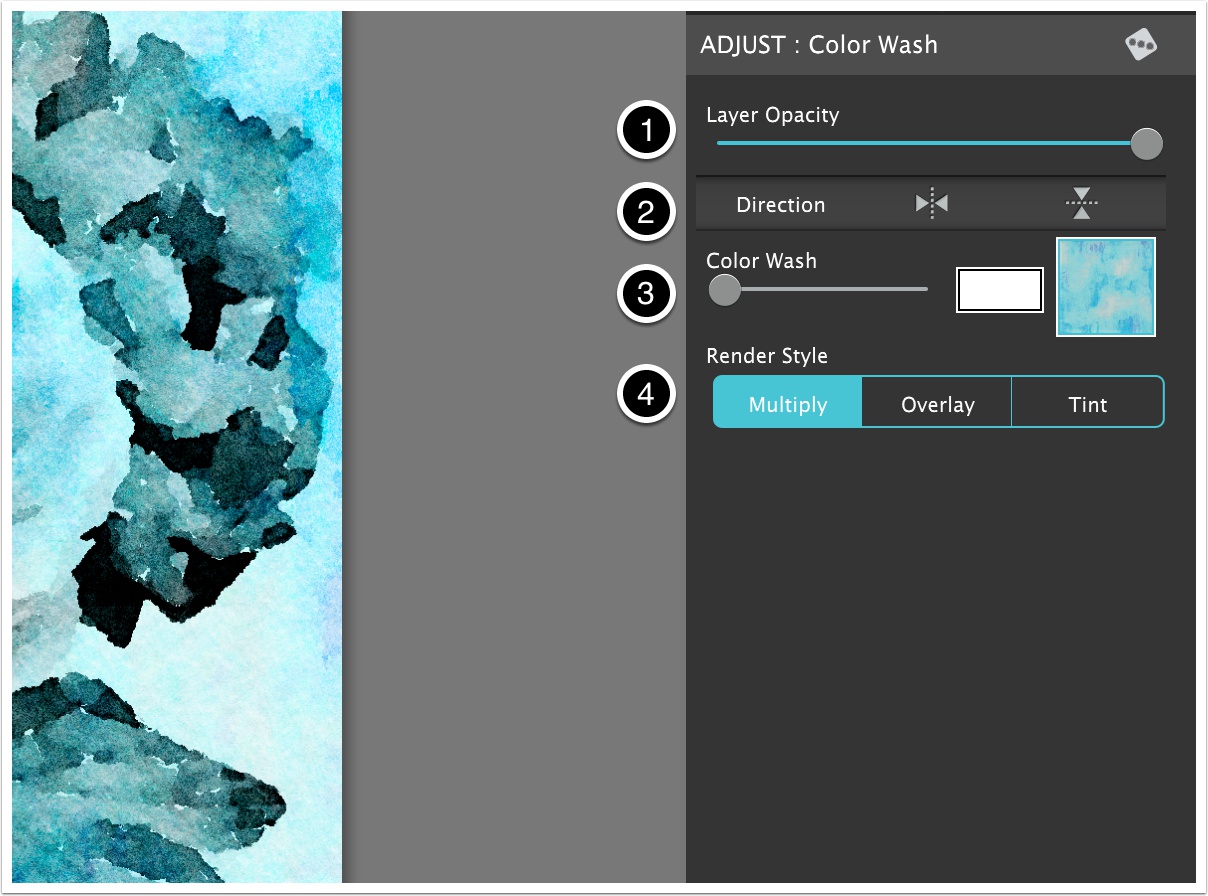
When you add a Color Wash layer you will find the settings for it below. You know you have the right controls for this layer when you see 'Adjust: Color Wash' at the top.
The controls are described as follows:
1) Layer Opacity: This controls the overall strength of the layer. If you would like to have a super subtle color applied to your painting then turn 'Layer Opacity' down.
2) Direction Controls: These two buttons control the overall direction of the wash. The first one will flip horizontally and the second will flip vertically.
3) Color Wash: This is a 3 part control. The control on the left is used to control how much tinting is applied to the color wash. The middle box uses a color picker to tint the wash with, and the right box is where you change the wash by choosing one from a library of handprinted washes.
4) Render Style: These three render styles control how the color wash is applied to the painting below it. 'Multiply' always makes the dark areas in the layer below the wash darker. 'Overlay' is a combination of making areas dark and making areas lighter but mostly light. 'Tint' subtly adds the color wash to the painting using a partial 'Multiply' and 'Overlay' technique. 'Tint' will typical work on all image types. You can use 'Multiply' to make your painting darker or 'Overlay' to make your painting lighter and translucent.
Liquefy Layer
Liquefy Layer is a transparent layer used to 'wetten' up parts of the painting. This layer is different then the other layers and needs the brush tool to apply the effect. To get the brush, go to the tool box above the document, then brush on the document area to liquefy areas in the watercolor using a continuous motion. The more times you brush over the painting the wetter it becomes. This subtle but powerful layer affects all layers under it. Once the effect is applied try moving it up and watch as it liquefies outlines, washes and other layers below.
1) Brush Tool: Use this to paint over your painting to liquefy or add 'wetness' to areas.
2) Erase Tool: Erase any areas you have painted on
3) Fill: Fill the whole image with wetness. You can also continue to 'Liquefy' the painting more by brushing on it after.
4) Clear: This clears the liquefied areas and defaults it back to none.

Liquefy Layer Controls
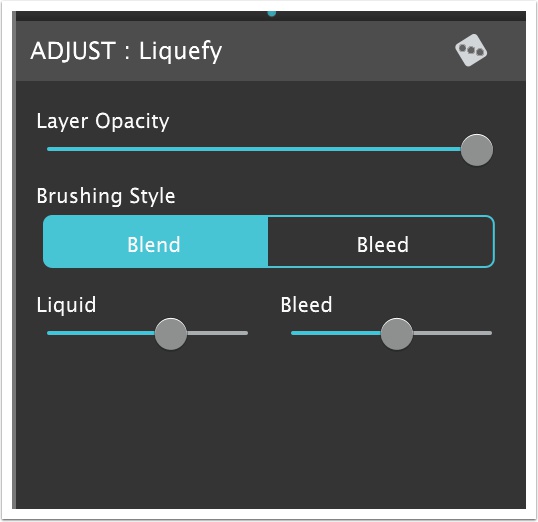
When you add a Liquefy layer you will also find additional controls on the panel below. You know you have the right controls for this layer when you see 'Adjust: Liquefy' at the top.
1) Layer Opacity: Controls the overall strength of the layer.
2) Brushing Style: Controls the style when you brush on the image. Blend will blend different color pigments together in a soft fashion. Bleed will bleed the color pigments across areas in the painting. Bleed is more accurate for adding that 'liquid' look however Blend does a fabulous job at smoothing and blending areas in the painting.
3) Liquid: How much 'Liquid' look is applied to the painting. This will affect all brushed on areas, and will also affect the 'Fill' mode as well.
4) Bleed: How far will the 'Liquid' bleeds out on the painting. Higher values will give more of a blurred look and lower values will follow the texture in the canvas more closely.
Splatters Layer
The Splatter Layer adds uniqueness to your painting by adding splatter dots to locations you define. These splatter dots can range from colorful so semi-opaque.
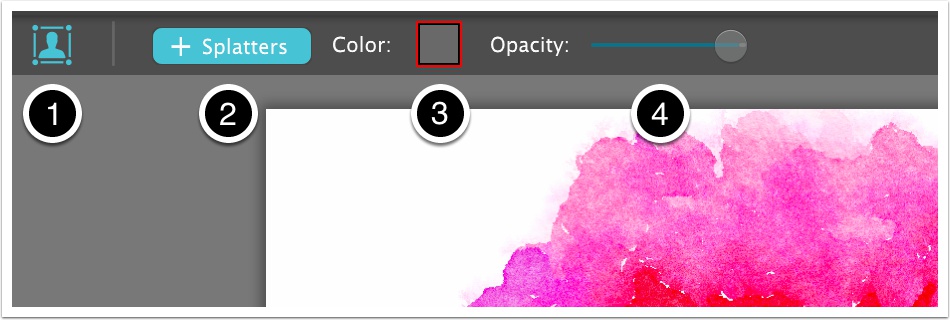
The Toolbar controls for the Splatter Layer are the most unique among the layers. This is the area where you control a good portion of what happens on the layer. Here is where you will add splatter(s), and along with other options to change the color and opacity.
1) Splatter Tool: This is the main tool (selected by default) called a placement box that allows you to move splatters around your painting. Once you have added a splatter a box will appear on the watercolor with a splatter inside of it.
2) Add Splatters: Tapping on this button will drop down a menu where you can choose one from a library of splatters. Selecting one from the library will automaticall add it to your painting. Use this button multiple times to as many splatters as you want.
3) Color Box: The color box controls what color the currently select splatter will be. This box will only show up if you have 'Color Style' set to 'Single' in the main control area.
4) Opacity: This controls the overall strength of the splatter and how transparent it is.
Splatter Layer Controls
The control area on the 'Splatter Layer' controls the overal functionaity of the layer and includes the splatters that are on the document. Any changes in here will affect all the splatters.
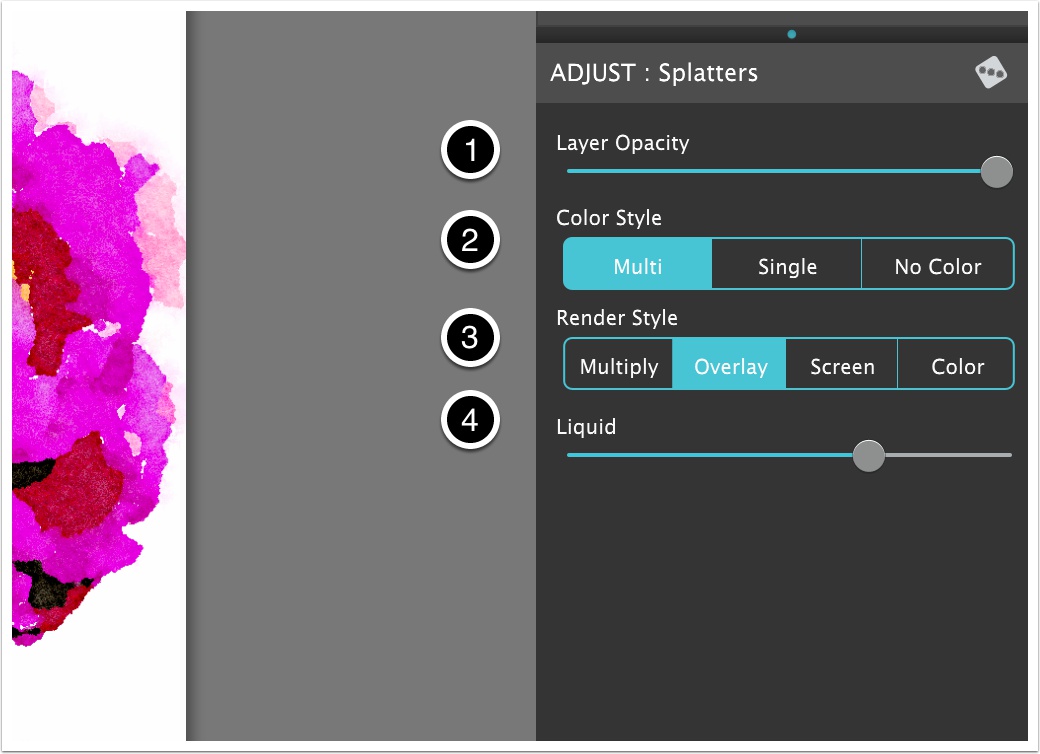
When you add a Splatter Layer you will find additional controls on the panel below. You know you have the right controls for this layer when you see 'Adjust: Splatters' at the top.
1) Layer Opacity: Controls the overall strength of the 'Splatter Layer'
2) Color Style: The 'Splatters' are divided into three Color Styles that controls what colors appear on the watercolor. Multi are splatters with multiple colors built in. Choosing 'Multi' will keep the original splatter colors in tact. Single lets you color them with a specific color using the color box located in the toolbox next to the add splatter and placement tools. No Color applies the splatters with no color and renders them as liquid only.
3) Render Style: This controls how the splatters are rendered onto the layers below. Multiply will darken up the image with the splatter, useful on lighter images or when you want darker splatters. Overlay does a darkening when applied to the midtone areas in the painting and really stands out when placed on the middle colors or grays. Screen is used to lighten up the image and will only be seen on darker parts of the image. Color is used as-is and just adds straight color into the painting.
4) Liquid: This controls how 'liquidy' the splatters become and will liquify any painting below the splatter. Stronger splatters will have a greater affect over weaker splatters so turn up the opacity up if you want an exaggerated liquidy feel.
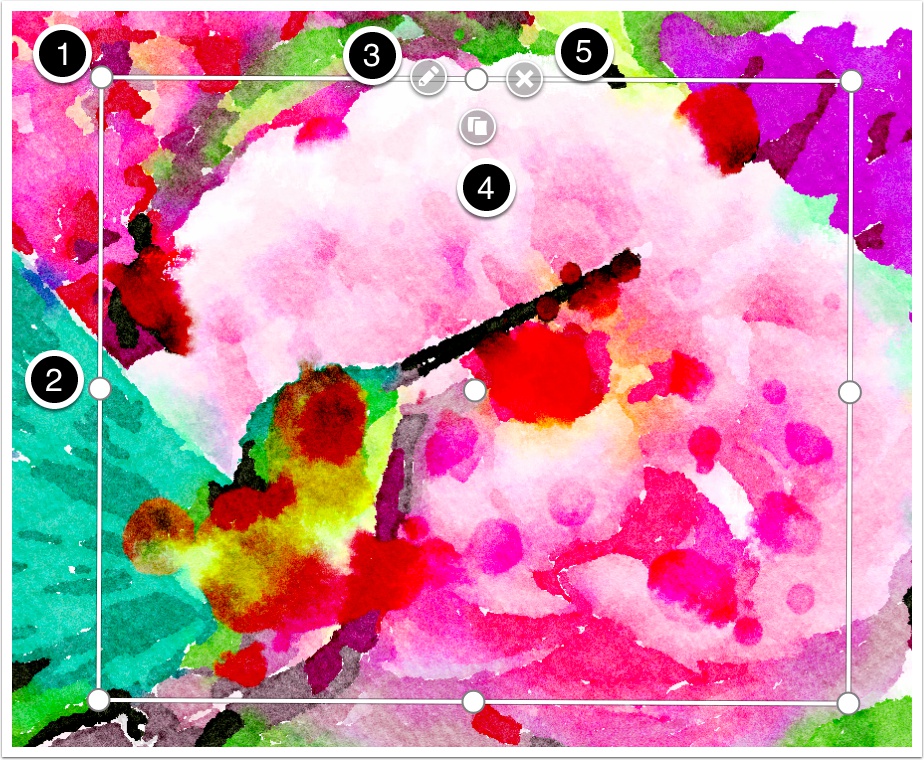
Splatter Placement Box
Whenever you have a splatter on your document a placement box will appear on the watercolor with a splatter in it. You can use this box to position the splatter and resize it to exactly where you want it. To do this:
1) Grab one of the circles in the 4 corners to resize and rotate the splatter.
2) Grab one of the circles on the sides or top/bottom to resize the splatter in only the horizontal or vertical direction.
3) Tap on the 'Pencil' button to change it using a library of splatters.
4) Tap on the 'Duplicate' button to clone the selected splatter and create another offset from the first one. This is great for retaining setting so you don't have to keep applying them everytime you add a splatter.
5) Tap the 'X' to delete the selected splatter.
The 'Splatter' tool has some unique workflow features that may not be obvious. On Mac/Win you can hit the 'Delete' key to delete any selected boxes. Holding down Ctrl/Cmd on Win/Mac while selecting boxes will select multiple or deselect the chosen one. On all platforms you can click/tap down on the document and drag to select multiple boxes. And tapping off any box on the desktop area will de-select all of the currently selected boxes (useful if you need the boxes out of the way during preview of your painting)
Outline Layer
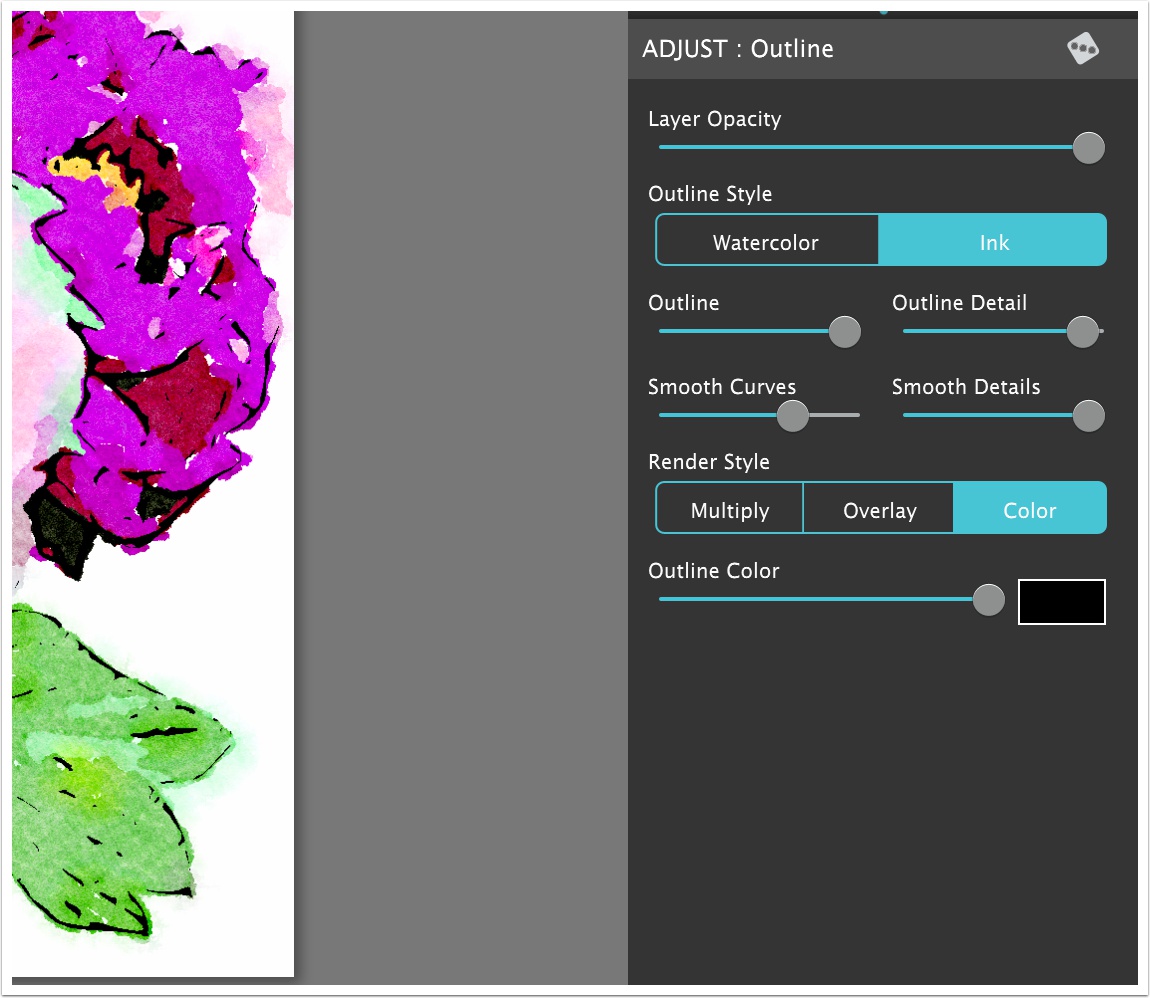
The 'Outline' layer can be used to add details or color to the painting. This layer can add different variations of 'style' to your image based on how the controls are set up. Looks can be a textured watercolor outline or a very straight edged ink outline.
1) Layer Opacity: Controls the overall 'Strength' of the layer.
2) Outline Style: Controls the 'style' of the outline details added. 'Watercolor' mode uses the paper texture and a watercolor brush to paint in the outline and has lots of texture. 'Ink' mode is drawn as if using a technical pen and is very straight with little texture.
3) Outline: Controls the overall thickness of the outline. You can use this to tweak the amount and thickness of the outline. Different images will produce more or less detail.
4) Outline Detail: This controls how the small details are handled in the outline. Large value will produce more small details and a lower value will have less small details. Use this in combination with 'Outline' to get that perfect detail in the painting.
5) Smooth Curves: This will control how smooth the curves are. Higher values will smooth out or 'round' the curves on the strokes and could give them a little more 'style'. Non smooth strokes follow the image closely and can be useful for small details.
6) Smooth Details: This is more of a subtle setting that affects the algorithm and settings of 'Outline' and 'Outline Detail'. It will smooth out the details and sometimes bring out areas that are not shown without it. This is a good control to just 'play around' with and see how it looks from painting to painting.
7) Render Style: This controls how the outline is rendered onto the layers below. Multiply will darken up the image with the outline while retaining the original paintings color. Overlay does a darkening when applied to the midtone areas in the painting and really stands out when placed on the middle colors or grays. This mode also retains the original colors in the painting. Color is used to mostly add color into the painting. The tone used is based on the original colors in the painting so darker areas will be a darker version of this color and lighter areas will be a lighter version of this color.
8) Outline Color: Controls the color and strength of the outline. This control will only show up if your 'Render Style' is 'Color'.
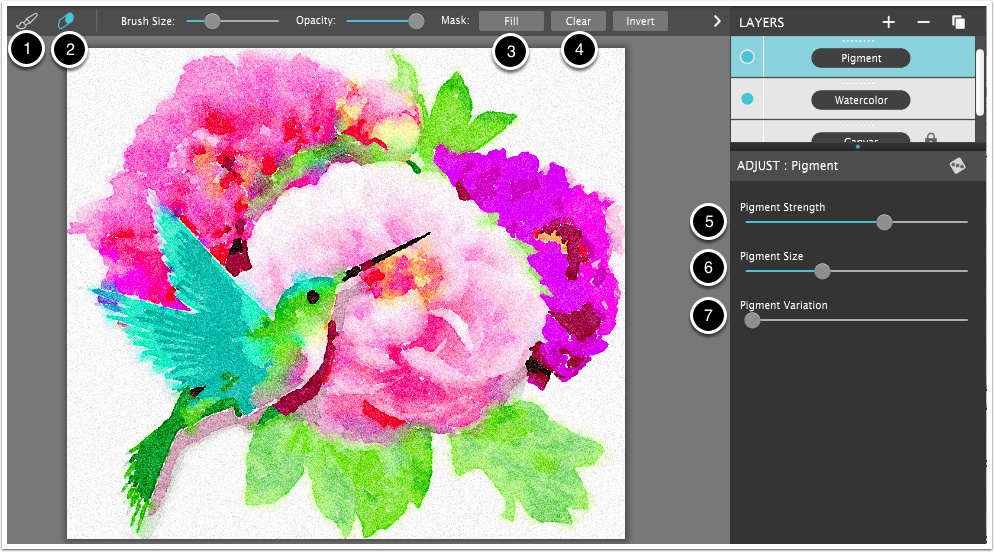
Pigment Layer
Pigment Layer adds a granulated pigment texture to the watercolor. Granulation is the effect you get when the pigment particles clump together rather than them settling evenly on a painted surface. This effect is great for creating additional texture in an otherwise 2D watercolor painting.
1) Brush Tool: Use this to paint over your painting to add pigment in the areas you need. By default the pigment is applied to the whole painting.
2) Erase Tool: Erase any areas you have painted pigment on
3) Fill: Fill the whole image with pigment.
4) Clear: This clears the pigment areas and defaults it back to none so you can paint on pigment in just those areas needed.
5) Pigment Strength: Controls the overall strength of the pigment on the painting. Move to the right for stronger pigment and left for less pigment.
6) Pigment Size: Controls the size of the pigment from tiny dots to larger granulating pigment texture.
7) Pigment Variation: Controls the randomness of the pigment in the painting.
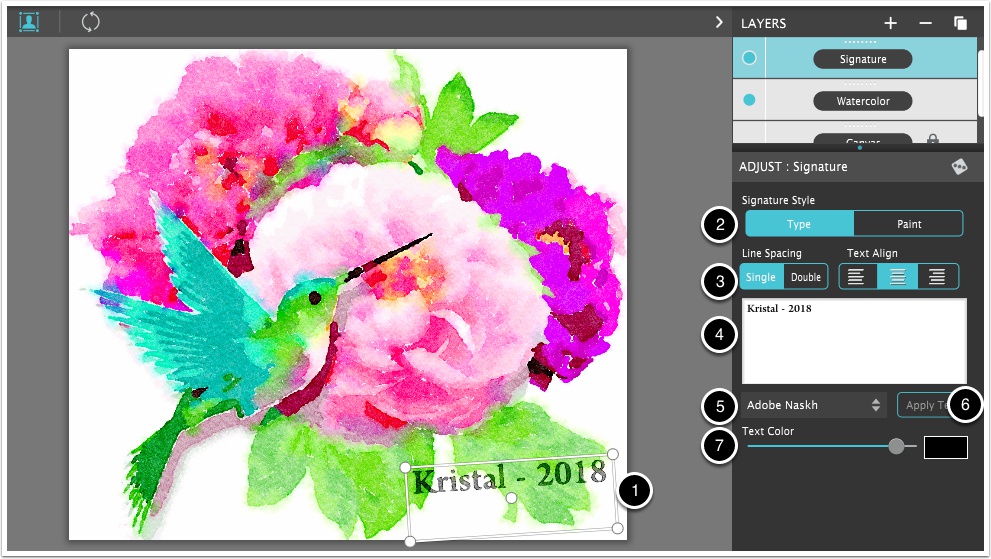
Signature Layer
Signature Layer personalizes your painting using two signature styles: The first uses a type face from the fonts installed on your computer, and the other allows you to paint on your signature freehand.
1) Signature Box: Use this on screen to move around, resize, and rotate your signature. Grab any corner to rotate and resize and grab the center to move.
2) Signature Style: Use this to control which style of signature you use. Type is used to type in text, Paint is to use free hand to draw in your signature by hand.
3) Line Spacing and Alignment: Controls the spacing between lines of text or the Left/Center/Right alignment of text.
4) Text Box: Use this to enter in the signature text.
5) Font Choice: Use this menu to choose which Font your signature will show up in.
6) Apply Text: Tap this button once done entering your text to render it onto your painting
7) Text Color: Controls the color of the signature. The box lets you choose the color and the slider controls the overal transparency of the signature.
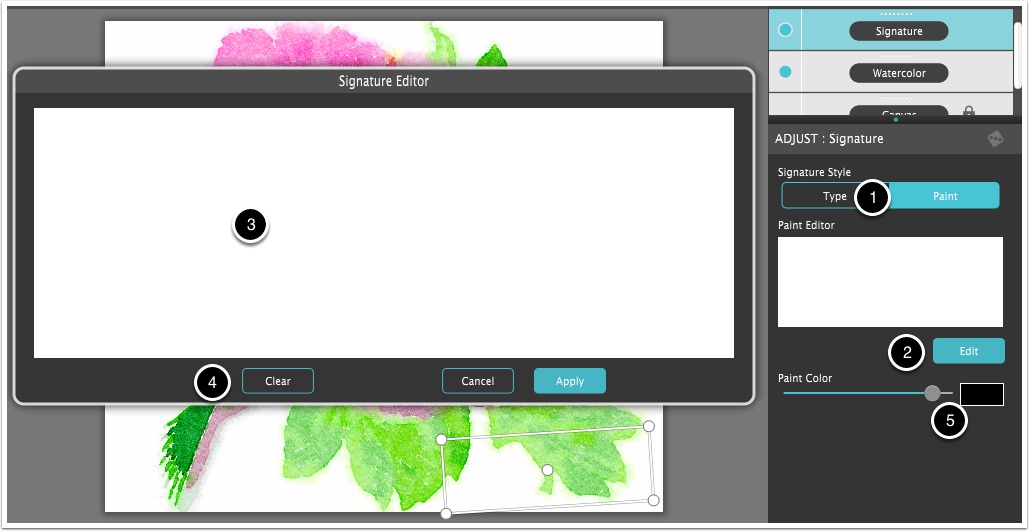
Paint Editor
If you choose the 1) "Paint" style as your signature you can freely paint by hand to create the signature. Tap on the 2) Edit button to bring up the controls.
3) Paint Area: Draw in this area to create your signature.
4) Clear: Tap this to clear the signature and start over.
5) Paint Color: Use the box to choose the color and use the slider to control the overall transparency.
Signature Layer as a Preset
A pro tip is to save your Signature as a Layer Preset. To do this go to the Layer menu and choose "Save Layer Preset". This way you can play it back on other paintings easily.
Liquid Vignette Layer
Liquid Vignette Layer creates a focal point by bleeding and blending out detail with our one-of-a-kind ellipse tool. When an ellipse is placed on a watercolor paint liquifies in a smooth gradual transition around the circle and out to the edges. Use one ellipse for a watery vignette, or several for focus on multiple areas.
1) Ellipse: Move this ellipse around and place exactly where you want a focus on your painting. Grab one of the 4 sides to resize/rotate and anywhere in the center to move the ellipse.
2) Add Ellipse: If you need more than one focus ellipse you can tap on this to add another ellipse into the painting.
3) Delete Ellipse: Delete the currently selected ellipse. (Cannot delete the last ellipse)
4) Strength: Controls the overal strength and blending of the vignette effect.
5) Focus Radius: How much bleed does the Liquid Vignette apply to the painting.

Canvas Layer
The 'Canvas Layer' is a crucial piece to a watercolor painting in quite a few ways. The way the water flows onto the canvas highly depends on the texture in the canvas. The watercolor algorithm actually takes into account which canvas texture is chosen and flows the paint in minute details based on this texture. In fact the Canvas is so critical that Watercolor Studio does not let you re-order the canvas or hide the layer from rendering.
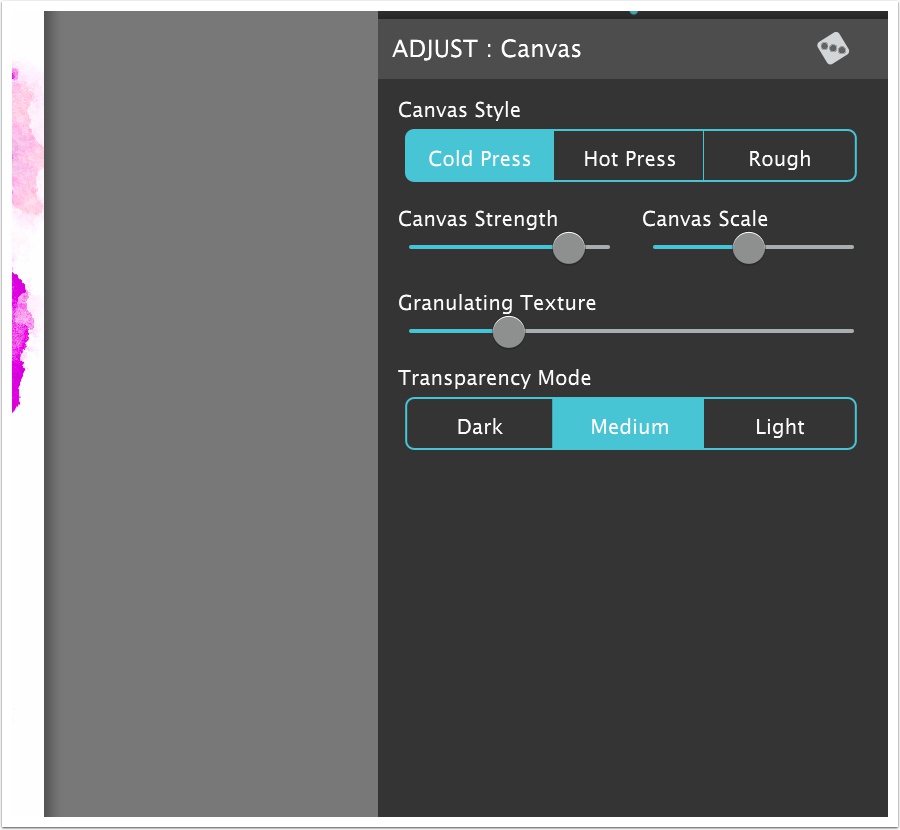
1) Canvas Style: This is the main 'style' of a canvas and controls not only the overall impression of the painting but also the 'flow' of paint along each area's edge. 'Cold Press' is the typical watercolor canvas style and is built on fairly typical peaks and values while having a good amount of texture. 'Hot Press' is similar to 'Cold Press' but is very less pronounced in the peaks and values and is considered a smoother paper. 'Rough' has pronounced peaks and valleys and medium texture for the water to follow.
2) Canvas Strength: Controls the overal strength of the canvas. This mainly focuses on the peaks and values of the paper.
3) Canvas Scale: Controls how large and small the canvas is. Think of this as if you were painting a small flower or rose. In this example you would want the 'Canvas Scale' to be large as you are closer to the paper and have more detail. If you painted something like a building you would be painting on a larger area of the canvas. In this case you would want to move the slider to the left for a smaller texture. Of course the power of starting out digitally is that you can change this to get that 'perfect' look. Quit a bit harder in a traditional painting.
4) Granulating Texture: This affects how the paint pigment reacts with the water and how they settle into the 'valleys' of the paper. Higher value will cause the pigments to react more and lesser values will cause the pigments to react less.
5) Transparency Mode: This controls the overall translucency of the painting by adjusting how strong the pigments will react with each other and the painting overall. You can control this on each watercolor layer with the 'Layer Opacity' control. Use this for a quick way to 'tweak' the level of everything.