Photo Formation is a photo effect that auto-transforms images into super creative paper formations then with a 3D light engine casts ultra cool shadows with loads of dimension. Use it to fragment, join, weave, rip and fold photos into fascinating eye-catching pieces, with all the subtle creases, curls and bends as if painstakingly assembled by hand.
Starting Out
When you first launch Photo Formation you will be presented with a familiar JixiPix UI.
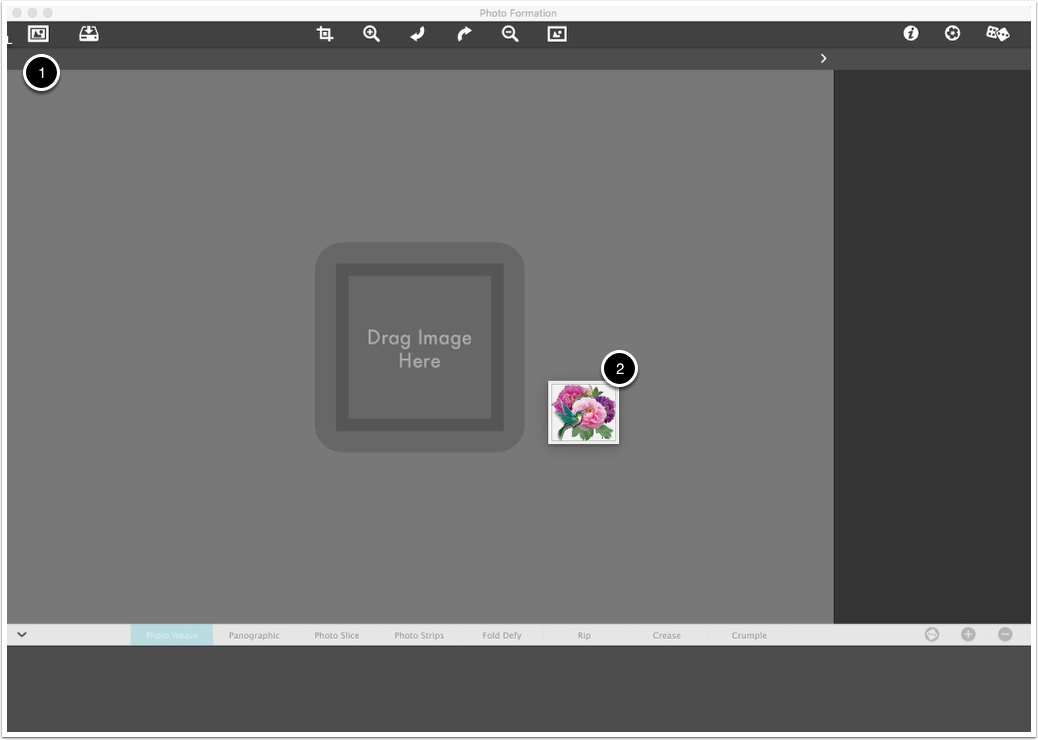
This is the screen that will be presented when first launching Photo Formation. You have 2 choices to load an image.
- Click on the "Get Photo" button in the upper left
- Drag and drop and image onto the main window
Once an image is placed in the application it will auto-create the initial formation for you using random settings. By default the app starts on Photo Weave.

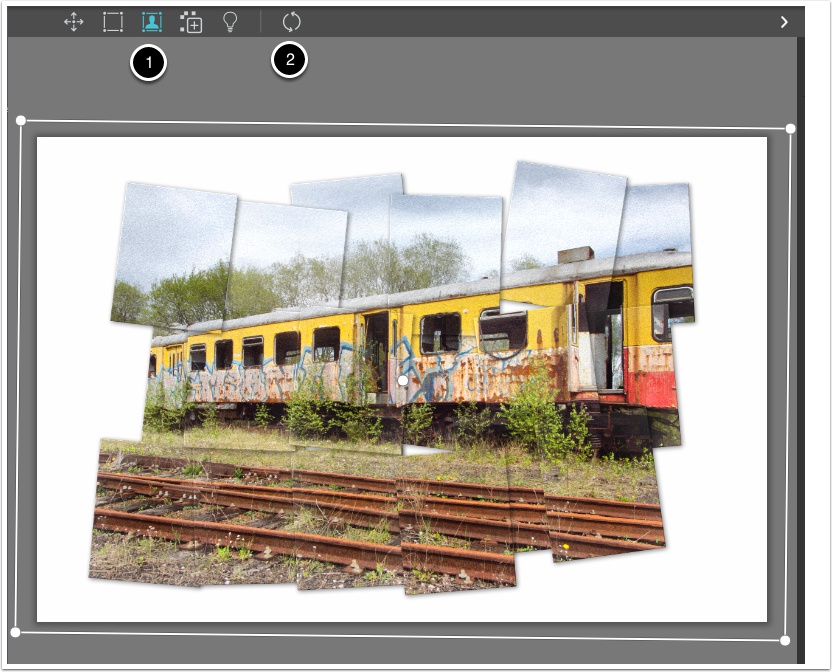
Initial User Inteface
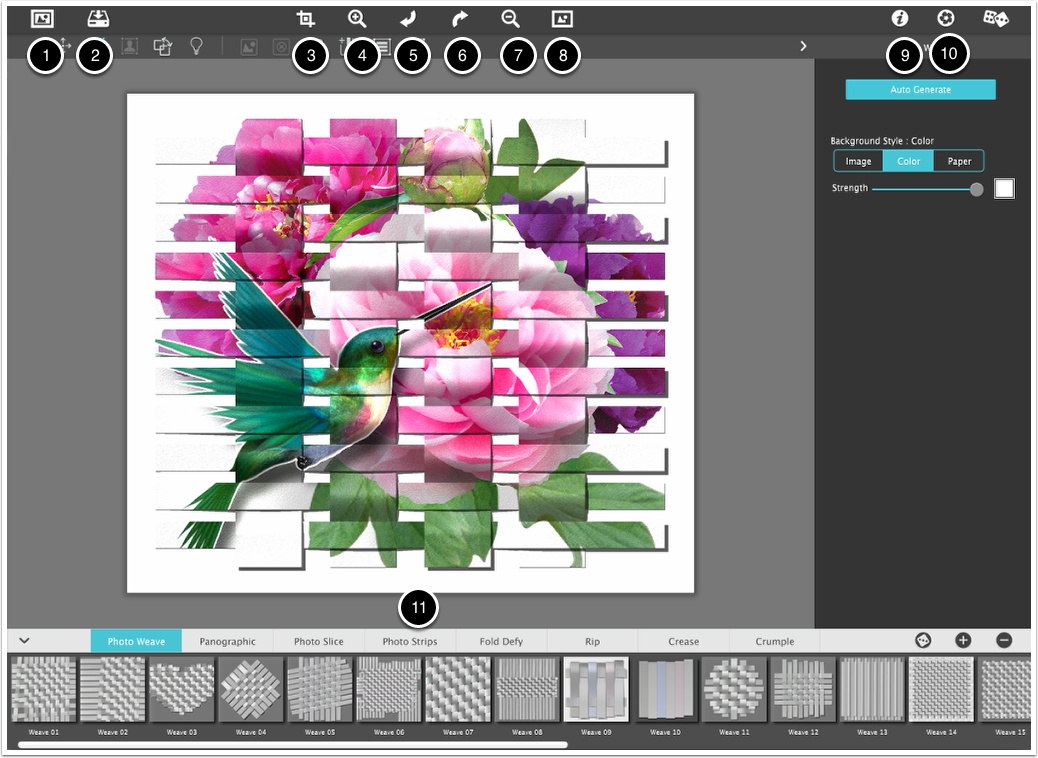
This next screen shows the initial user interface when the first image is opened inside the application. The following items are general, however, once your familiar with them they will apply to all the JixiPix applications.
1) Get Image Button. Used to load in an image to process inside of Photo Formation. You can also drag and drop an image into Photo Formation at any time and the document will switch to that current Photo. (Be careful when doing this as your process will start over).
2) Save Image Button. This will bring up a small menu where you can choose to Save Photo, Save Preset, Bring up this Info page, and get info on other JixiPix Products, etc. This menu will be described in detail in another section.
3) Crop Button. Use this dialog to crop your photo. This is very useful to cut out areas you do not want in your final images.
4) Zoom In Button. Zoom In on your image, or use keyboard Cmd + or Ctrl + on Windows.
5) Undo Button. Undo to your previous step, or use keyboard Cmd Z or Ctrl Z on Windows.
6) Redo Button. Redo to a previous step forward. This only works after hitting Undo at least once, or use keyboard Cmd Shift Z or Ctrl Shift Z.
7) Zoom Out Button. Zoom Out on your image (Cmd - or Ctrl -). You can also use keyboard Cmd 0 or Ctrl 0 to quickly make your photo fit into the window.
8) Original Button. Click on this button and hold it down to see your original loaded photo. This is very useful when doing minor changes to a watercolor and lets you compare the before photo to the rendered one. Click and release to get a view of before and after.
9) Info Button. Will bring up this Info page inside of the app.
10) Product Button. Shows other great JixiPix products :-)
11) Preset Browser. The main area is going to show the different "Effects" and below that will be the actual presets for each effect. For a quick start this is where you will begin. Click through the Presets on the bottom of the app after an image is placed in the app to get started. We refer to this section as the 'Browser' or 'Preset' section. Presets are a quick way to load in pre-defined 'looks' for your image and includes everything you need to recreate this 'look' at the point you saved it.
Presets
Photo Formation has a very powerful preset system. A preset is a 'snapshot' of everything you are working on except your initial image. You can play back this presets on any new image you load. This gives you the ability create a fabulous look once, then play it back (or use it as a starting point) for future images. When you save a preset everything you have been working on is captured like settings, layers, brushed areas and more, into put in a nice tidy package represented as thumbnail that you will find in the browser or preset section at the bottom. You also have the ability to name your presets when you save them, delete existing presets, save 'layer' presets, and mark some of your presets as favorite to move them up to the beginning of the 'Preset' section.
1) Once you load in an image you can click through presets to playback your settings, or test out the ones included with Photo Formation. Doing this is simple, just tap on one of the thumbnails at the bottom. Once you do this the system will apply that preset and render your image into a painting.
2) If you have a great look that you want to save as a painting just hit the '+' button and then give it a name. (Names have to be unique and the system will ask if you want to replace an existing one.)
3) To delete a preset you can either tap the '-' button or hold down on a preset for a second. Once you do this a series of 'X's will show up over top of the thumbnails and you can tap this to delete the preset. Clicking anywhere else on the document will then turn off the 'delete' mode.
4) To favorite a preset, hold down on any preset and keep holding until you see the hearts. Selecting a heart will move that preset to the front of the list. Super useful if you create a preset you use often. Again, tapping anywhere will disable this mode to continue work as normal.
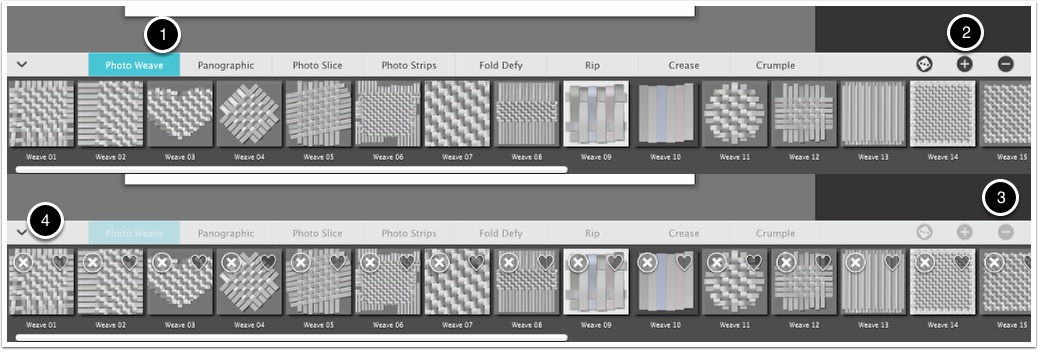
Photo Weave - General UI
Photo Weave is 1 of 4 effects that use very similar UI. Most of what is described here will be the same across Panographic, Photo Slice, and Photo Strips.
Photo Weave is a very complicated effect but is easy to master after knowing a few basic things and just playing around.
1) Auto Generate - Tapping on this button will bring up the Auto Generate wizard where you can generate your 'mesh' by choosing number of strips, weave strength, texture of paper, conform shape, etc. Any changes you make while in this mode will overwite any work you have previously done. It is best to play around with this to get an idea of the creation process.
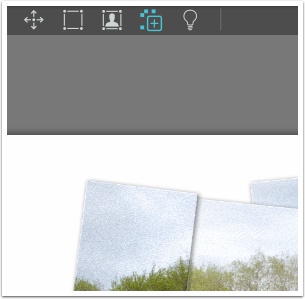
2) Multiple Select UI - This area will only show up if you have multiple tiles selected.
3) Photo Settings - This section only shows up if you have one or more tiles selected. This area adjusts all settings on the currently selected tile and any current settings on the selected tile(s) will be shown in the sliders. Making any change to one of the sliders will apply the settings to all the selected tiles.
4) Background - Controls the background style of the effect.
5) Tile Tool - This tool is the main tool that you will use in Photo Formation. You can use this to select a tile, select multiple tiles, and deselect all tiles. Once a tile is selected its settings can be adjusted in the "Photo Settings". You will also use this tool to move the tile around on screen by resizing or rotating the box by grabbing one of the corners.
6) Image Tool - Use this tool to move the image around inside of any selected tile. You can resize the image by grabbing a corner and moving it around. Move the whole image by tapping on the center area and moving it around.
7) Flip Tool - Use this tool to flip the 'weave' from the front to the back. Anywhere you click on the effect will cause the weave to reverse from behind to front and front to behind.
8) Light Tool - Use this tool to move the light source around on the document. The icon on-screen is the representation of where in the world the light is coming from.
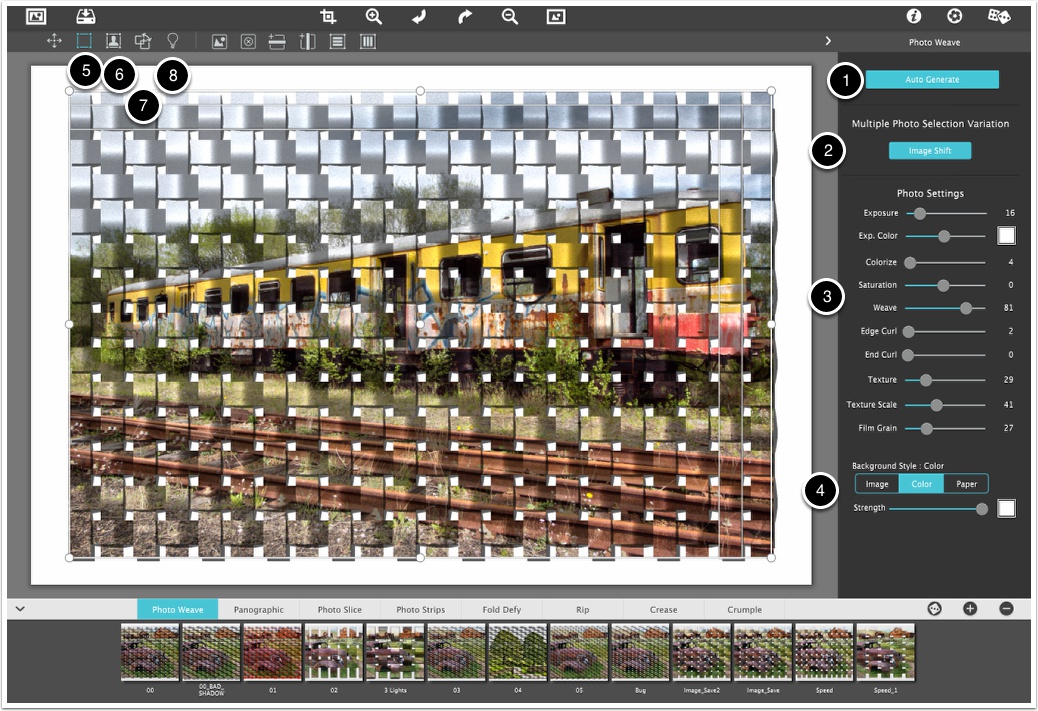
Photo Weave - Auto Generate
You will be using the Auto Generate mode to create your initial weave. Any changes in here will automatically cause the Photo Weave to be updated with the new settings.
1) Vertical Strips - Controls the number of vertical strips in the weave.
2) Horizontal Strips - Number of horizontal strips.
3) Gutter - This slider controls how much spacing is between each strip from huge to barely noticable.
4) Variation - Change this slider to control the 'randomization' that goes into each strip.
5) Weave - How 'deep' does each strip look. This will control the lighting, shadows, and curve of each horizontal and vertical strip.
6) Edge Curl - Controls how much curling each strip will get along its edges. Affects the whole strip.
7) End Curl - Controls how much curling each strip will get. Only affects the end of the strip after the last 'weave'.
8) Exposure - This controls the overal exposure of the tile. Moving the slider to the left will keep the photo exposure looking the same as the photo originally loaded into the app. Moving it to the right will give Photo Formation the freedom to change the photo exposure. What this means is that Photo Formation will slightly vary each tile so they look unique. The higher this value is on various tiles the more freedom you give Photo Formation to change the exposure on each tile. Exposure can be thought of us the time the photo is exposed to the light. The higher this value is the lighter the photo may become.
9) Exp. Color - This is more of an edge exposure. This will take the color chosen and combine this to expose the edges of the image to light. This control works very similar to exposure in that you are giving Photo Formation the freedom to make this amount more or less up to the maximum the slider value.
10) Colorize - This will add a sight color variation to your weave. When you take a photo with your camera it will componsate for the overal color tone in the scene. If you take multiple photos then each photo can have a slight tone difference. This is Photo Formations way of making the tiles realistic as if each one was taken with your camera separately and pieced together. Quite similar to Exposure in that each tile will be slightly different than the other tiles up to the maximum you set.
11) Saturate - Controls the overal saturation of the photo on each tile. Higher values will over-saturate the image and lesser values will de-saturate thie image. Just like Exposure, this control will set the amount of saturation variation happens on each tile. The bigger the number the more variation from tile to tile that Photo Formation will create.
12) Texture - Texture controls how much 'paper texture' is applied to each tile. This paper texture can simulate the look of dimpled photo paper. This will be the same value on tile rather than varied across.
13) Texture Scale - Controls how large the 'dimpled' photo texture looks on each tile. This will be the same value on tile rather than varied across.
14) Grain - Controls how much film grain is applied to a tile. This varies per tile up to the maximum set on this slider.
15) Conform to Shape - Photo Weave will try to make strips that confrom to the shape chosen.
16) Random - Randomize the above settings. Very similar to the "Random Dice" button on the preset tab and the top of the app. Added here as a quick way to randomize things to get a general look and then tweak those settings to perfect the look you are after.
17) Reset - Randomizes some of the settings while resetting others to give a more uniform look. Useful if you make too drastic of changes and what to get back to a starting point.
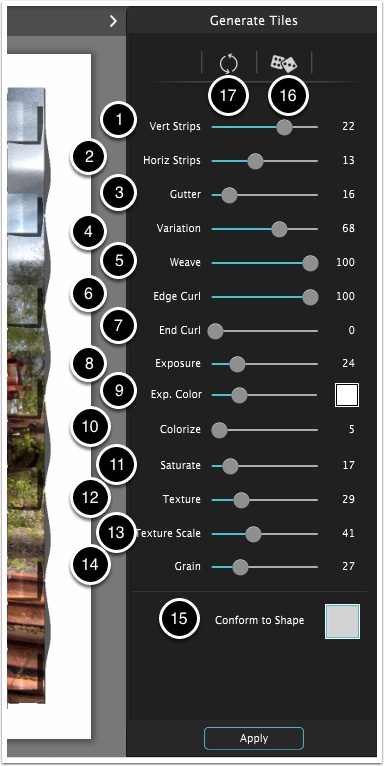
Photo Weave Tools - Tile Tool
There are 4 main tools in Photo Weave used to control the tiles, the image on the selected tiles, flip weaves, and control the lighting.
1) Tile Tool - Used to move a tile around. Using the corners will resize and rotate the tile. Using the top, bottom, left, and right controls will resize just the width or height depending on which control you choose. You can select multiple objects by dragging a box around any tiles. Or you can use Ctrl/Cmd in combination with selecting tiles to add or delete from the current selection when tapping on a tile. Hitting the "Delete" key will delete any selected tile. (Hint. If the control points are too small to accurately grab the correct one you can zoom in on the document using the zoom button or Ctrl/Cmd +)
2) Load Image - Use this button to load in a custom image that is applied to just the selected tile(s).
3) Delete Image - Use this to delete any custom image loaded on the selected tile(s). After using this the image will default back to the original image chosen as your main image using the in Photo Formation (Get Photo button or drag and drop)
4) Add Horizontal Strip - Tap on this to add a horizontal strip. Photo Weave will place it in consecutive locations and try to find a free spot to fit it in.
5) Add Vertical Strip - Add a vertical strip. Similar to Horizontal in that Photo Weave finds a spot to place a new vertical strip that does not go over top of another one.
6) Select All Horizontal - Tap on this to select all the horizontal strips.
7) Select All Vertical - Tap on this to select all the vertical strips.
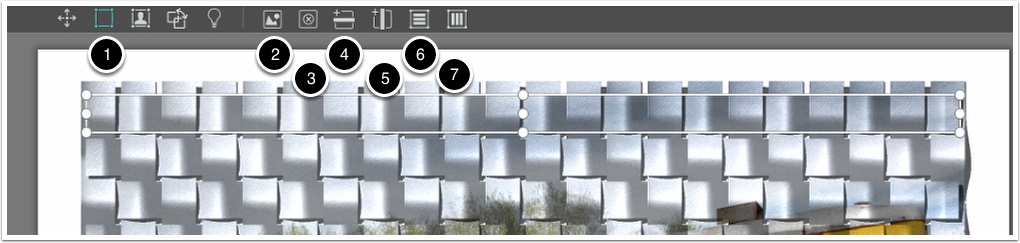
Photo Weave Tile Settings
Each tile will have its own settings. You can adjust the settings on one or more tiles by selecting the tiles with the Tile Tool (and alternatively selecting multiple tiles by dragging or using Ctrl/Cmd click).
There are 4 main sections. 1) Auto Generate, 2) Multiple Tile settings, 3) Photo Settings, and 4) Background. Auto Generate will always be visible. Multiple Tile settings will only be visible if 2 or more tiles are selected, Photo Settings will be visible if 1 or more tiles are selected, and Background will always be visible.
Image Shift - This is under the multiple tile settings area. Each time you tap on this Photo Formation will 'shift' the photo on each of the selected tiles by a small amount. Tapping multiple times can slowly shift the image around on the tiles.
Photo Settings - All of these controls are the same as in the "Auto Generate" section above. These settings only show up if you have 1 or more tiles selected and the settings on the sliders are the 'average' of all the selected tiles. Changing any of the sliders will set those values on all the selected tiles.
Background - Controls the overall background behind the tiles from Image to Color to a built in paper. If you want transparent background then choose color and set the strength to 0 and be sure to save your photo as PNG or TIFF (JPEG does not support transparency)
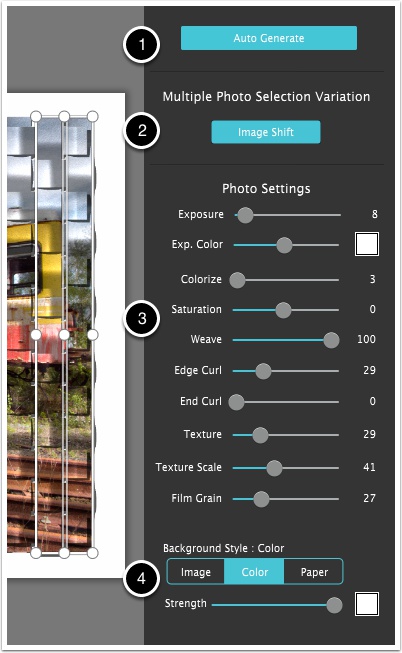
Photo Weave Tools - Image Tool
The 1) image tool allows you to move around and resize the image that is currently on the selected tiles. Step to use this is to select the tile(s) that you want to adjust the image on, then select this tool. The Image Tool will show a box where the image is currently at. Move the image by dragging the center of the image, rotate/resize the image by dragging one of the corner points, or resize the image by dragging the Top, Left, Right, or Bottom control point. You can use the 2) Reset button to reset the image back to the original location.
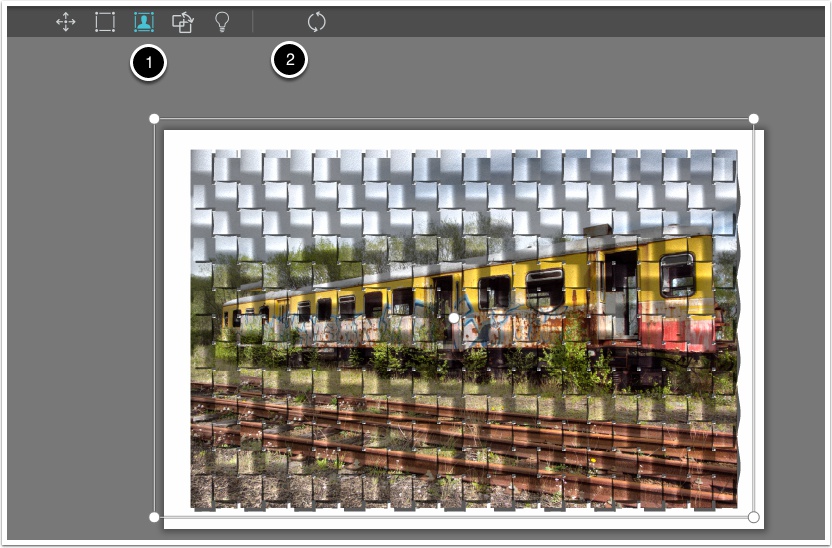
Photo Weave Tools - Flip Weave Tool
This tool is a super simple tool. The only thing you can do is tap on a weave and this tool will flip that weave from over/under to under/over. Useful to un-weave your weave.
BIG HINT: Use this tool last. Any changes to moving tiles or resizing tiles will reset this setting and you must apply it again. Auto Weaving your photo is not an easy task and a lot of calculations have to be made when changes are made.
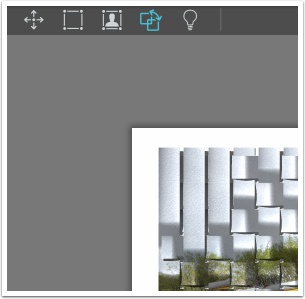
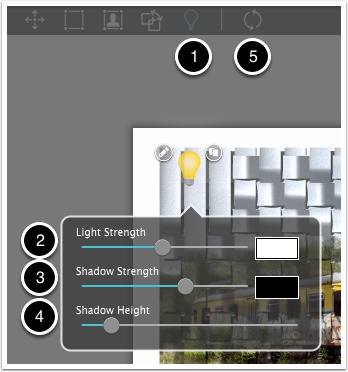
Photo Weave Tools - Light Tool
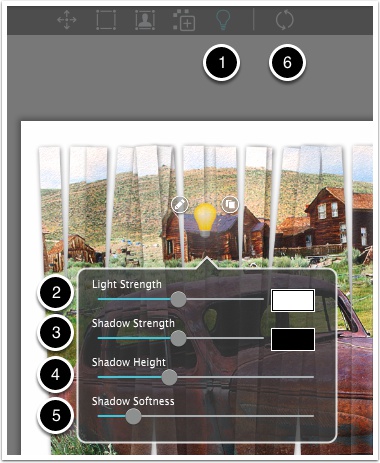
This tool controls the overall lighting on your tiles. Photo Formation uses an incredibly realstic rendering engine to make the tiles look photo realistic with texture, lighting and real shadows that curl with the tiles. You can move the light around on the photo to change the direction the light is coming from, tap the "Edit" icon to tweak the lighting and shadows, and can tap on the "Duplicate" button to add in another light if you want multiple shadows. Moving the light to the edges will pronounce the curling of the tile, the texture of the tile, and the distance of the shadows. Each light will have unique settings and by changing which light is selected you can control each lights settings.
Tapping on the 1) Edit icon will bring up the settings for each light.
2) Light Strength - This controls the overall strength of the light. Higher values will pronounce the curves of the tiles, any curl applied to the tiles, and the texture applied to each tile. You can also change the color of the light by tapping on the color box. Be creative by changing the light color.
3) Shadow Strength - This controls how dark the shadows are. You can make this anything from subtle to dark and pronounced. The color picker box next to the Shadow Strength gives you the chance to pick that perfect shadow color or tone. And remember that each light has its own shadow and shadow color.
4) Shadow Height - Controls how far off the table or tile the shadow is. The higher the value the further each tile will look like it is off the table and each other. This will also slightly more pronounce the curl on each tile.
5) Reset - Resets all of the lighting back to 1 light in the default area.
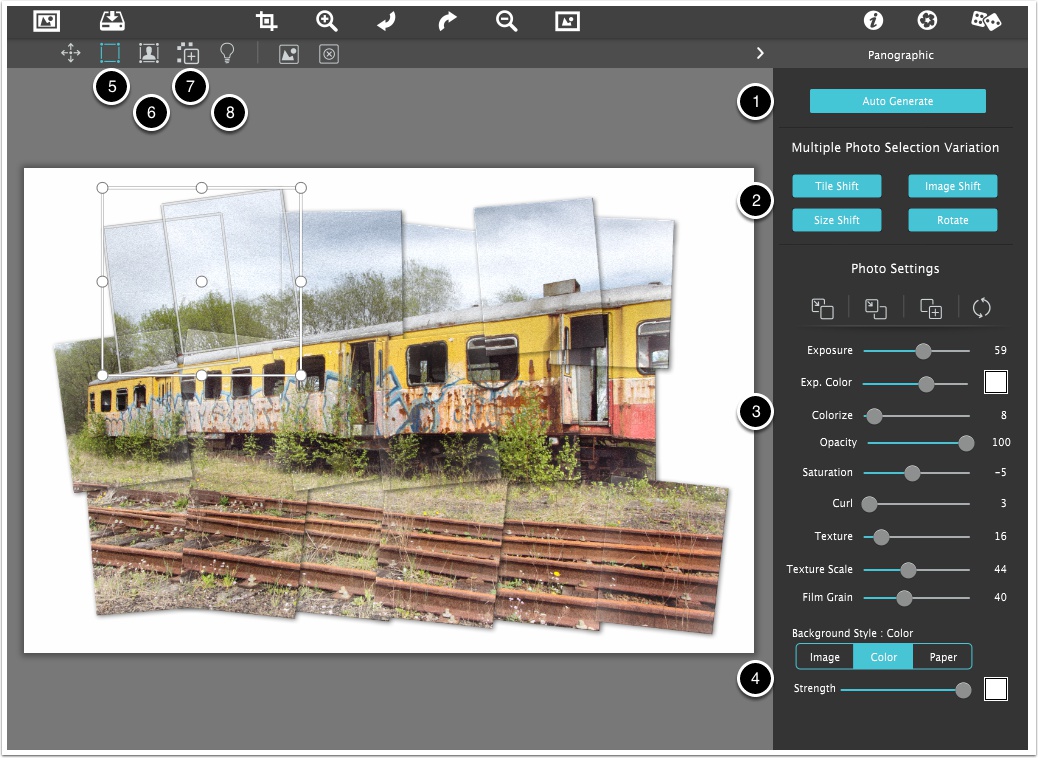
Panographic - General UI
1) Auto Generate - Tapping on this button will bring up the Auto Generate wizard where you can generate your 'panography' by choosing number of tiles, tile curl, texture of paper, conform shape, etc. Any changes you make while in this mode will overwite any work you have previously done. It is best to play around with this to get an idea of the creation process.
2) Multiple Select UI - This area will only show up if you have multiple tiles selected.
3) Photo Settings - This section only shows up if you have one or more tiles selected. This area adjusts all settings on the currently selected tile and any current settings on the selected tile(s) will be shown in the sliders. Making any change to one of the sliders will apply the settings to all the selected tiles.
4) Background - Controls the background style of the effect.
5) Tile Tool - This tool is the main tool that you will use in Photo Formation. You can use this to select a tile, select multiple tiles, and deselect all tiles. Once a tile is selected its settings can be adjusted in the "Photo Settings". You will also use this tool to move the tile around on screen by resizing or rotating the box by grabbing one of the corners.
6) Image Tool - Use this tool to move the image around inside of any selected tile. You can resize the image by grabbing a corner and moving it around. Move the whole image by tapping on the center area and moving it around.
7) Add Tile Tool - Use this tool to add a tile wherever you click.
8) Light Tool - Use this tool to move the light source around on the document. The icon on-screen is the representation of where in the world the light is coming from.
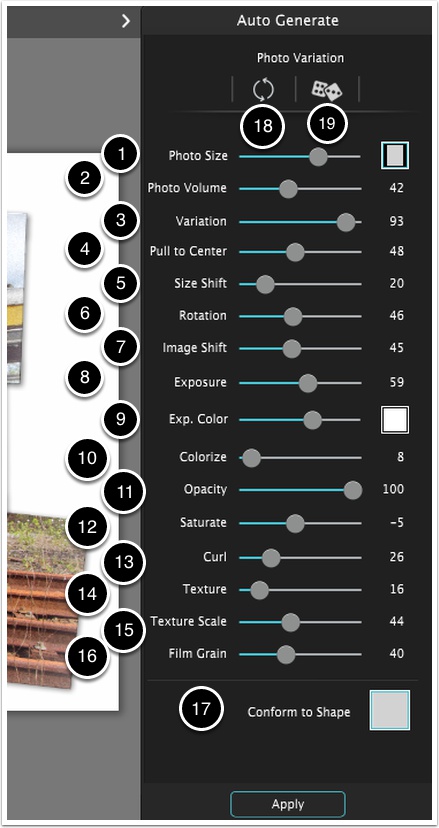
Panographic - Auto Generate
You will be using the Auto Generate mode to create your layout. Any changes in here will automatically cause the tiles to be updated with the new settings.
1) Photo Size - Controls the size of the tiles and the shape.
2) Photo Volume - Controls how many tiles are generated.
3) Variation - Change this slider to control the 'randomization' that goes into each strip.
4) Pull to Center - Pulls the tiles to the center by a varied amount. A setting of 0 on this will keep the tiles aligned in a grid and a value of 100 will pull the tiles towards the center.
5) Size Shift - Controls how varied the tile size is for each tile.
6) Rotation- Controls how varied the angle is on each tile.
7) Image Shift - Controls how offset the image is on each tile.
8) Exposure - This controls the overal exposure of the tile. Moving the slider to the left will keep the photo exposure looking the same as the photo originally loaded into the app. Moving it to the right will give Photo Formation the freedom to change the photo exposure. What this means is that Photo Formation will slightly vary each tile so they look unique. The higher this value is on various tiles the more freedom you give Photo Formation to change the exposure on each tile. Exposure can be thought of us the time the photo is exposed to the light. The higher this value is the lighter the photo may become.
9) Exp. Color - This is more of an edge exposure. This will take the color chosen and combine this to expose the edges of the image to light. This control works very similar to exposure in that you are giving Photo Formation the freedom to make this amount more or less up to the maximum the slider value.
10) Colorize - This will add a sight color variation to your tile(s). When you take a photo with your camera it will componsate for the overal color tone in the scene. If you take multiple photos then each photo can have a slight tone difference. This is Photo Formations way of making the tiles realistic as if each one was taken with your camera separately and pieced together. Quite similar to Exposure in that each tile will be slightly different than the other tiles up to the maximum you set.
11) Opacity - Controls the overal opacity on the tiles. Each tile is given a random opacity up to this value.
12) Saturate - Controls the overal saturation of the photo on each tile. Higher values will over-saturate the image and lesser values will de-saturate thie image. Just like Exposure, this control will set the amount of saturation variation happens on each tile. The bigger the number the more variation from tile to tile that Photo Formation will create.
13) Curl - How much corner curl is allowed to be applied to each tile.
14) Texture - Texture controls how much 'paper texture' is applied to each tile. This paper texture can simulate the look of dimpled photo paper. This will be the same value on tile rather than varied across.
15) Texture Scale - Controls how large the 'dimpled' photo texture looks on each tile. This will be the same value on tile rather than varied across.
16) Film Grain - Controls how much film grain is applied to a tile. This varies per tile up to the maximum set on this slider.
17) Conform to Shape - Photo Weave will try to make strips that confrom to the shape chosen.
18) Reset/Grid - Randomizes some of the settings while resetting others to give a more uniform look. Useful if you make too drastic of changes and what to get back to a starting point and keep things in a grid pattern.
18) Random - Randomize the above settings. Very similar to the "Random Dice" button on the preset tab and the top of the app. Added here as a quick way to randomize things to get a general look and then tweak those settings to perfect the look you are after.
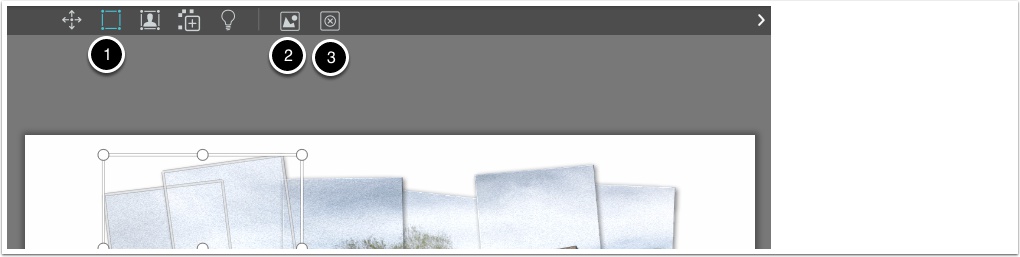
Panographic Tools - Tile Tool
There are 4 main tools in Panographic used to control the tiles, the image on the selected tiles, add tiles, and control the lighting.
1) Tile Tool - Used to move a tile around. Using the corners will resize and rotate the tile. Using the top, bottom, left, and right controls will resize just the width or height depending on which control you choose. You can select multiple objects by dragging a box around any tiles. Or you can use Ctrl/Cmd in combination with selecting tiles to add or delete from the current selection when tapping on a tile. Hitting the "Delete" key will delete any selected tile. (Hint. If the control points are too small to accurately grab the correct one you can zoom in on the document using the zoom button or Ctrl/Cmd +)
2) Load Image - Use this button to load in a custom image that is applied to just the selected tile(s).
3) Delete Image - Use this to delete any custom image loaded on the selected tile(s). After using this the image will default back to the original image chosen as your main image using the in Photo Formation (Get Photo button or drag and drop)
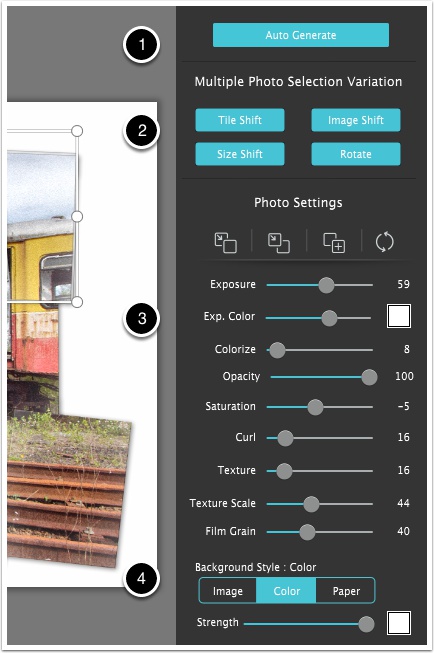
Panographic Tile Settings
Each tile will have its own settings. You can adjust the settings on one or more tiles by selecting the tiles with the Tile Tool (and alternatively selecting multiple tiles by dragging or using Ctrl/Cmd click).
There are 4 main sections. 1) Auto Generate, 2) Multiple Tile settings, 3) Photo Settings, and 4) Background. Auto Generate will always be visible. Multiple Tile settings will only be visible if 2 or more tiles are selected, Photo Settings will be visible if 1 or more tiles are selected, and Background will always be visible.
Tile Shift - This is under the multiple tile settings area. Each time you tap on this Photo Formation will 'shift' the currently selected tile(s) by a small amount. Tapping multiple times can slowly shift the tile around the document. Great for getting that 'randomized' look without have too much change or having to move each tile separately.
Image Shift - This is under the multiple tile settings area. Each time you tap on this Photo Formation will 'shift' the photo on each of the selected tiles by a small amount. Tapping multiple times can slowly shift the image around on the tiles.
Size Shift - This is under the multiple tile settings area. Each time you tap on this Photo Formation will resize the currently selected tile(s) by a small amount.
Rotate - This is under the multiple tile settings area. Each time you tap on this Photo Formation will rotate the currently selected tile(s) by a small amount.
Photo Settings - All of these controls are the same as in the "Auto Generate" section above. These settings only show up if you have 1 or more tiles selected and the settings on the sliders are the 'average' of all the selected tiles. Changing any of the sliders will set those values on all the selected tiles.
Background - Controls the overall background behind the tiles from Image to Color to a built in paper. If you want transparent background then choose color and set the strength to 0 and be sure to save your photo as PNG or TIFF (JPEG does not support transparency)
Panographic Tools - Image Tool
The 1) image tool allows you to move around and resize the image that is currently on the selected tiles. Step to use this is to select the tile(s) that you want to adjust the image on, then select this tool. The Image Tool will show a box where the image is currently at. Move the image by dragging the center of the image, rotate/resize the image by dragging one of the corner points, or resize the image by dragging the Top, Left, Right, or Bottom control point. You can use the 2) Reset button to reset the image back to the original location.
Panographic Tools - Add Tile Tool
This tool is a super simple tool. The only thing you can do is tap on the document to add a tile. Just keep in mind that if you "Auto Generate" these added tiles will go away.
Panographic Tools - Light Tool
This tool controls the overall lighting on your tiles. Photo Formation uses an incredibly realstic rendering engine to make the tiles look photo realistic with texture, lighting and real shadows that curl with the tiles. You can move the light around on the photo to change the direction the light is coming from, tap the "Edit" icon to tweak the lighting and shadows, and can tap on the "Duplicate" button to add in another light if you want multiple shadows. Moving the light to the edges will pronounce the curling of the tile, the texture of the tile, and the distance of the shadows. Each light will have unique settings and by changing which light is selected you can control each lights settings.
Tapping on the 1) Edit icon will bring up the settings for each light.
2) Light Strength - This controls the overall strength of the light. Higher values will pronounce the curves of the tiles, any curl applied to the tiles, and the texture applied to each tile. You can also change the color of the light by tapping on the color box. Be creative by changing the light color.
3) Shadow Strength - This controls how dark the shadows are. You can make this anything from subtle to dark and pronounced. The color picker box next to the Shadow Strength gives you the chance to pick that perfect shadow color or tone. And remember that each light has its own shadow and shadow color.
4) Shadow Height - Controls how far off the table or tile the shadow is. The higher the value the further each tile will look like it is off the table and each other. This will also slightly more pronounce the curl on each tile.
5) Shadow Softness - Controls how soft the shadow is.
6) Reset - Resets all of the lighting back to 1 light in the default area.

Photo Slice - General UI
1) Auto Generate - Tapping on this button will bring up the Auto Generate wizard where you can generate your fragmented image by choosing number of tiles, tile curl, texture of paper, conform shape, etc. Any changes you make while in this mode will overwite any work you have previously done. It is best to play around with this to get an idea of the creation process.
2) Multiple Select UI - This area will only show up if you have multiple tiles selected.
3) Photo Settings - This section only shows up if you have one or more tiles selected. This area adjusts all settings on the currently selected tile and any current settings on the selected tile(s) will be shown in the sliders. Making any change to one of the sliders will apply the settings to all the selected tiles.
4) Background - Controls the background style of the effect.
5) Tile Tool - This tool is the main tool that you will use in Photo Formation. You can use this to select a tile, select multiple tiles, and deselect all tiles. Once a tile is selected its settings can be adjusted in the "Photo Settings". You will also use this tool to move the tile around on screen by resizing or rotating the box by grabbing one of the corners.
6) Image Tool - Use this tool to move the image around inside of any selected tile. You can resize the image by grabbing a corner and moving it around. Move the whole image by tapping on the center area and moving it around.
7) Light Tool - Use this tool to move the light source around on the document. The icon on-screen is the representation of where in the world the light is coming from.
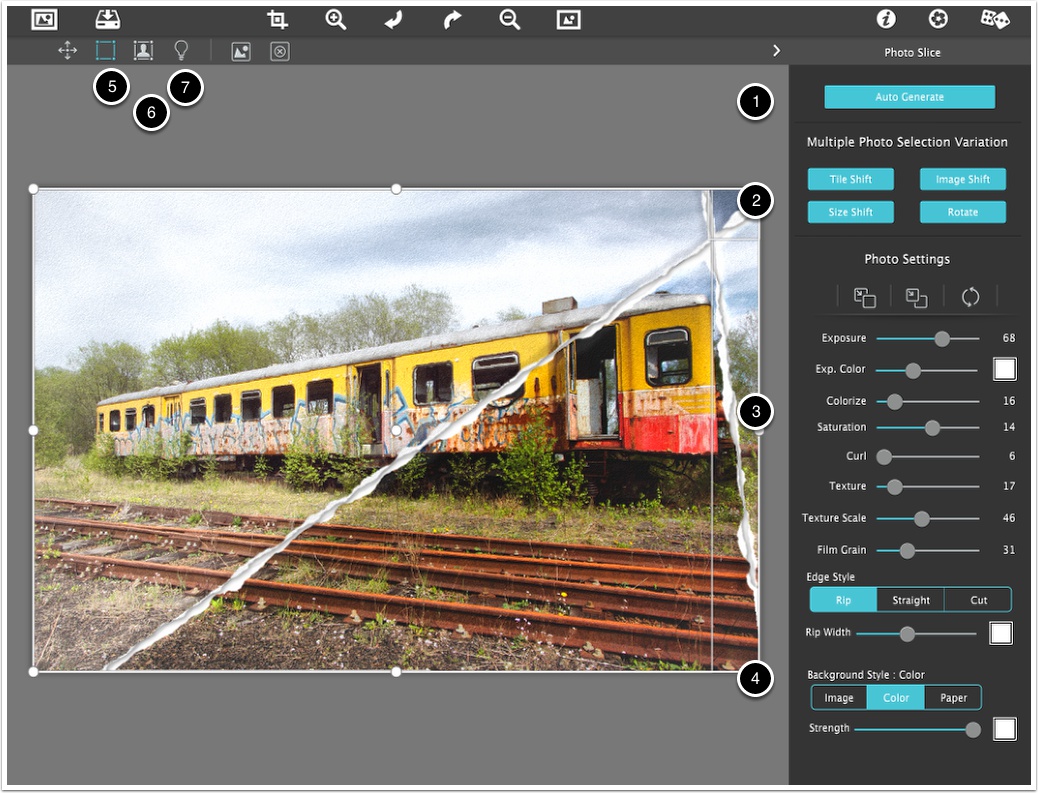
Photo Slice - Auto Generate
You will be using the Auto Generate mode to create your layout. Any changes in here will automatically cause the tiles to be updated with the new settings.
1) - Photo Slice is very similar to Panographic and Photo Weave in the auto generate section, however it has a very large change in that you will also be working on the document to add in cut-lines to your image. Photo Slice will automatically generate a few of the cut-lines and you can freely moves those generated by dragging anywhere on the line. You can resize and rotate the line by dragging one of the two endpoints, and you can delete the line by tapping on the "X". To draw a new line you click anywhere on the photo and drag. This will create a new 'fragment' out of the photo. Once you hit "Apply" at the bottom of the auto generate window the fragments will be rendered and ready to move or adjust.
2) Variation - Change this slider to control the 'randomization' that goes into each strip.
3) Image Shift - Controls how offset the image is on each tile.
4) Exposure - This controls the overal exposure of the tile. Moving the slider to the left will keep the photo exposure looking the same as the photo originally loaded into the app. Moving it to the right will give Photo Formation the freedom to change the photo exposure. What this means is that Photo Formation will slightly vary each tile so they look unique. The higher this value is on various tiles the more freedom you give Photo Formation to change the exposure on each tile. Exposure can be thought of us the time the photo is exposed to the light. The higher this value is the lighter the photo may become.
5) Exp. Color - This is more of an edge exposure. This will take the color chosen and combine this to expose the edges of the image to light. This control works very similar to exposure in that you are giving Photo Formation the freedom to make this amount more or less up to the maximum the slider value.
6) Colorize - This will add a sight color variation to your weave. When you take a photo with your camera it will componsate for the overal color tone in the scene. If you take multiple photos then each photo can have a slight tone difference. This is Photo Formations way of making the tiles realistic as if each one was taken with your camera separately and pieced together. Quite similar to Exposure in that each tile will be slightly different than the other tiles up to the maximum you set.
7) Saturate - Controls the overal saturation of the photo on each tile. Higher values will over-saturate the image and lesser values will de-saturate thie image. Just like Exposure, this control will set the amount of saturation variation happens on each tile. The bigger the number the more variation from tile to tile that Photo Formation will create.
8) Curl - How much corner curl is allowed to be applied to each tile.
9) Texture - Texture controls how much 'paper texture' is applied to each tile. This paper texture can simulate the look of dimpled photo paper. This will be the same value on tile rather than varied across.
10) Texture Scale - Controls how large the 'dimpled' photo texture looks on each tile. This will be the same value on tile rather than varied across.
11) Grain - Controls how much film grain is applied to a tile. This varies per tile up to the maximum set on this slider.
12) Edge Style - Would you like to see edges that are ripped, straight, or cut? This applies to all the tiles in the Auto Generate but you can change each tile to be different after you have applied.
13) Conform to Shape - Photo Weave will try to make strips that confrom to the shape chosen.
14) Reset/Grid - Randomizes some of the settings while resetting others to give a more uniform look. Useful if you make too drastic of changes and what to get back to a starting point and keep things in a grid pattern.
15) Random - Randomize the above settings. Very similar to the "Random Dice" button on the preset tab and the top of the app. Added here as a quick way to randomize things to get a general look and then tweak those settings to perfect the look you are after.

Photo Slice Tools - Tile Tool
There are 4 main tools in Panographic used to control the tiles, the image on the selected tiles, add tiles, and control the lighting.
1) Tile Tool - Used to move a tile around. Using the corners will resize and rotate the tile. Using the top, bottom, left, and right controls will resize just the width or height depending on which control you choose. You can select multiple objects by dragging a box around any tiles. Or you can use Ctrl/Cmd in combination with selecting tiles to add or delete from the current selection when tapping on a tile. Hitting the "Delete" key will delete any selected tile. (Hint. If the control points are too small to accurately grab the correct one you can zoom in on the document using the zoom button or Ctrl/Cmd +)
2) Load Image - Use this button to load in a custom image that is applied to just the selected tile(s).
3) Delete Image - Use this to delete any custom image loaded on the selected tile(s). After using this the image will default back to the original image chosen as your main image using the in Photo Formation (Get Photo button or drag and drop)

Photo Slice Tile Settings
Each tile will have its own settings. You can adjust the settings on one or more tiles by selecting the tiles with the Tile Tool (and alternatively selecting multiple tiles by dragging or using Ctrl/Cmd click).
There are 4 main sections. 1) Auto Generate, 2) Multiple Tile settings, 3) Photo Settings, and 4) Background. Auto Generate will always be visible. Multiple Tile settings will only be visible if 2 or more tiles are selected, Photo Settings will be visible if 1 or more tiles are selected, and Background will always be visible.
Tile Shift - This is under the multiple tile settings area. Each time you tap on this Photo Formation will 'shift' the currently selected tile(s) by a small amount. Tapping multiple times can slowly shift the tile around the document. Great for getting that 'randomized' look without have too much change or having to move each tile separately.
Image Shift - This is under the multiple tile settings area. Each time you tap on this Photo Formation will 'shift' the photo on each of the selected tiles by a small amount. Tapping multiple times can slowly shift the image around on the tiles.
Size Shift - This is under the multiple tile settings area. Each time you tap on this Photo Formation will resize the currently selected tile(s) by a small amount.
Rotate - This is under the multiple tile settings area. Each time you tap on this Photo Formation will rotate the currently selected tile(s) by a small amount.
Photo Settings - All of these controls are the same as in the "Auto Generate" section above. These settings only show up if you have 1 or more tiles selected and the settings on the sliders are the 'average' of all the selected tiles. Changing any of the sliders will set those values on all the selected tiles.
Background - Controls the overall background behind the tiles from Image to Color to a built in paper. If you want transparent background then choose color and set the strength to 0 and be sure to save your photo as PNG or TIFF (JPEG does not support transparency)
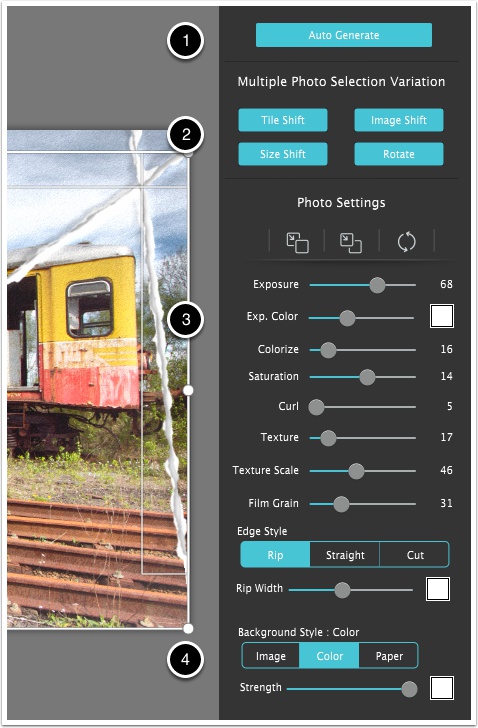
Photo Slice Tools - Image Tool
The 1) image tool allows you to move around and resize the image that is currently on the selected tiles. Step to use this is to select the tile(s) that you want to adjust the image on, then select this tool. The Image Tool will show a box where the image is currently at. Move the image by dragging the center of the image, rotate/resize the image by dragging one of the corner points, or resize the image by dragging the Top, Left, Right, or Bottom control point. You can use the 2) Reset button to reset the image back to the original location.
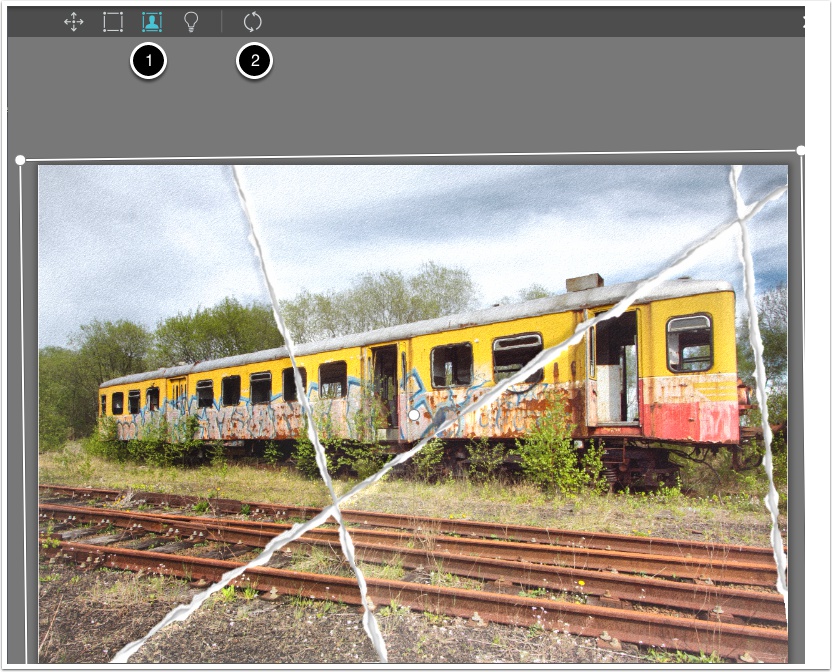
Photo Slice Tools - Light Tool
This tool controls the overall lighting on your tiles. Photo Formation uses an incredibly realstic rendering engine to make the tiles look photo realistic with texture, lighting and real shadows that curl with the tiles. You can move the light around on the photo to change the direction the light is coming from, tap the "Edit" icon to tweak the lighting and shadows, and can tap on the "Duplicate" button to add in another light if you want multiple shadows. Moving the light to the edges will pronounce the curling of the tile, the texture of the tile, and the distance of the shadows. Each light will have unique settings and by changing which light is selected you can control each lights settings.
Tapping on the 1) Edit icon will bring up the settings for each light.
2) Light Strength - This controls the overall strength of the light. Higher values will pronounce the curves of the tiles, any curl applied to the tiles, and the texture applied to each tile. You can also change the color of the light by tapping on the color box. Be creative by changing the light color.
3) Shadow Strength - This controls how dark the shadows are. You can make this anything from subtle to dark and pronounced. The color picker box next to the Shadow Strength gives you the chance to pick that perfect shadow color or tone. And remember that each light has its own shadow and shadow color.
4) Shadow Height - Controls how far off the table or tile the shadow is. The higher the value the further each tile will look like it is off the table and each other. This will also slightly more pronounce the curl on each tile.
5) Shadow Softness - Controls how soft the shadow is.
6) Reset - Resets all of the lighting back to 1 light in the default area.
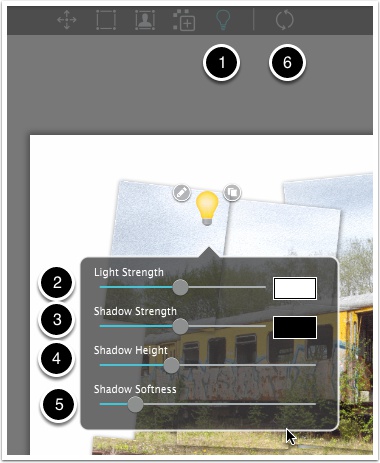
Photo Strips - General UI
1) Auto Generate - Tapping on this button will bring up the Auto Generate wizard where you can generate your Photo Slice by choosing number of tiles, tile curl, texture of paper, conform shape, etc. Any changes you make while in this mode will overwite any work you have previously done. It is best to play around with this to get an idea of the creation process.
2) Multiple Select UI - This area will only show up if you have multiple tiles selected.
3) Photo Settings - This section only shows up if you have one or more tiles selected. This area adjusts all settings on the currently selected tile and any current settings on the selected tile(s) will be shown in the sliders. Making any change to one of the sliders will apply the settings to all the selected tiles.
4) Background - Controls the background style of the effect.
5) Tile Tool - This tool is the main tool that you will use in Photo Formation. You can use this to select a tile, select multiple tiles, and deselect all tiles. Once a tile is selected its settings can be adjusted in the "Photo Settings". You will also use this tool to move the tile around on screen by resizing or rotating the box by grabbing one of the corners.
6) Image Tool - Use this tool to move the image around inside of any selected tile. You can resize the image by grabbing a corner and moving it around. Move the whole image by tapping on the center area and moving it around.
7) Add Tile Tool - Use this tool to add a tile wherever you click.
8) Light Tool - Use this tool to move the light source around on the document. The icon on-screen is the representation of where in the world the light is coming from.
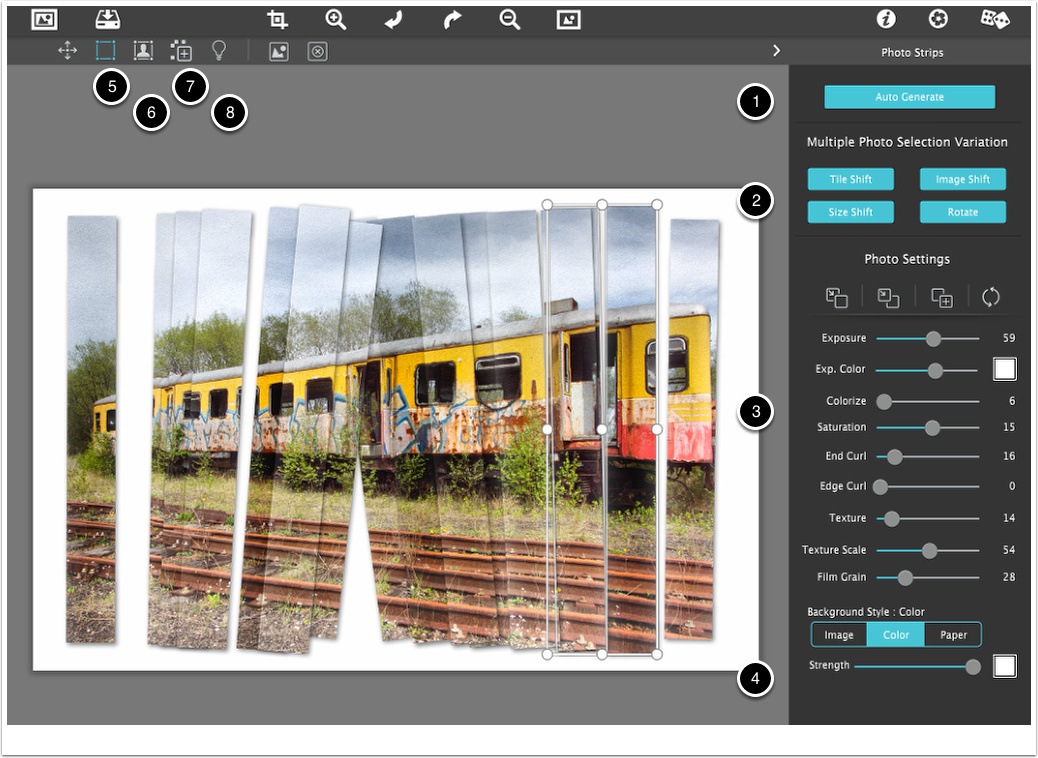
Photo Strips - Auto Generate
You will be using the Auto Generate mode to create your layout. Any changes in here will automatically cause the tiles to be updated with the new settings.
1) Photo Size - Controls the size of the tiles and the shape.
2) Photo Volume - Controls how many tiles are generated.
3) Variation - Change this slider to control the 'randomization' that goes into each strip.
4) Pull to Center - Pulls the tiles to the center by a varied amount. A setting of 0 on this will keep the tiles aligned in a grid and a value of 100 will pull the tiles towards the center.
5) Size Shift - Controls how varied the tile size is for each tile.
6) Rotation- Controls how varied the angle is on each tile.
7) Image Shift - Controls how offset the image is on each tile.
8) Exposure - This controls the overal exposure of the tile. Moving the slider to the left will keep the photo exposure looking the same as the photo originally loaded into the app. Moving it to the right will give Photo Formation the freedom to change the photo exposure. What this means is that Photo Formation will slightly vary each tile so they look unique. The higher this value is on various tiles the more freedom you give Photo Formation to change the exposure on each tile. Exposure can be thought of us the time the photo is exposed to the light. The higher this value is the lighter the photo may become.
9) Exp. Color - This is more of an edge exposure. This will take the color chosen and combine this to expose the edges of the image to light. This control works very similar to exposure in that you are giving Photo Formation the freedom to make this amount more or less up to the maximum the slider value.
10) Colorize - This will add a sight color variation to your tiles. When you take a photo with your camera it will componsate for the overal color tone in the scene. If you take multiple photos then each photo can have a slight tone difference. This is Photo Formations way of making the tiles realistic as if each one was taken with your camera separately and pieced together. Quite similar to Exposure in that each tile will be slightly different than the other tiles up to the maximum you set.
11) Saturate - Controls the overal saturation of the photo on each tile. Higher values will over-saturate the image and lesser values will de-saturate thie image. Just like Exposure, this control will set the amount of saturation variation happens on each tile. The bigger the number the more variation from tile to tile that Photo Formation will create.
12) End Curl - How much corner curl is allowed to be applied to each tile. This is basically the ends of the tile.
13) Edge Curl - How much curl is allowed to be applied to each tile. Edge curl is different from curl in that the long part of the tile is curved.
14 Texture - Texture controls how much 'paper texture' is applied to each tile. This paper texture can simulate the look of dimpled photo paper. This will be the same value on tile rather than varied across.
15) Texture Scale - Controls how large the 'dimpled' photo texture looks on each tile. This will be the same value on tile rather than varied across.
16) Film Grain - Controls how much film grain is applied to a tile. This varies per tile up to the maximum set on this slider.
17) Conform to Shape - Photo Weave will try to make strips that confrom to the shape chosen.
18) Reset/Grid - Randomizes some of the settings while resetting others to give a more uniform look. Useful if you make too drastic of changes and what to get back to a starting point and keep things in a grid pattern.
18) Random - Randomize the above settings. Very similar to the "Random Dice" button on the preset tab and the top of the app. Added here as a quick way to randomize things to get a general look and then tweak those settings to perfect the look you are after.
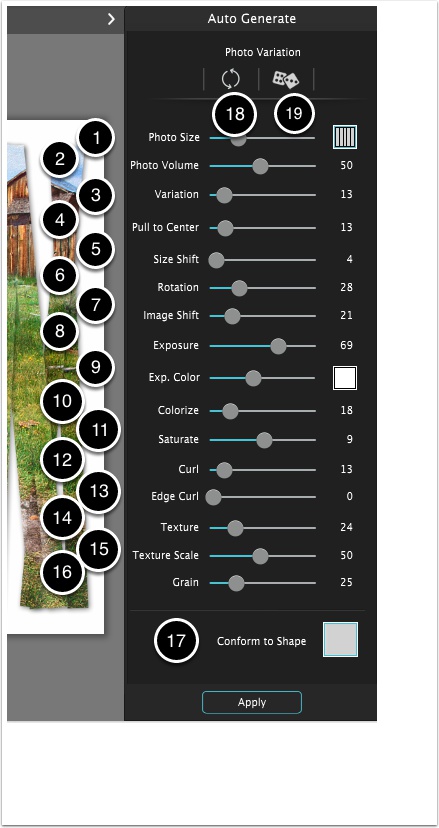
Photo Strips Tools - Tile Tool
There are 4 main tools in Photo Strips used to control the tiles, the image on the selected tiles, add tiles, and control the lighting.
1) Tile Tool - Used to move a tile around. Using the corners will resize and rotate the tile. Using the top, bottom, left, and right controls will resize just the width or height depending on which control you choose. You can select multiple objects by dragging a box around any tiles. Or you can use Ctrl/Cmd in combination with selecting tiles to add or delete from the current selection when tapping on a tile. Hitting the "Delete" key will delete any selected tile. (Hint. If the control points are too small to accurately grab the correct one you can zoom in on the document using the zoom button or Ctrl/Cmd +)
2) Load Image - Use this button to load in a custom image that is applied to just the selected tile(s).
3) Delete Image - Use this to delete any custom image loaded on the selected tile(s). After using this the image will default back to the original image chosen as your main image using the in Photo Formation (Get Photo button or drag and drop)
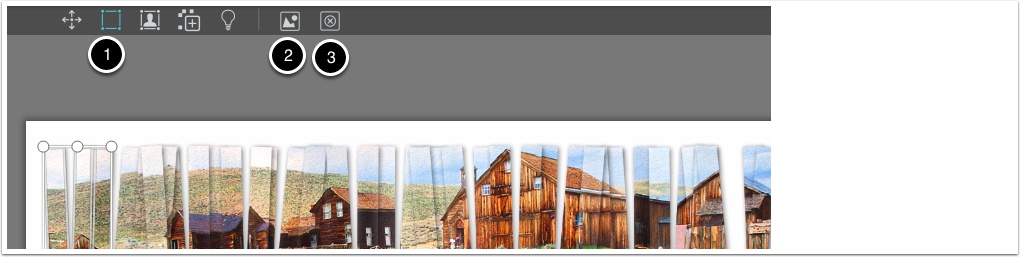
Photo Strips Tile Settings
Each tile will have its own settings. You can adjust the settings on one or more tiles by selecting the tiles with the Tile Tool (and alternatively selecting multiple tiles by dragging or using Ctrl/Cmd click).
There are 4 main sections. 1) Auto Generate, 2) Multiple Tile settings, 3) Photo Settings, and 4) Background. Auto Generate will always be visible. Multiple Tile settings will only be visible if 2 or more tiles are selected, Photo Settings will be visible if 1 or more tiles are selected, and Background will always be visible.
Tile Shift - This is under the multiple tile settings area. Each time you tap on this Photo Formation will 'shift' the currently selected tile(s) by a small amount. Tapping multiple times can slowly shift the tile around the document. Great for getting that 'randomized' look without have too much change or having to move each tile separately.
Image Shift - This is under the multiple tile settings area. Each time you tap on this Photo Formation will 'shift' the photo on each of the selected tiles by a small amount. Tapping multiple times can slowly shift the image around on the tiles.
Size Shift - This is under the multiple tile settings area. Each time you tap on this Photo Formation will resize the currently selected tile(s) by a small amount.
Rotate - This is under the multiple tile settings area. Each time you tap on this Photo Formation will rotate the currently selected tile(s) by a small amount.
Photo Settings - All of these controls are the same as in the "Auto Generate" section above. These settings only show up if you have 1 or more tiles selected and the settings on the sliders are the 'average' of all the selected tiles. Changing any of the sliders will set those values on all the selected tiles.
Background - Controls the overall background behind the tiles from Image to Color to a built in paper. If you want transparent background then choose color and set the strength to 0 and be sure to save your photo as PNG or TIFF (JPEG does not support transparency)
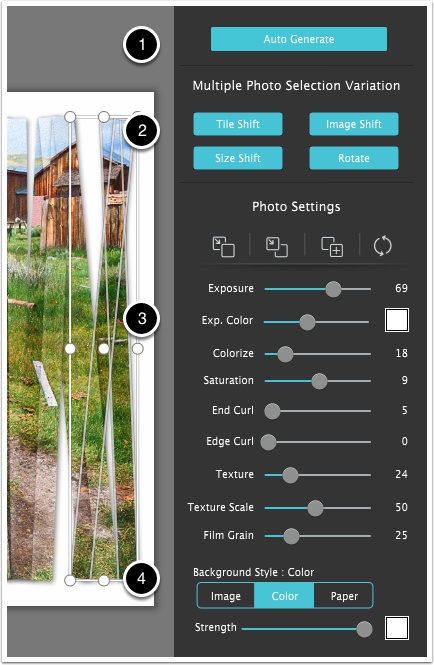
Photo Strips Tools - Image Tool
The 1) image tool allows you to move around and resize the image that is currently on the selected tiles. Step to use this is to select the tile(s) that you want to adjust the image on, then select this tool. The Image Tool will show a box where the image is currently at. Move the image by dragging the center of the image, rotate/resize the image by dragging one of the corner points, or resize the image by dragging the Top, Left, Right, or Bottom control point. You can use the 2) Reset button to reset the image back to the original location.
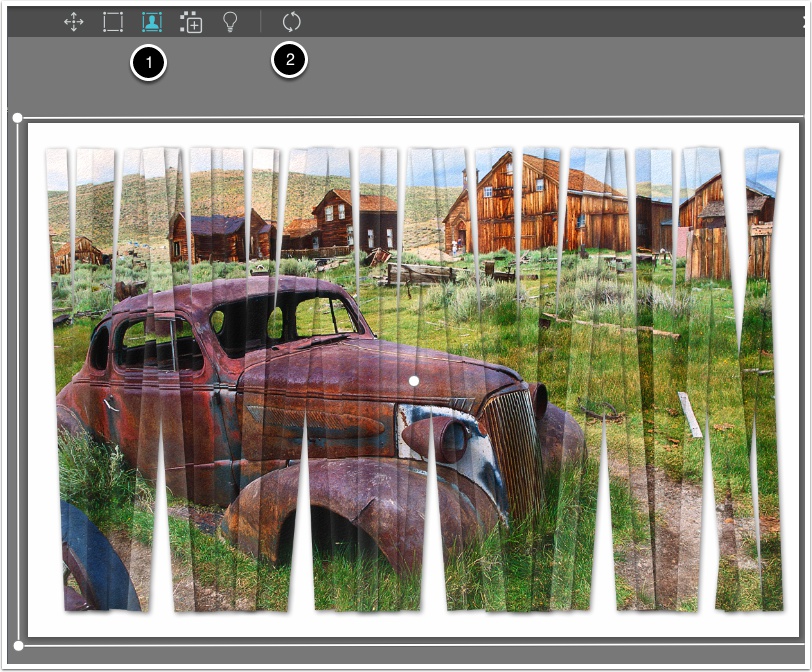
Photo Strips Tools - Add Tile Tool
This tool is a super simple tool. The only thing you can do is tap on the document to add a tile. Just keep in mind that if you "Auto Generate" these added tiles will go away.
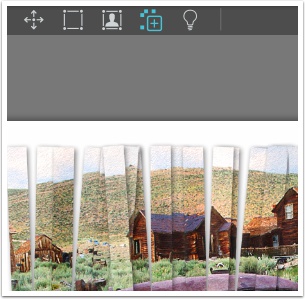
Photo Strips Tools - Light Tool
This tool controls the overall lighting on your tiles. Photo Formation uses an incredibly realstic rendering engine to make the tiles look photo realistic with texture, lighting and real shadows that curl with the tiles. You can move the light around on the photo to change the direction the light is coming from, tap the "Edit" icon to tweak the lighting and shadows, and can tap on the "Duplicate" button to add in another light if you want multiple shadows. Moving the light to the edges will pronounce the curling of the tile, the texture of the tile, and the distance of the shadows. Each light will have unique settings and by changing which light is selected you can control each lights settings.
Tapping on the 1) Edit icon will bring up the settings for each light.
2) Light Strength - This controls the overall strength of the light. Higher values will pronounce the curves of the tiles, any curl applied to the tiles, and the texture applied to each tile. You can also change the color of the light by tapping on the color box. Be creative by changing the light color.
3) Shadow Strength - This controls how dark the shadows are. You can make this anything from subtle to dark and pronounced. The color picker box next to the Shadow Strength gives you the chance to pick that perfect shadow color or tone. And remember that each light has its own shadow and shadow color.
4) Shadow Height - Controls how far off the table or tile the shadow is. The higher the value the further each tile will look like it is off the table and each other. This will also slightly more pronounce the curl on each tile.
5) Shadow Softness - Controls how soft the shadow is.
6) Reset - Resets all of the lighting back to 1 light in the default area.