It’s all about the edge! There is something artistic about the old days of plate photography. The silky smooth images and fabulously artistic edges are just amazing to look at.
Before the days of digital or film photography, photographers had to process their images using glass plates, metal plates, and paper to get their final image. These processes took tremendous skill and passion to produce the final product. Some of the processing techniques even required the processing of the glass plate within minutes of taking the photograph. Boy have times changed!
Until today you had only a few choices if you wanted to recreate some of the old-style photo art. You would pick a stock photo and blend it into your photography. And since there are only a few choices you were left with your artwork starting to look so familiar. Chromatic Edges changes all that and gives you unlimited artistic photography styles while only taking a few steps to create.
JixiPix harnessed the power of machine learning and thousands of hours of artistic human creativity to developm an unlimited assortment of edges, textures, and scratches into a simple and gorgeous product that will make any photographer or artist fall in love in seconds. And the great thing is…even if you know nothing about the fabulous photo techniques from a hundred years ago you will still appreciate the possibilities and creativity you can achieve with Chromatic Edges.
Chromatic Edges is filled to the brim with styles. Easily create Calotypes, Cyanotyps, Daguerreotypes, Gelatin Silver Plates, Tintype, Autochrome, Ambrotype, Carbon Print, Aristotype, Salted Paper Print, colored edges, and thousands of styles in between.
JixiPix takes vintage to a whole new extreme. Gone are the days of having a few tiny choices when it comes to adding flare to your imagery. Chromatic Edges harkens back to the days of glass, silver and paper plates.
Chromatic Edges
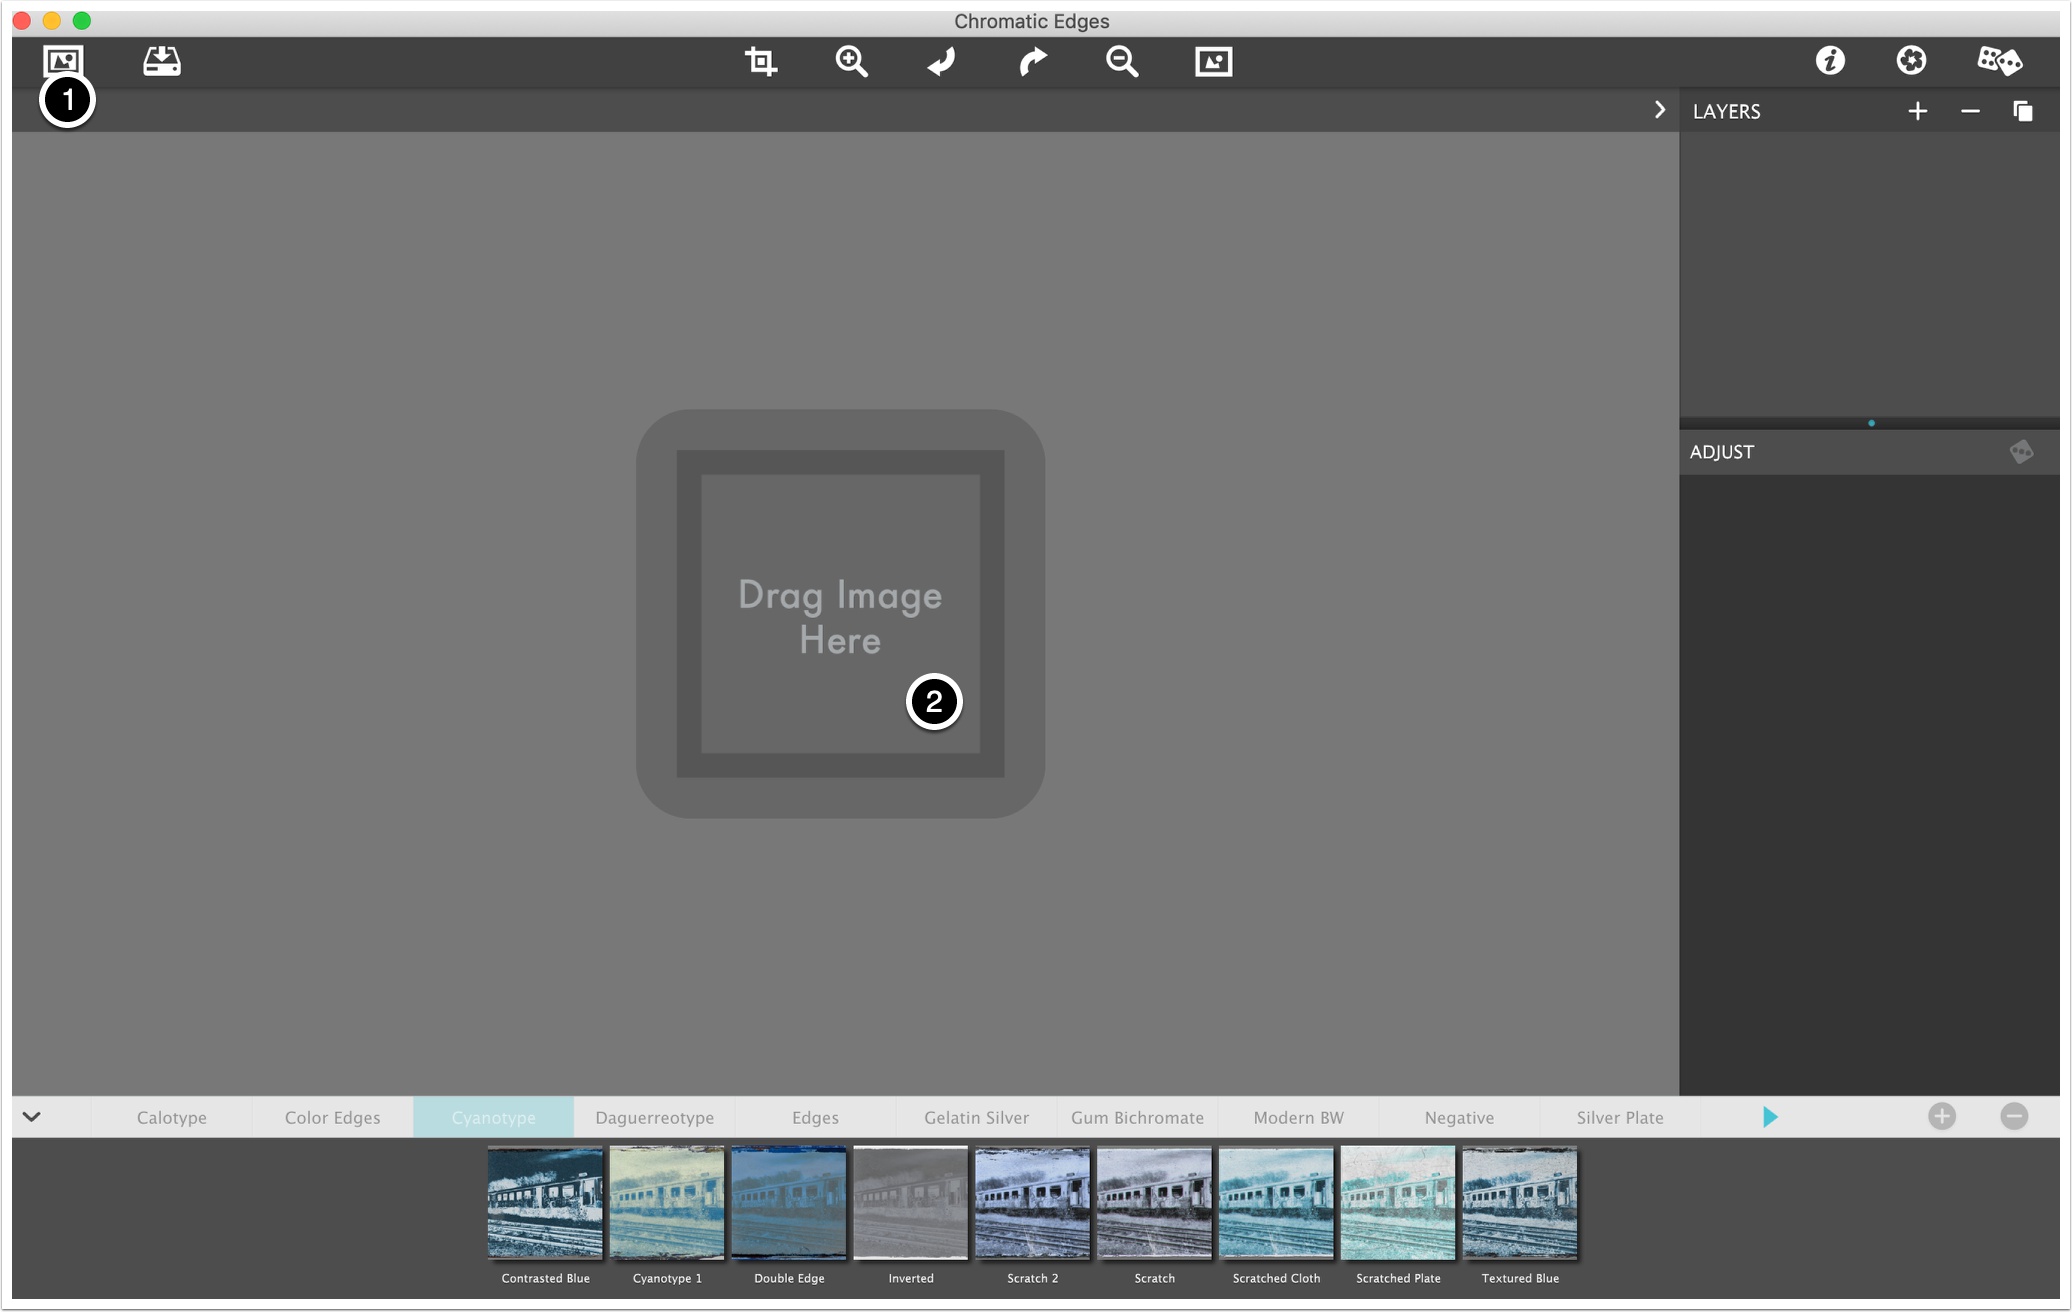
When you first launch Chromatic Edges you will be presented with a familiar JixiPix UI.
This is the screen that will be presented when first launching Chromatic Edges. You have 2 choices to load an image.
- Click on the "Get Photo" button in the upper left
- Drag and drop and image onto the main window

Initial User Inteface
This next screen shows the initial user interface when the first image is opened inside the application. The following items are general, however, once your familiar with them they will apply to all the JixiPix applications.
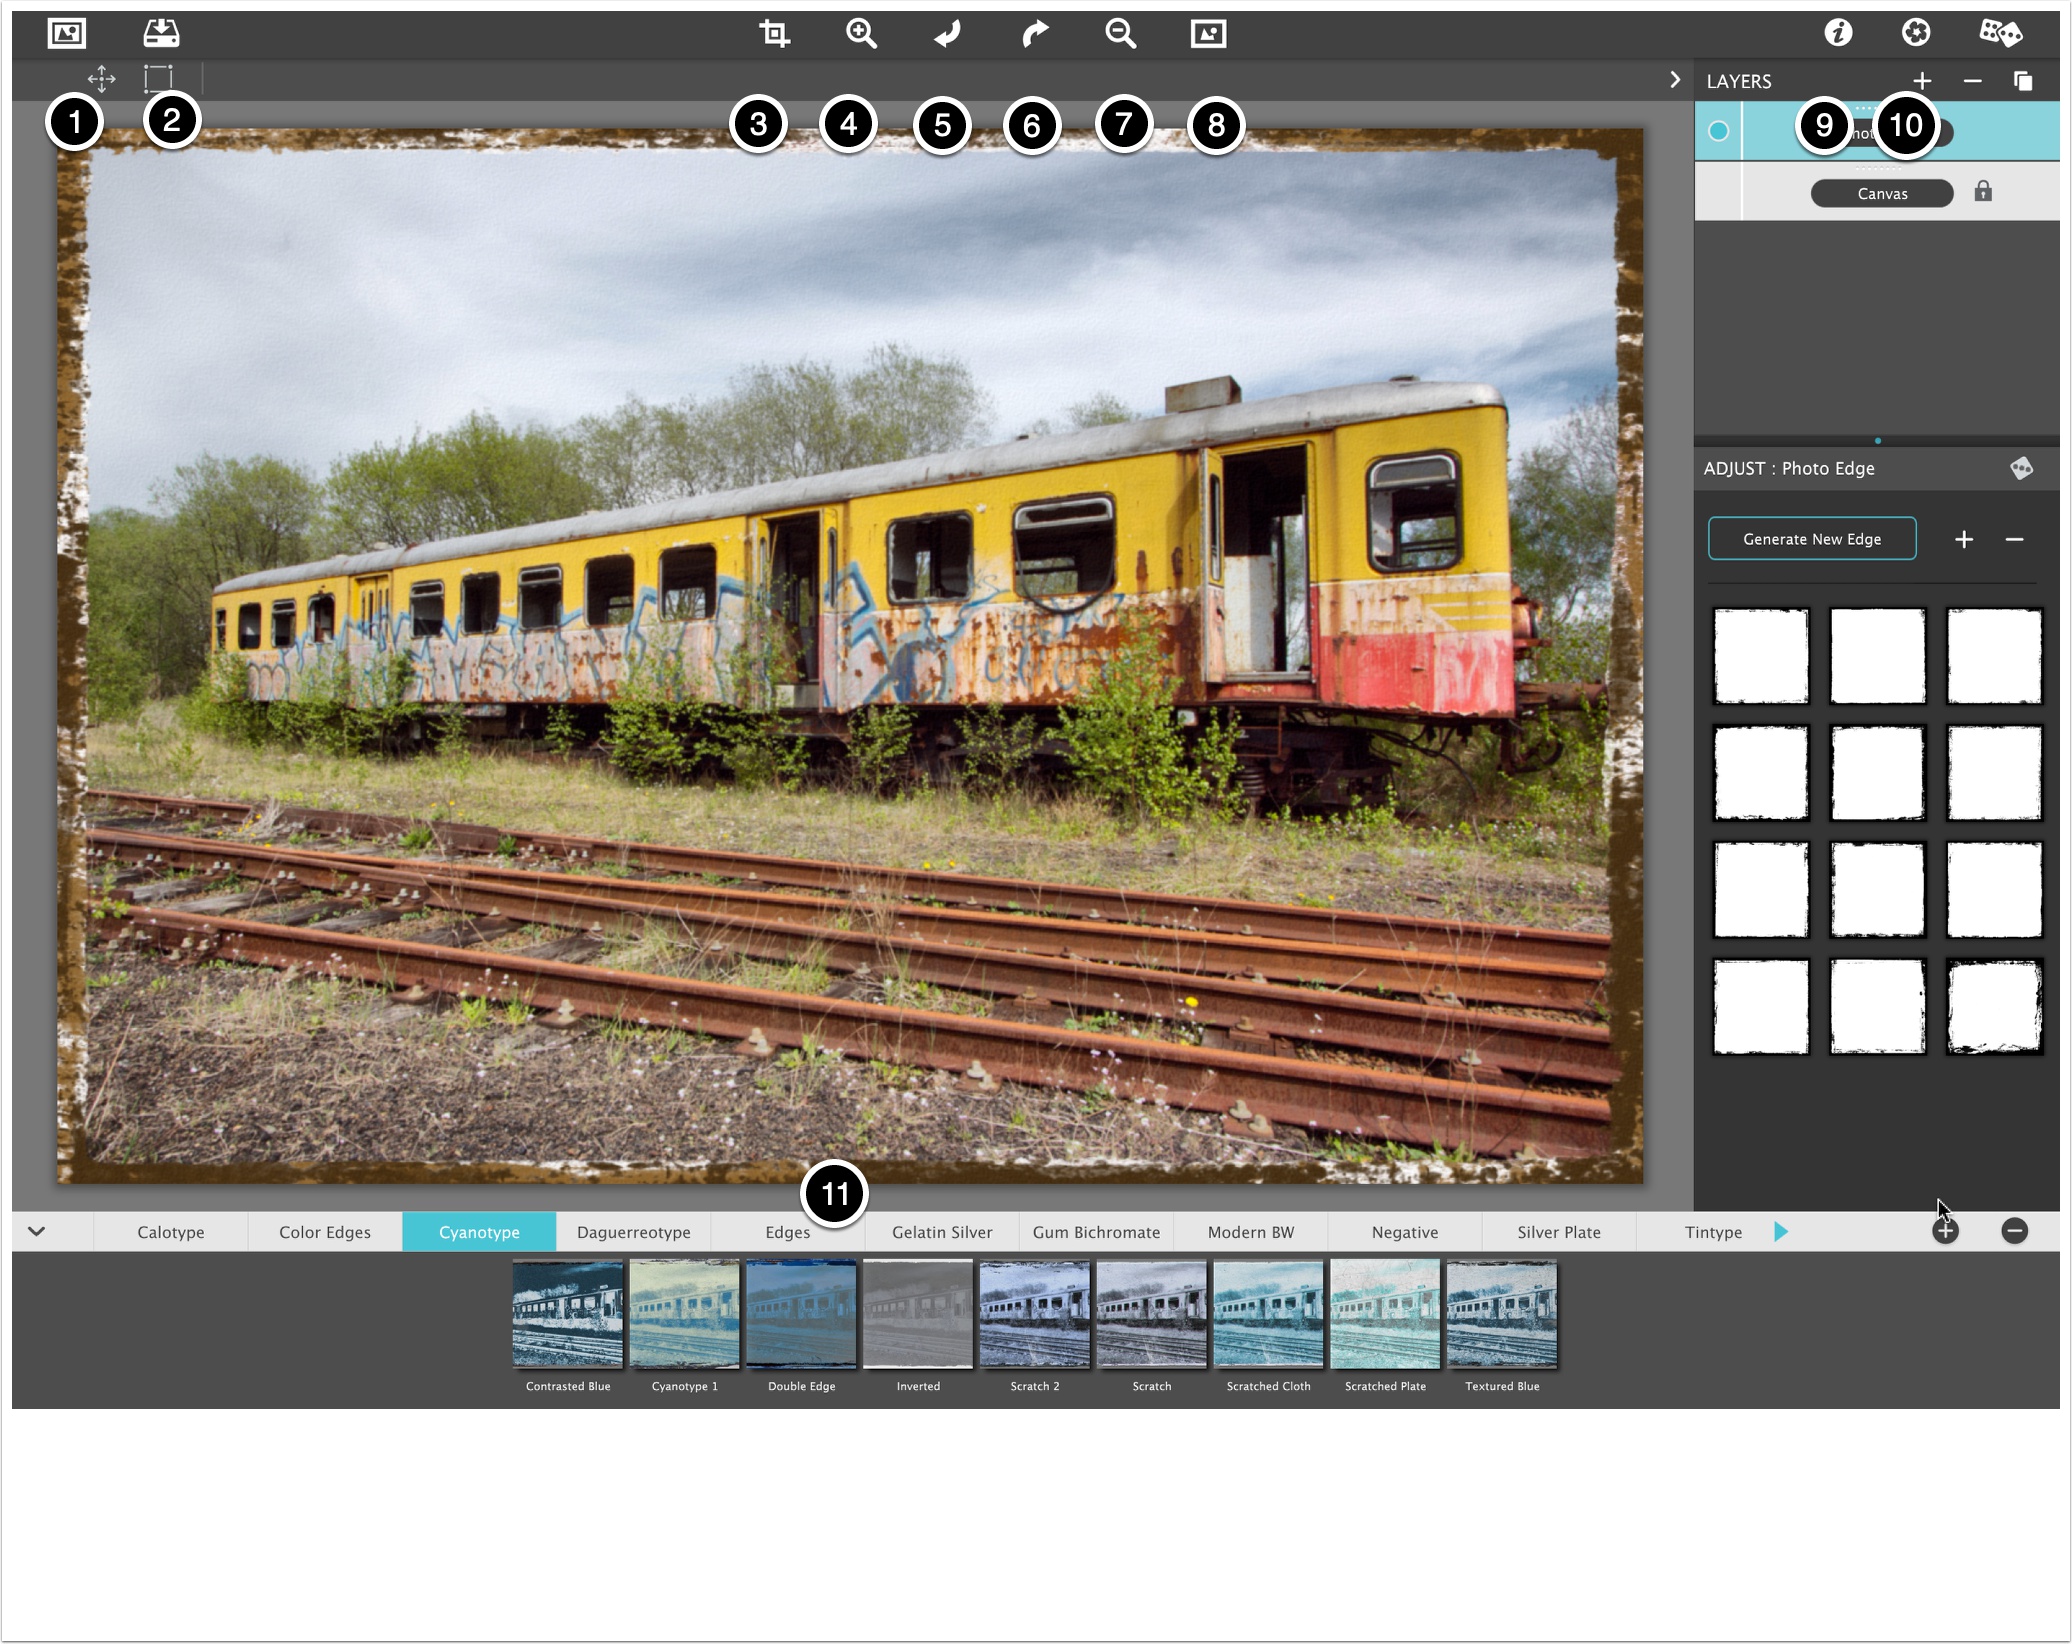
1) Get Image Button. Used to load in an image to process inside of Chromatic Edges. You can also drag and drop an image into Chromatic Edges at any time and the document will switch to that current Photo. (Be careful when doing this as your process will start over).
2) Save Image Button. This will bring up a small menu where you can choose to Save Photo, Save Preset, Bring up this Info page, and get info on other JixiPix Products, etc. This menu will be described in detail in another section.
3) Crop Button. Use this dialog to crop your photo. This is very useful to cut out areas you do not want in your final images.
4) Zoom In Button. Zoom In on your image, or use keyboard Cmd + or Ctrl + on Windows.
5) Undo Button. Undo to your previous step, or use keyboard Cmd Z or Ctrl Z on Windows.
6) Redo Button. Redo to a previous step forward. This only works after hitting Undo at least once, or use keyboard Cmd Shift Z or Ctrl Shift Z.
7) Zoom Out Button. Zoom Out on your image (Cmd - or Ctrl -). You can also use keyboard Cmd 0 or Ctrl 0 to quickly make your photo fit into the window.
8) Original Button. Click on this button and hold it down to see your original loaded photo. This is very useful when doing minor changes to photo and lets you compare the before photo to the rendered one. Click and release to get a view of before and after.
9) Info Button. Will bring up this Info page inside of the app.
10) Product Button. Shows other great JixiPix products :-)
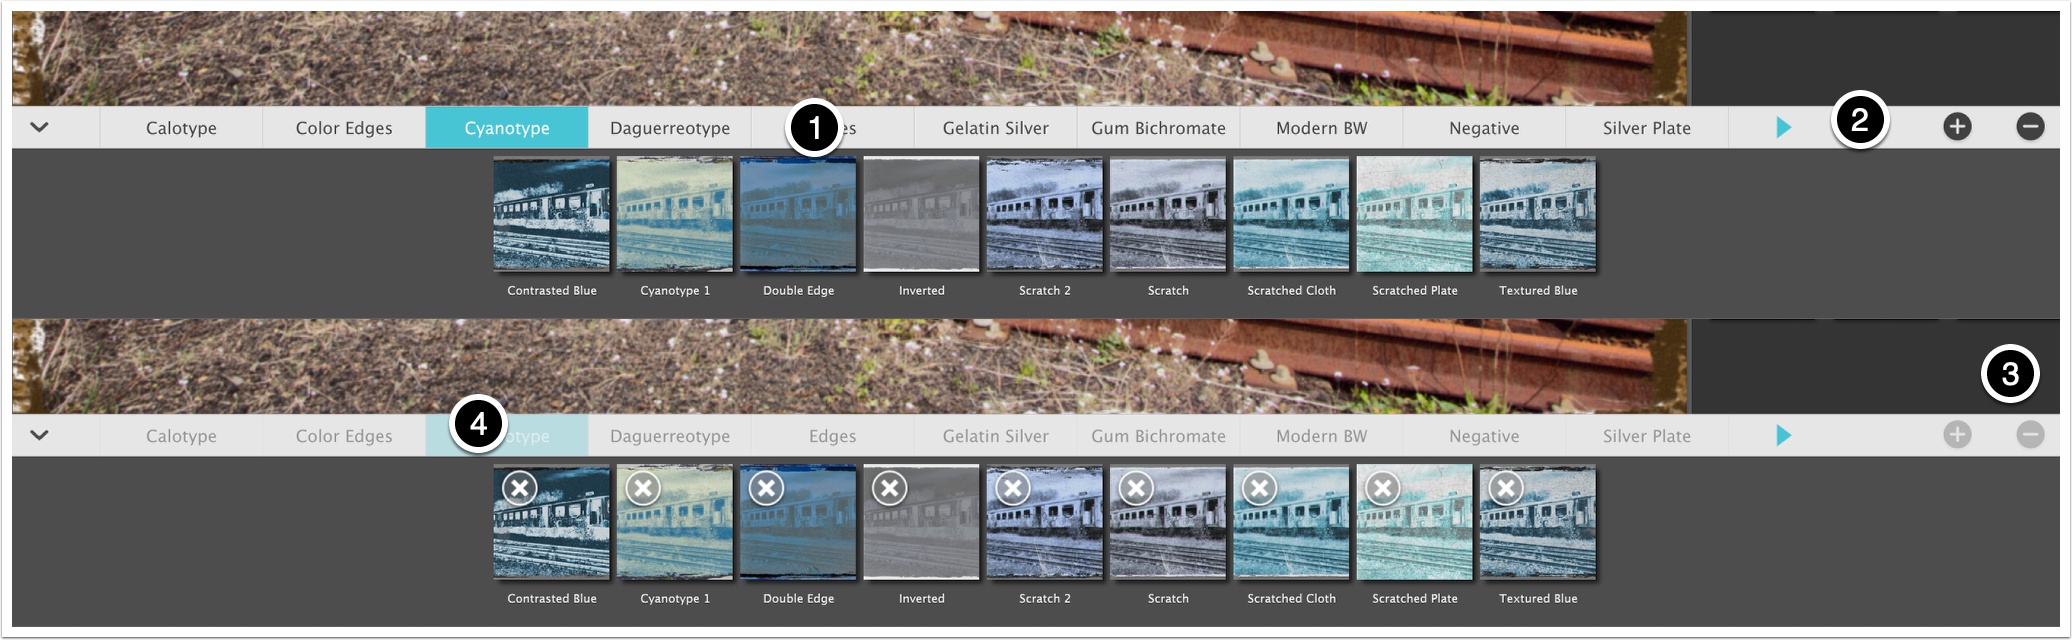
11) Preset Browser. For a quick start this is where you will begin. Click through the Presets on the bottom of the app after an image is placed in the app. We refer to this section as the 'Browser' or 'Preset' section. Presets are a quick way to load in pre-defined 'looks' for your image and includes everything you need to recreate this 'look' at the point you saved it.
Presets
Chromatic Edges has a very powerful preset system. A preset is a 'snapshot' of everything you are working on except your initial image. You can play back this presets on any new image you load. This gives you the ability create a fabulous look once, then play it back (or use it as a starting point) for future images. When you save a preset everything you have been working on is captured like settings, layers, brushed areas and more, into put in a nice tidy package represented as thumbnail that you will find in the browser or preset section at the bottom. You also have the ability to name your presets when you save them, delete existing presets, save 'layer' presets, and mark some of your presets as favorite to move them up to the beginning of the 'Preset' section.
1) Once you load in an image you can click through presets to playback your settings, or test out the ones included with Chromatic Edges. Doing this is simple, just tap on one of the thumbnails at the bottom. Once you do this the system will apply that preset and render your image into a painting.
2) If you have a great look that you want to save as a painting just hit the '+' button and then give it a name. (Names have to be unique and the system will ask if you want to replace an existing one.)
3) To delete a preset you can either tap the '-' button or hold down on a preset for a second. Once you do this a series of 'X's will show up over top of the thumbnails and you can tap this to delete the preset. Clicking anywhere else on the document will then turn off the 'delete' mode.
4) To favorite a preset, hold down on any preset and keep holding until you see the hearts. Selecting a heart will move that preset to the front of the list. Super useful if you create a preset you use often. Again, tapping anywhere will disable this mode to continue work as normal.
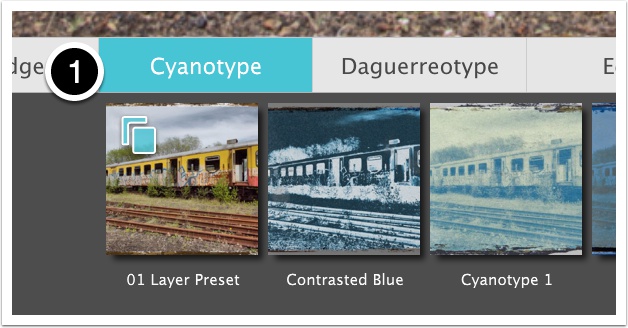
Layer Presets
Layer Presets are very similar to regular presets except for a couple of notable exceptions. First is that only the currently selected layers will be saved as a preset. Second, a 'Layer Preset' that is tapped on in the 'Preset' section is added into the layer system rather than replacing everything. And third, a 'Layer Preset' has a custom icon (1) in the 'Preset' section to signify that it is a layer preset.
Layers
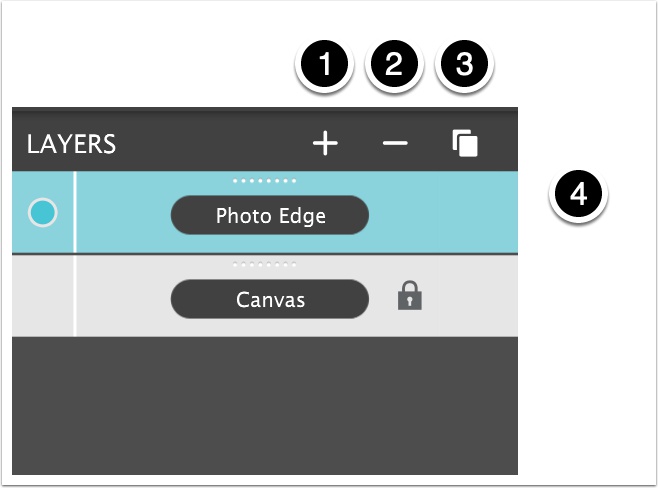
The power of Chromatic Edges is it's smart layer system. For you to get custom looks you will utilize this layering system adding and stacking multiple layers. This system allows you to combine these layers to make your photo unique.
1) Add Layer. This will bring up a menu of all layer types available in Chromatic Edges. Selecting one will add the layer above the currently selected layer.
2) Delete Layer. This will delete the currently selected layer(s). To delete multiple layers hold the keyboard Cmd/Ctrl key while selecting each layers you want to delete, then delete.
3) Layer Menu. This menu has a few fun things in it which will be described shortly.
4) Active Layer. To select a layer just click or tap on it. To move the layer use the drag dots (top of each layer), hold for a second, then move. This will allow you to drag layers above or below the current one(s). Tapping on the name will allow you to rename the layer (very useful to keep track of layers when you get multiple involved).
Add Layer Menu
Tapping on the "+" button will bring up the available layer types. Tapping on any of these will add a layer above the currently selected layer. In Chromatic Edges the layer types are as follows:
Photo Edge: The Photo Edge layer is one of three layer types that deal with edges and is probably the main type. This particular one applies the edge as a mask by cutting out the outside area where the edge is at.
Color Edge: This layer deals with edges it by putting the edge fill with color behind the image. Kind of like adding 2 Photo Edge layers and the one behind is color.
Outside Edge: The 'Outside Edge' layer is used to put a outside only edge. More of a border style edge.
Adjustment Layer: This is the layer you would use to make adjustments to your image like brightness, contrast, saturation, etc.
Texture: The 'Texture' layer is used, as the name implies, to add texture to your image using colors or masking.
Scratches: Adds very realistic and natural looking scratch textures to your image.
Chromatic: Used to change your image into all sorts of color styles.
Black & White: Used to change the image into various black and white styles.
Grain: Adds natural film grain to the image.
Soft Focus: This layer adds a soft focus to the image by softly blurring the image while blending it into the photo.
Drop Shadow: Adds a drop shadow to your photo that is applied outside the edges and image.

Layer Menu
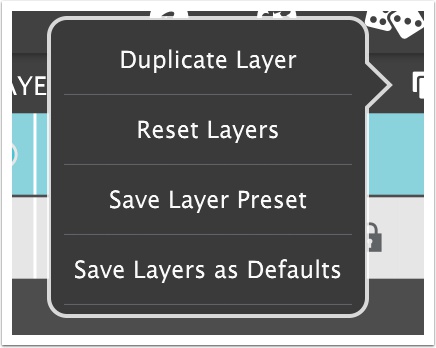
This menu has a few useful features available.
Duplicate Layer: Choosing this duplicates the currently selected layer(s) and stacks it above the currently selected one.
Reset Layers: Resets all layers back to their defaults. Using this will delete all layers and reset them back to the default settings. Useful when you are just playing around and want to get back to the start.
Save Layer Preset: This will save the current selected layer(s) as a "Layer Preset". This layer preset is similar to a regular preset except that when you play it back it will only 'add' to your existing layers rather than replace them. (See more in the Preset description below.)
Save Layers as Defaults: This will save your current layer settings and everytime you load in a photo these settings will get applied.
Layer Settings
You can get to Layer Settings by selecting a single layer. Doing this will load a control panel below the layer palette with all the settings that pertain to this layer. Here is where you will adjust settings and customize the painting to your own preference. (Please note, if you choose multiple layers the settings will hide.)
On the layer(s) you will also find several layer features:
1) Visible Button: Layer(s) can be hidden or shown by using this circular button. Invisible layers are quite useful when you want to see lower layers look without having an upper layer obstructing the view.
2) Locked Layer: A lock icon has been placed on the Canvas Layer to prevent it from being moved or deleted.
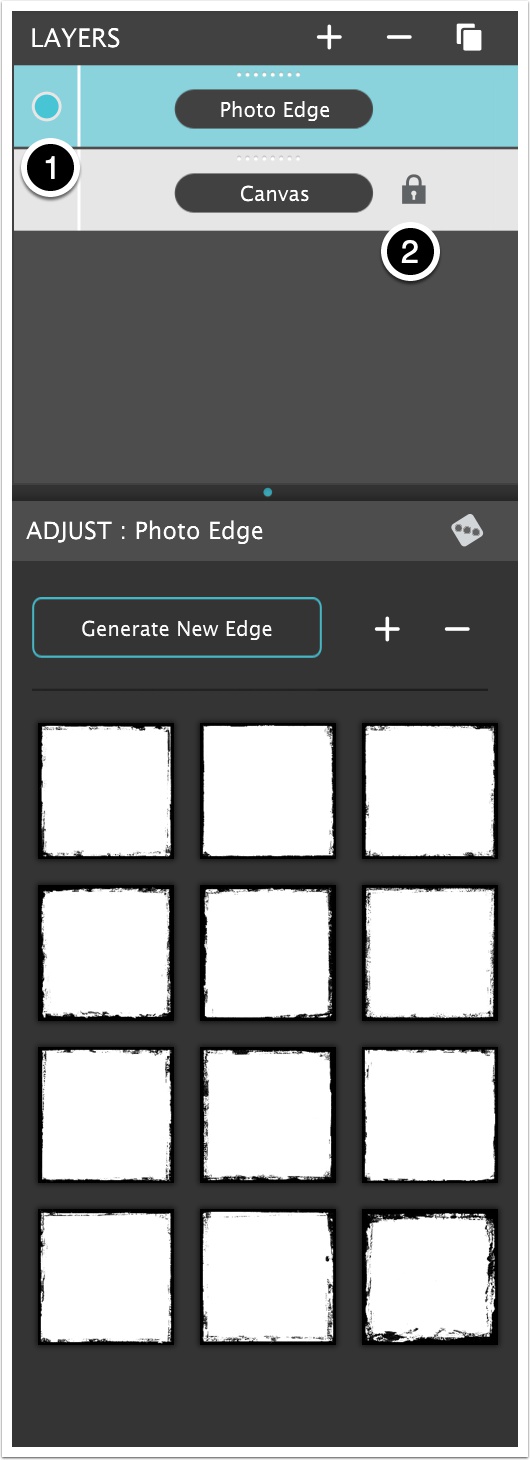
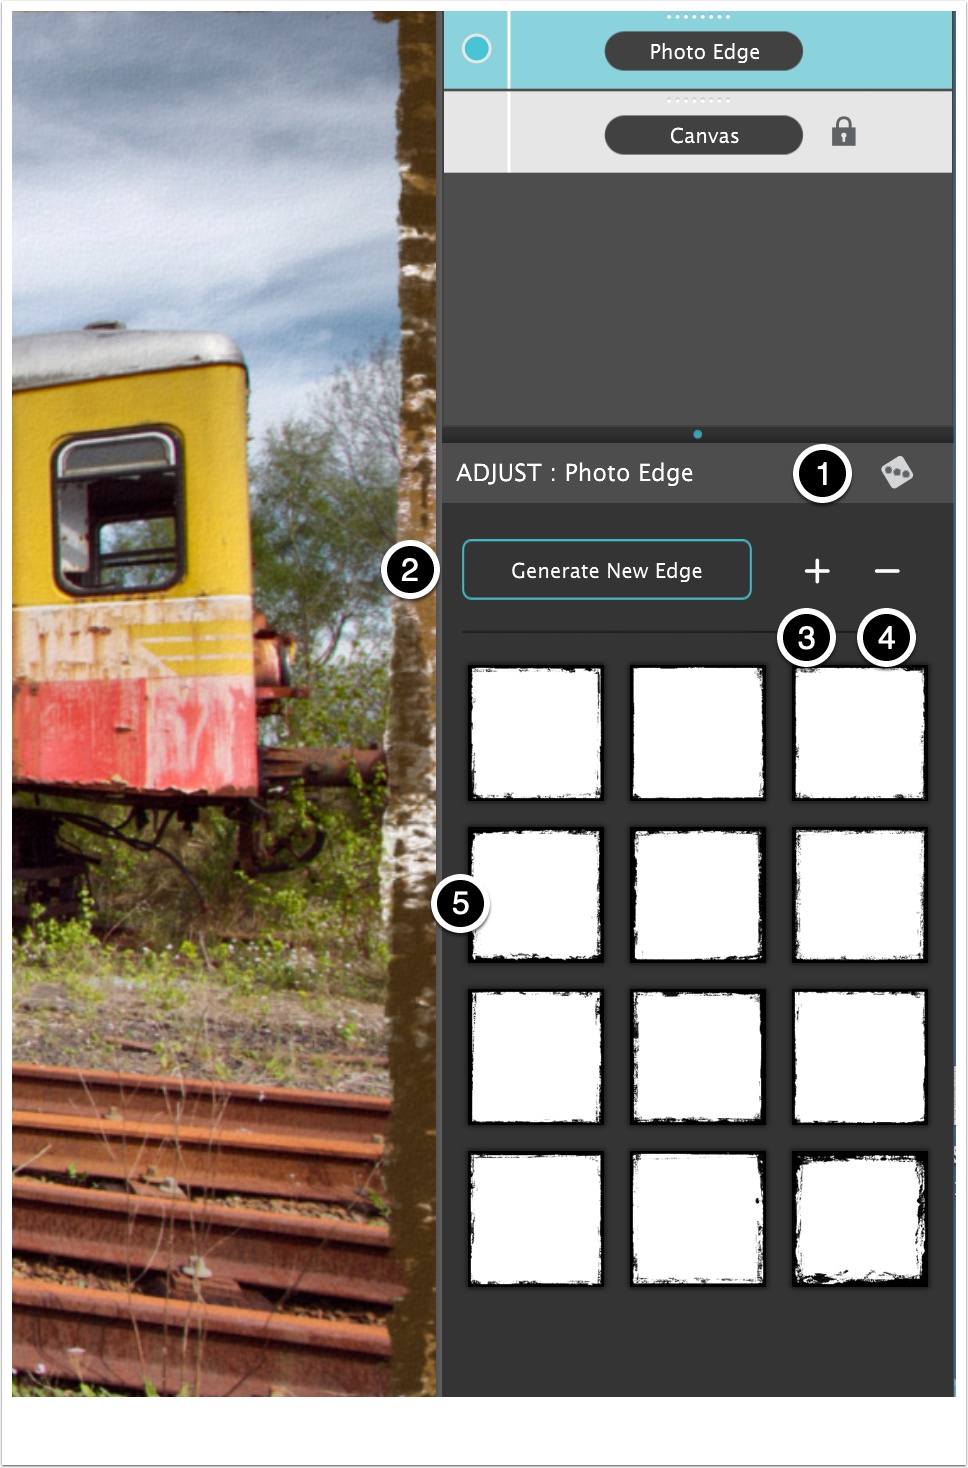
Photo Edge Layer
The Photo Edge layer is one of three layer types that deal with edges. This particular one applies the edge as a mask by cutting out the outside area where the edge is at.
1) Randomize Settings: Tapping the dice icon will randomize the settings on this layer.
2) Generate New Edge: Tapping this button will cause the Machine Learning part of Chromatic Edges to generate a completely unique edge and apply it to your image.
3) Save Edge: Tapping the '+' will save the currently generated edge for later reuse. After it is saved a small thumbnail will show up in the list of preview edges.
4) Delete Edge: Tapping on this will delete the currently selected edge in the list of preview edges list.
5) Preview Edges List: This list shows all the thumbnails from the edges that you have saved for future use (or JixiPix shipped with). Tapping one will cause the current edge on the image to change into the selected edge.
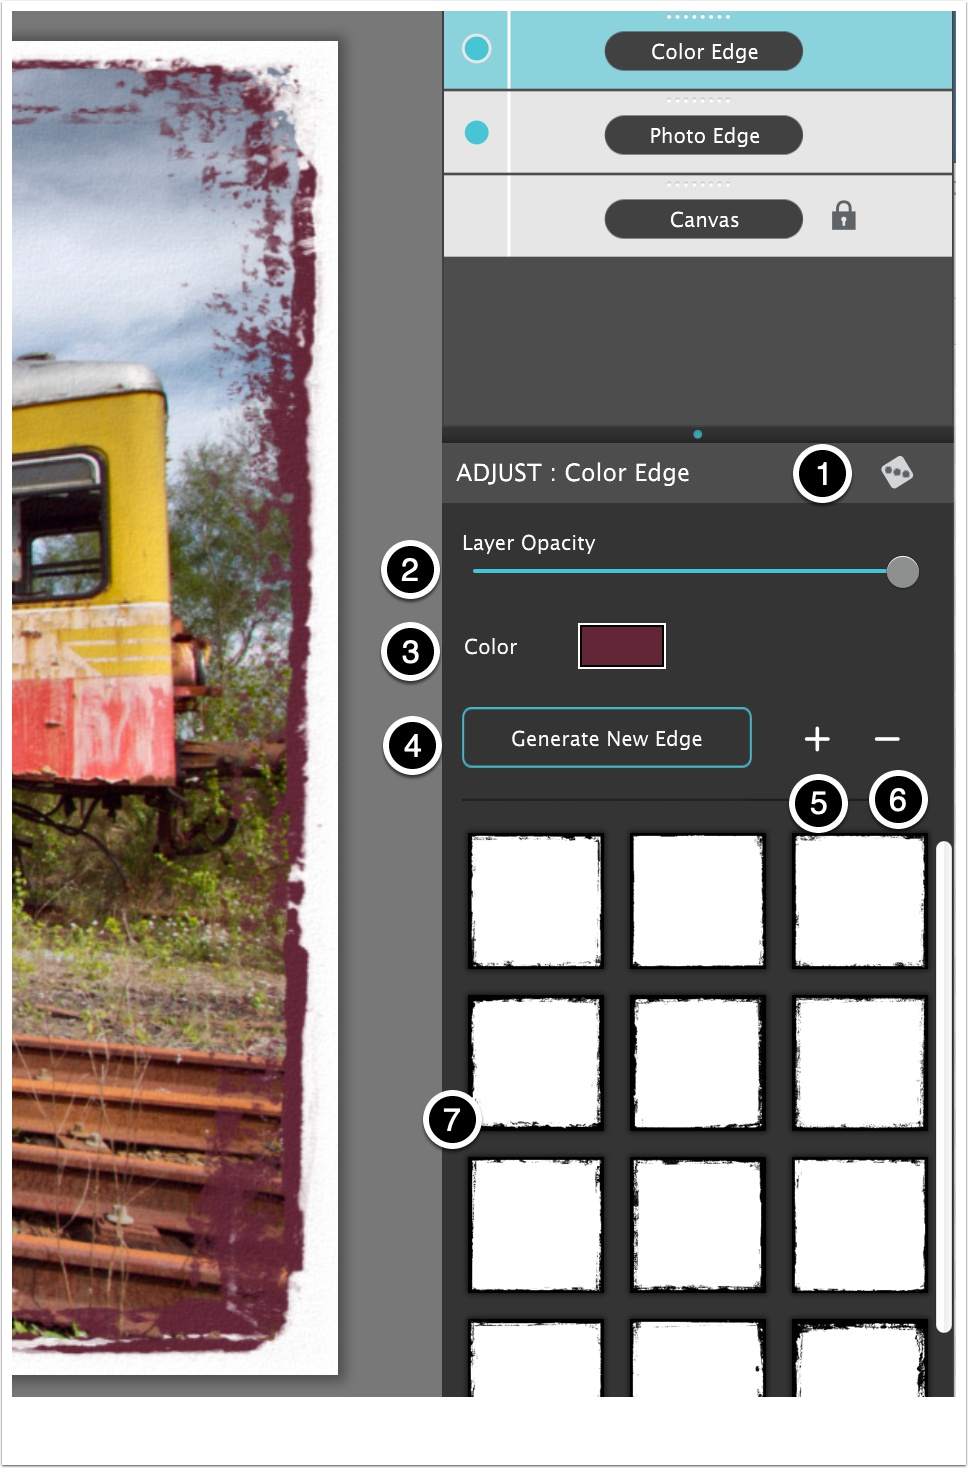
Color Edge Layer
The 'Color Edge' layer is another layer that works with edges. However this layer does it by putting the edge fill with color behind the image (and if there is no edge on the image then this layer will not do anything). In the example below you can see the purple color is applied to the outside of the edge from the 'Photo Edge' layer below.
1) Randomize Settings: Tapping the dice icon will randomize the settings on this layer.
2) Layer Opacity: Controls how strong the overal layer is. A value to the left will have less color visible and further to the right will have more color visible.
3) Color: This is the color that will show up behind the other previous layer.
4) Generate New Edge: Tapping this button will cause the Machine Learning part of Chromatic Edges to generate a completely unique edge and apply it to your image.
5) Save Edge: Tapping the '+' will save the currently generated edge for later reuse. After it is saved a small thumbnail will show up in the list of preview edges.
6) Delete Edge: Tapping on this will delete the currently selected edge in the list of preview edges list.
7) Preview Edges List: This list shows all the thumbnails from the edges that you have saved for future use (or JixiPix shipped with). Tapping one will cause the current edge on the image to change into the selected edge.
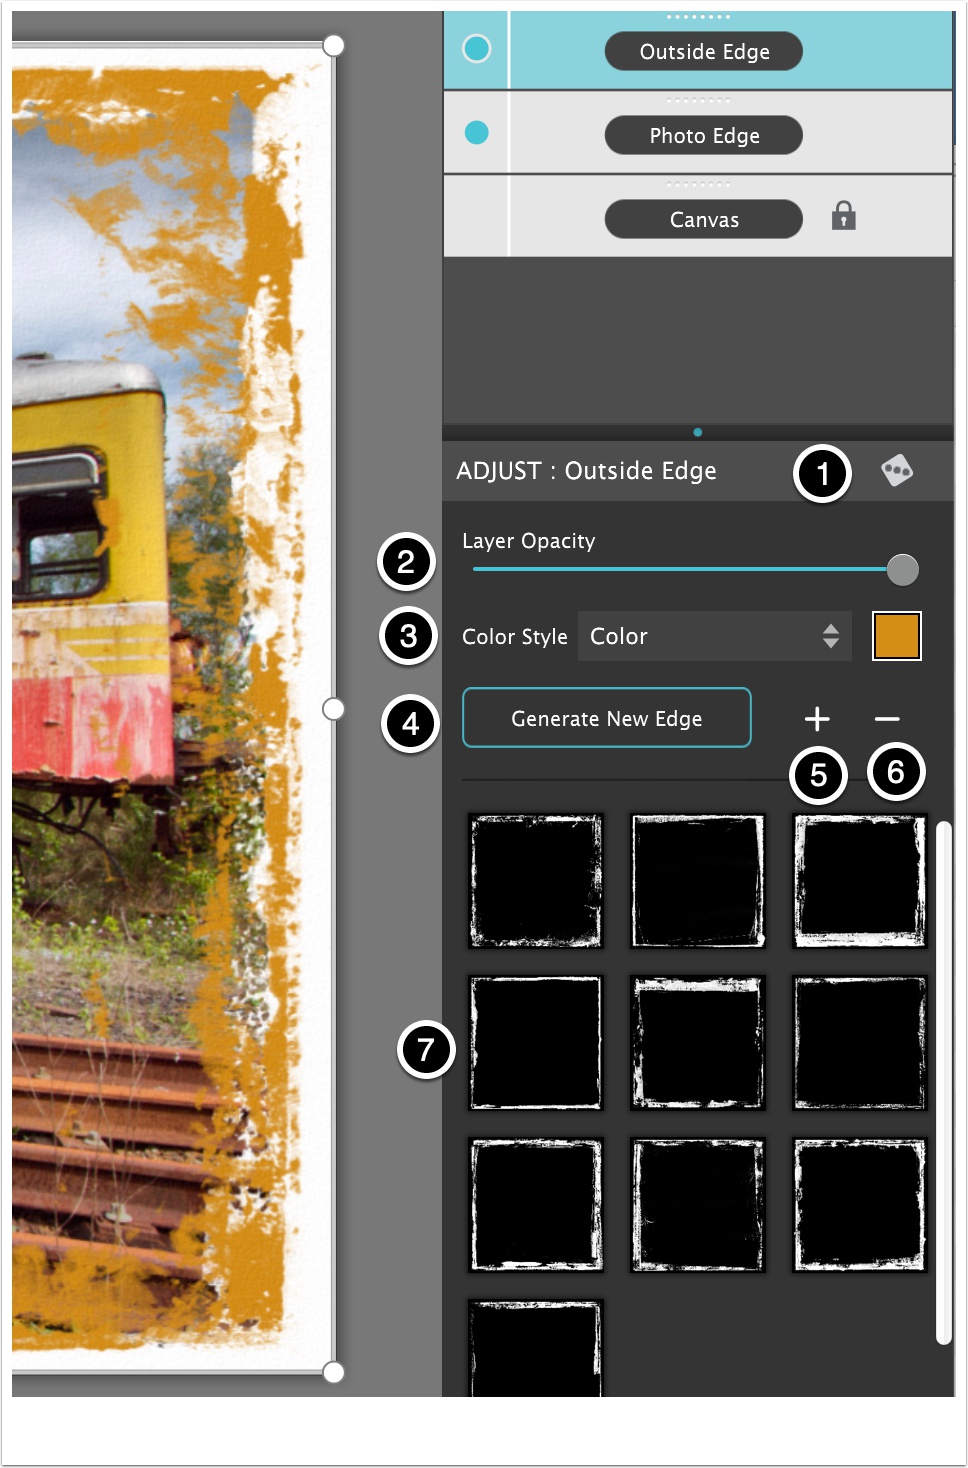
Outside Edge Layer
The 'Outside Edge' layer is used to put a outside only edge. If you look at the sample below the brown color is applied only to the outside edge.
1) Randomize Settings: Tapping the dice icon will randomize the settings on this layer.
2) Layer Opacity: Controls how strong the overal layer is. A value to the left will have less color visible and further to the right will have more color visible.
3) Color Style: This controls how the color is 'composited' onto the layers below it. This menu includes a lot of choices and will give a huge variation for each style.
4) Generate New Edge: Tapping this button will cause the Machine Learning part of Chromatic Edges to generate a completely unique edge and apply it to your image.
5) Save Edge: Tapping the '+' will save the currently generated edge for later reuse. After it is saved a small thumbnail will show up in the list of preview edges.
6) Delete Edge: Tapping on this will delete the currently selected edge in the list of preview edges list.
7) Preview Edges List: This list shows all the thumbnails from the edges that you have saved for future use (or JixiPix shipped with). Tapping one will cause the current edge on the image to change into the selected edge.
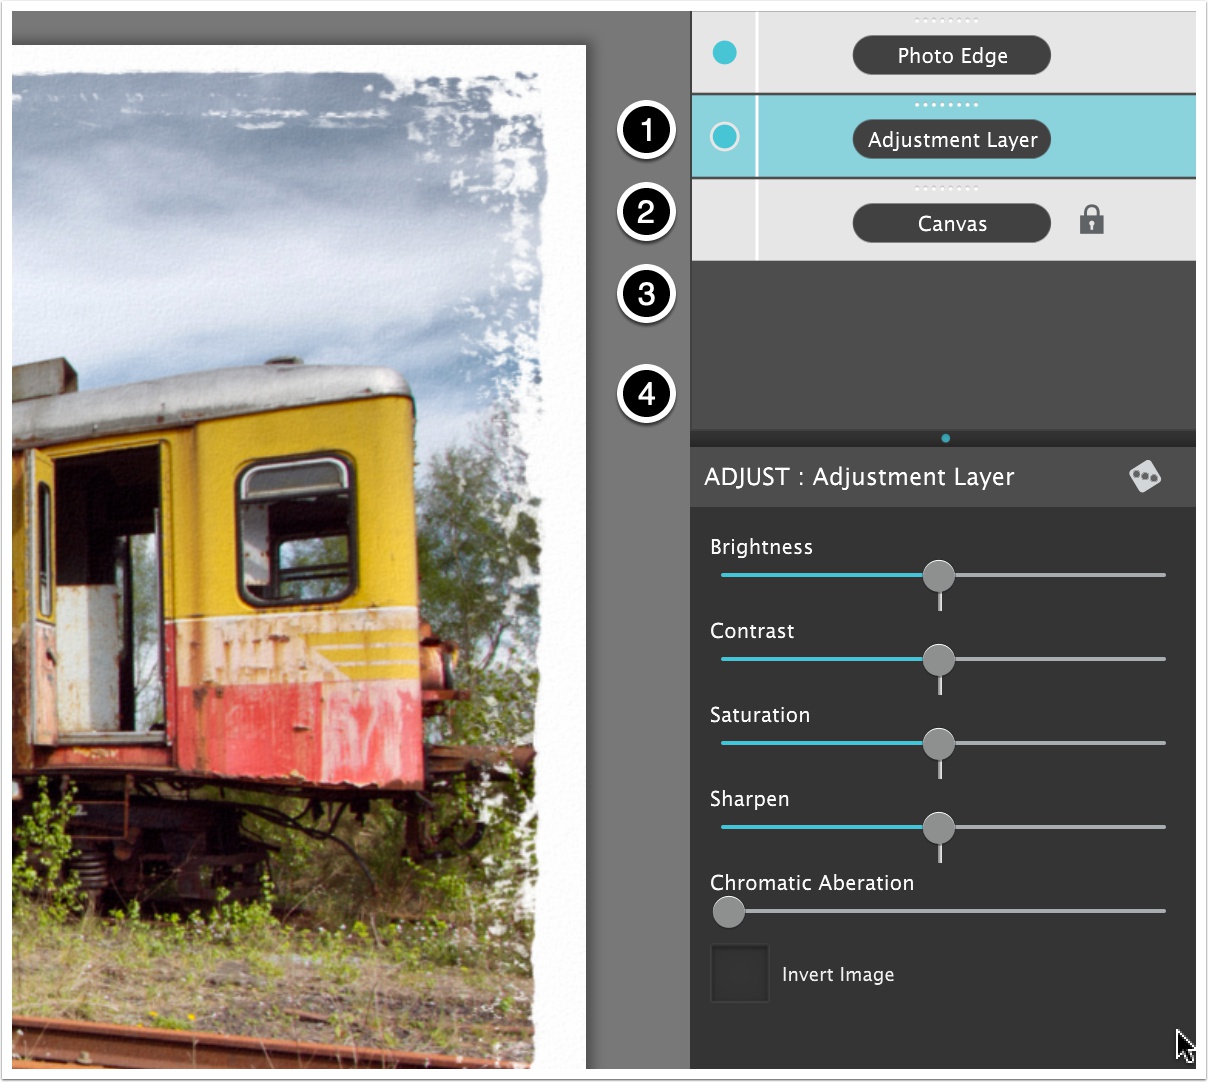
Adjustment Layer
This is the layer you would use to make adjustments to your image (or layers below it). Basic things like Brightness, Contrast, Saturation, Sharpen and Invert Image. The other slider is 'Chromatic Aberation'. 'Chromatic Aberation' is the fine details when the colors of light are not perfectly aligned in your lens (for traditional photography). It can help give the photo an 'old' quality to it or 'instant' style photo.
You would typically use this layer underneath your 'edge' layers but it is not required and when combining to make cool images its easy to have this above edges as well.
Texture Layer
The 'Texture' layer is used, as the name implies, to add texture to your image. The settings are very similar to 'Outside Edge'
1) Randomize Settings: Tapping the dice icon will randomize the settings on this layer.
2) Layer Opacity: Controls how strong the overal layer is. A value to the left will have less color visible and further to the right will have more color visible.
3) Color Style and Color: This controls how the color is 'composited' onto the layers below it. This menu includes a lot of choices and will give a huge variation for each style.
4) Generate New Texture: Tapping this button will cause the Machine Learning part of Chromatic Edges to generate a completely unique texture and apply it to your image.
5) Save Texture: Tapping the '+' will save the currently generated texture for later reuse. After it is saved a small thumbnail will show up in the list of preview textures.
6) Delete Texure: Tapping on this will delete the currently selected texture in the list of preview edges list.
7) Preview Texture List: This list shows all the thumbnails from the textures that you have saved for future use (or JixiPix shipped with). Tapping one will cause the current texture on the image to change into the selected texture.

Scratches Layer
The 'Scratches' layer is used, as the name implies, to add scratches to your image. The settings are the same as the 'Texture' layer.
1) Randomize Settings: Tapping the dice icon will randomize the settings on this layer.
2) Layer Opacity: Controls how strong the overal layer is. A value to the left will have less color visible and further to the right will have more color visible.
3) Color Style and Color: This controls how the color is 'composited' onto the layers below it. This menu includes a lot of choices and will give a huge variation for each style.
4) Generate New Texture: Tapping this button will cause the Machine Learning part of Chromatic Edges to generate a completely unique texture and apply it to your image.
5) Save Texture: Tapping the '+' will save the currently generated texture for later reuse. After it is saved a small thumbnail will show up in the list of preview textures.
6) Delete Texure: Tapping on this will delete the currently selected texture in the list of preview edges list.
7) Preview Texture List: This list shows all the thumbnails from the textures that you have saved for future use (or JixiPix shipped with). Tapping one will cause the current texture on the image to change into the selected texture.

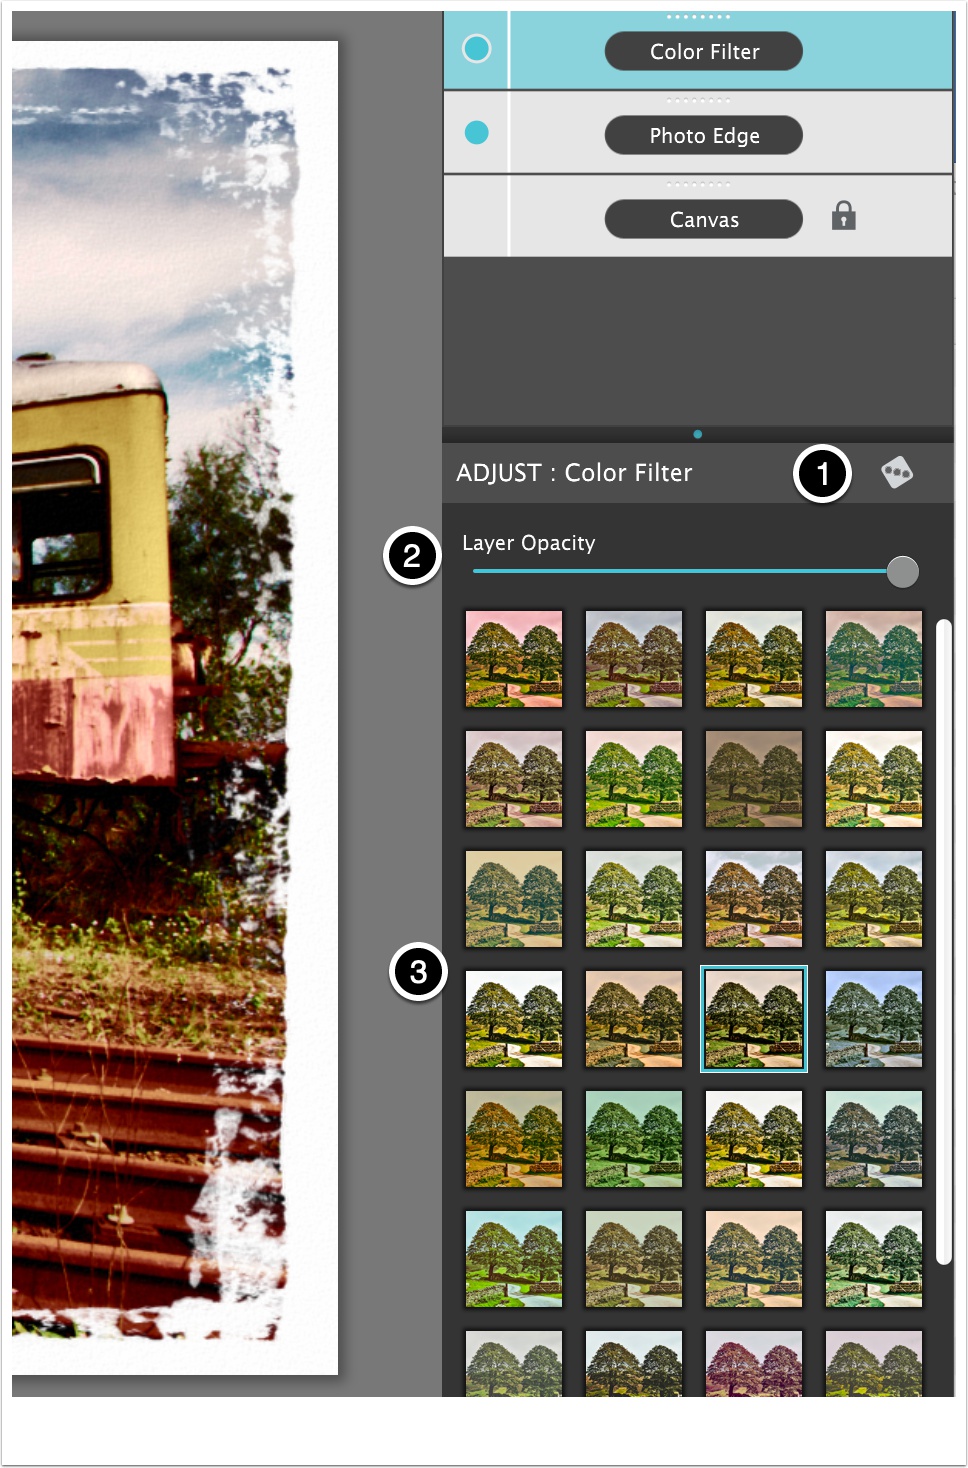
Chromatic
Chromatic is used to change your image into all sorts of color styles.
1) Randomize Settings: Tapping the dice icon will randomize the settings on this layer.
2) Layer Opacity: Controls how strong the overal layer is. A value to the left will have less color visible and further to the right will have more color visible.
3) Color Filter List: This list shows thumbnails of all the different color filters that you can apply to your image.
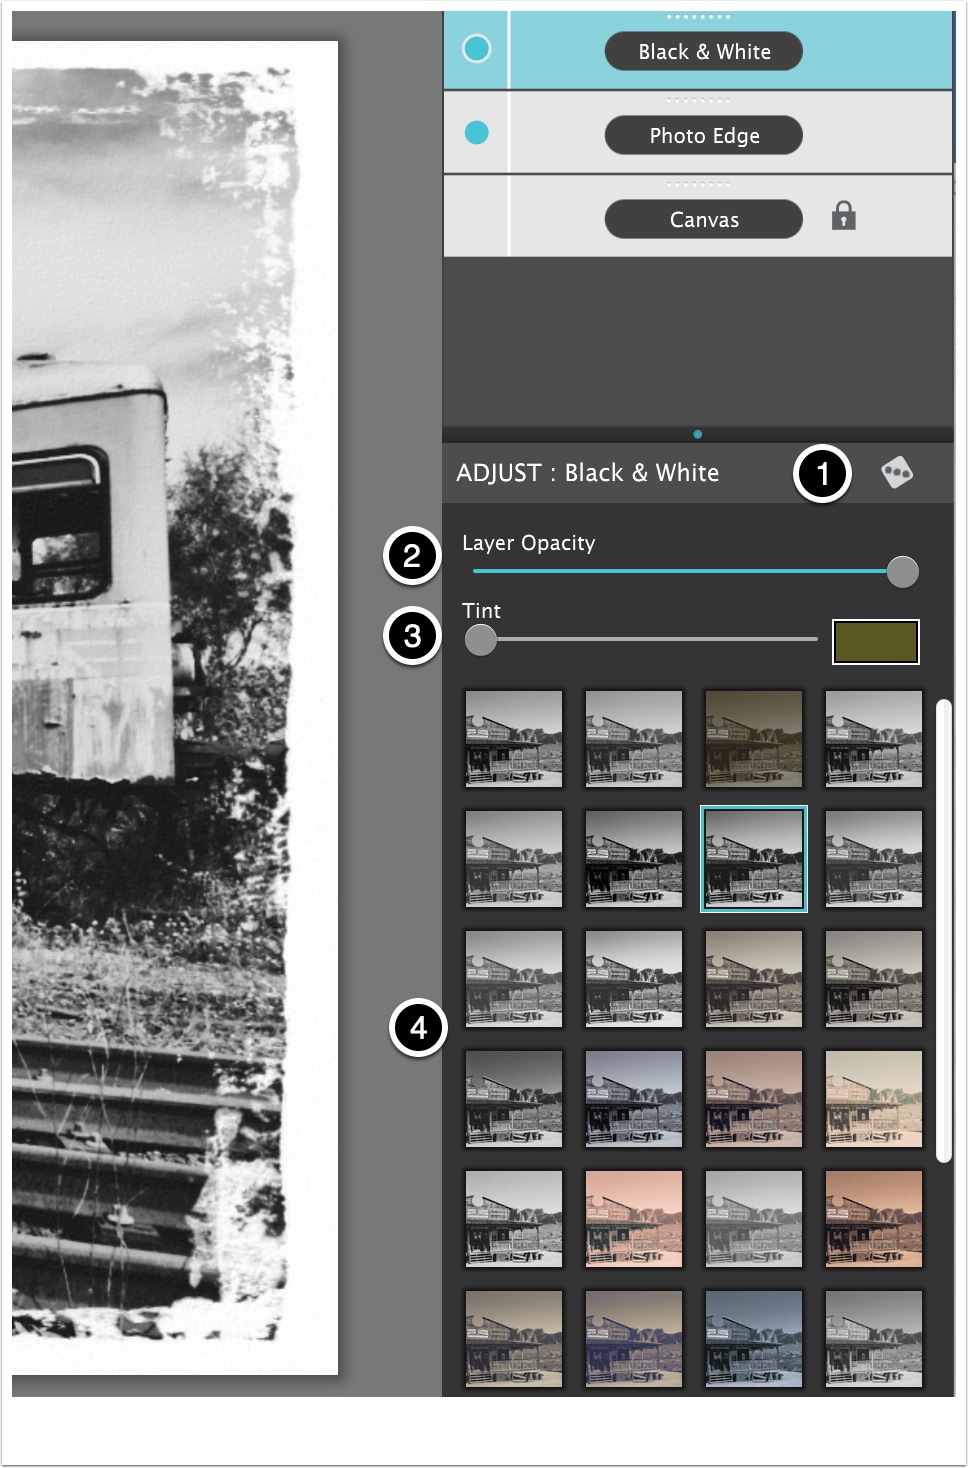
Black and White Filter
Black and White is used to change the image into various black and white styles.
1) Randomize Settings: Tapping the dice icon will randomize the settings on this layer.
2) Layer Opacity: Controls how strong the overal layer is. A value to the left will have less color visible and further to the right will have more color visible.
3) Tint Color: Combines this color and strength with the black and white filter to give a black and white filter that is tinted.
4) Black and White Filter List: This list shows thumbnails of all the different black and white filters that you can apply to your image.
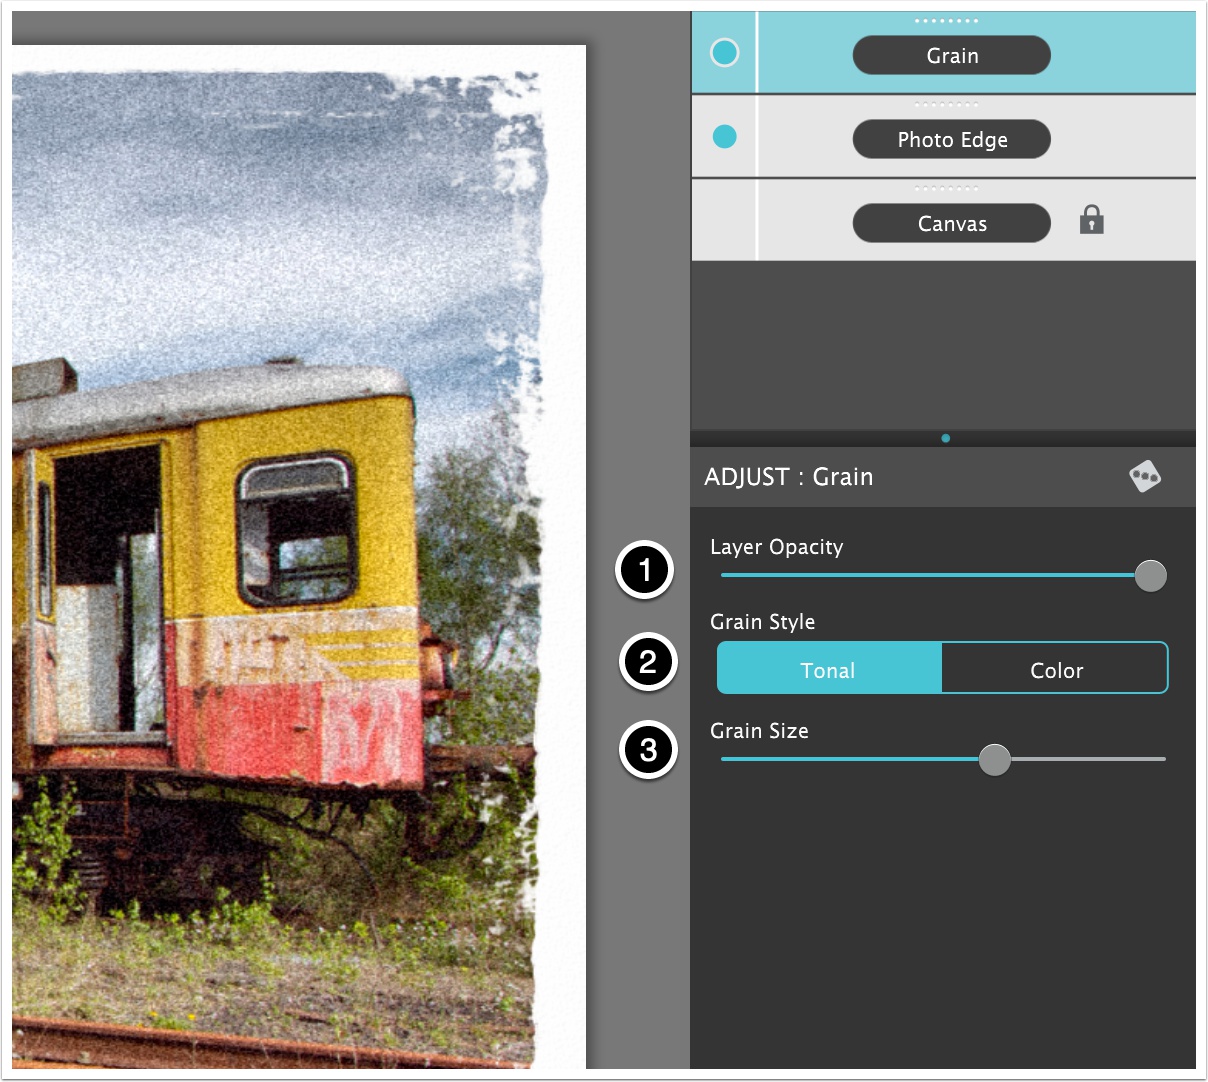
Grain Layer
Use this layer to add Grain to your photo.
1) Layer Opacity: Controls the overal strength of the grain.
2) Grain Style: Choices are either Tonal or Color. Tonal is a tonal shift in the image and color adds RGB color.
3) Grain Size: Controls how large the grain is.
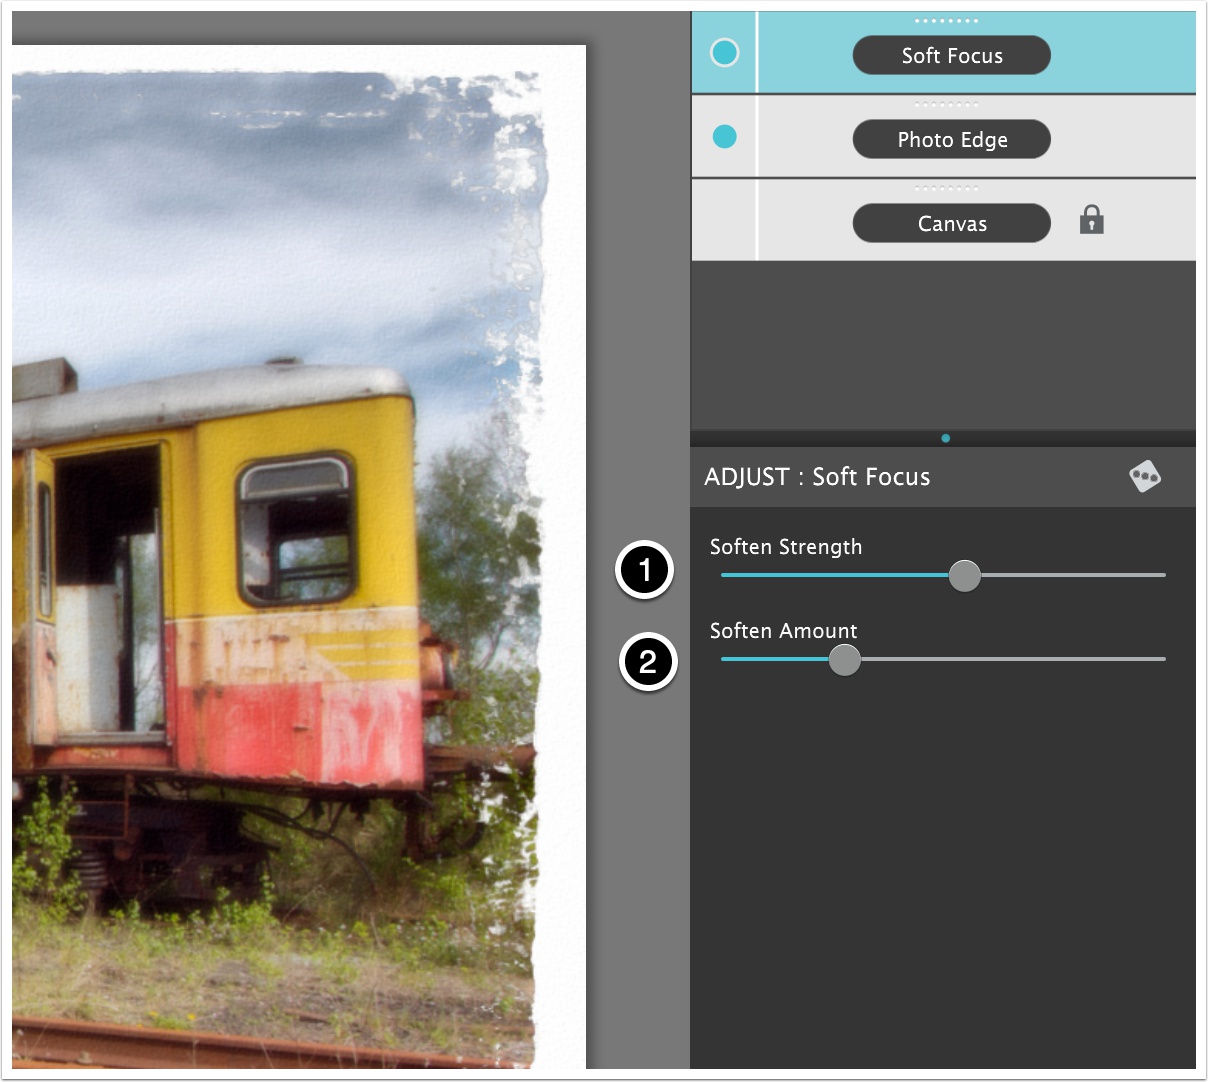
Soft Focus Layer
This layer adds a soft focus to the image by softly blurring the image while blending it into the photo. Settings can control the look to give an overal 'blur' look to a 'dreamy' quality.
1) Soften Strength: Controls the overal strength of the de-focus effect.
2) Soften Amount: Controls the amount of de-focus applied. This is equivalent to how much you would make your subject out of focus with a real lense. 'Soften Strength' controls how much of that is applied and bled back into the focused portion of the photo.
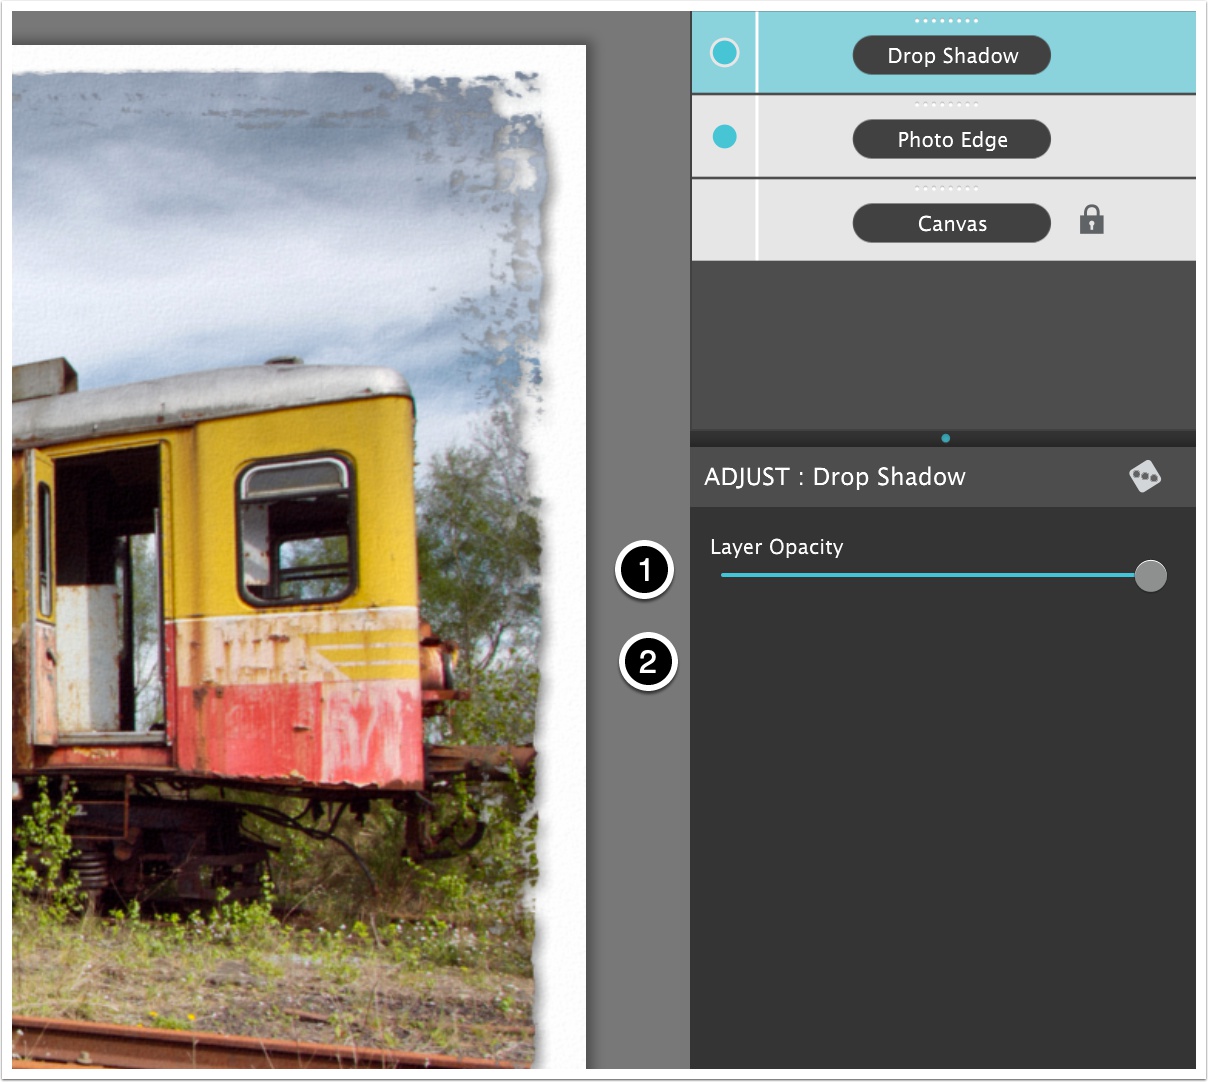
Drop Shadow Layer
This layer style adds a drop shadow to your photo. It does require there to be other edge types below it to work (otherwise there is no way to see the drop shadow under the photo).
1) Layer Opacity: Controls the overal strength of the de-focus effect.
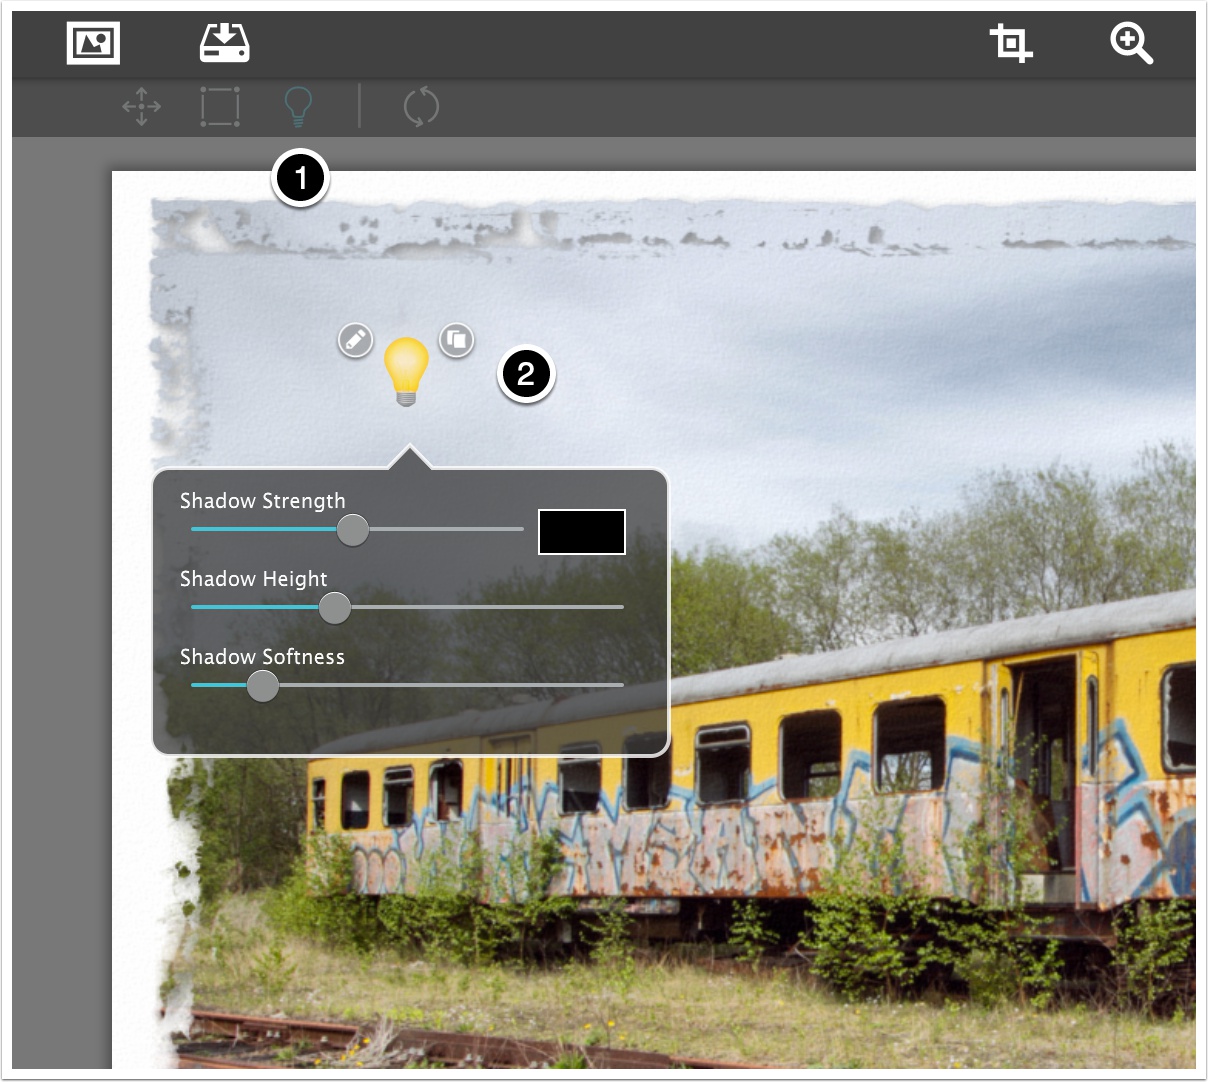
Drop Shadow Tool
When selecting the 'Light Tool' you can change the overal settings of the drop shadow and reposition the light (to move the drop shadow to a different location).
1) Light Tool: Used to make changes to the on-screen light.
2) Light: You can move this light-bulb around on the document by dragging and dropping or choose the pencil to edit the settings.
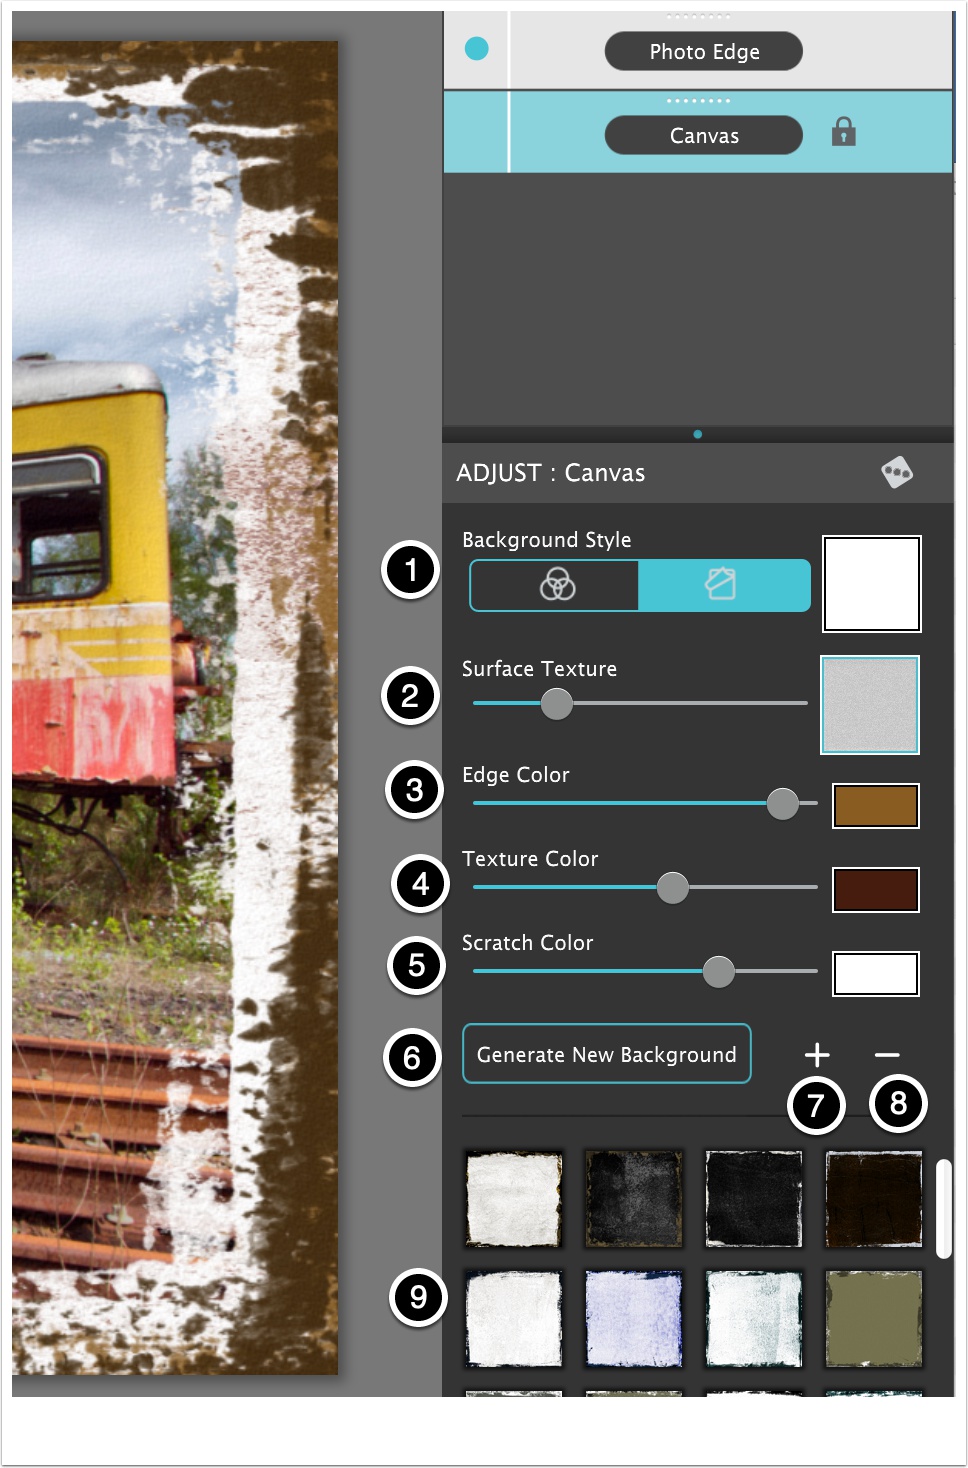
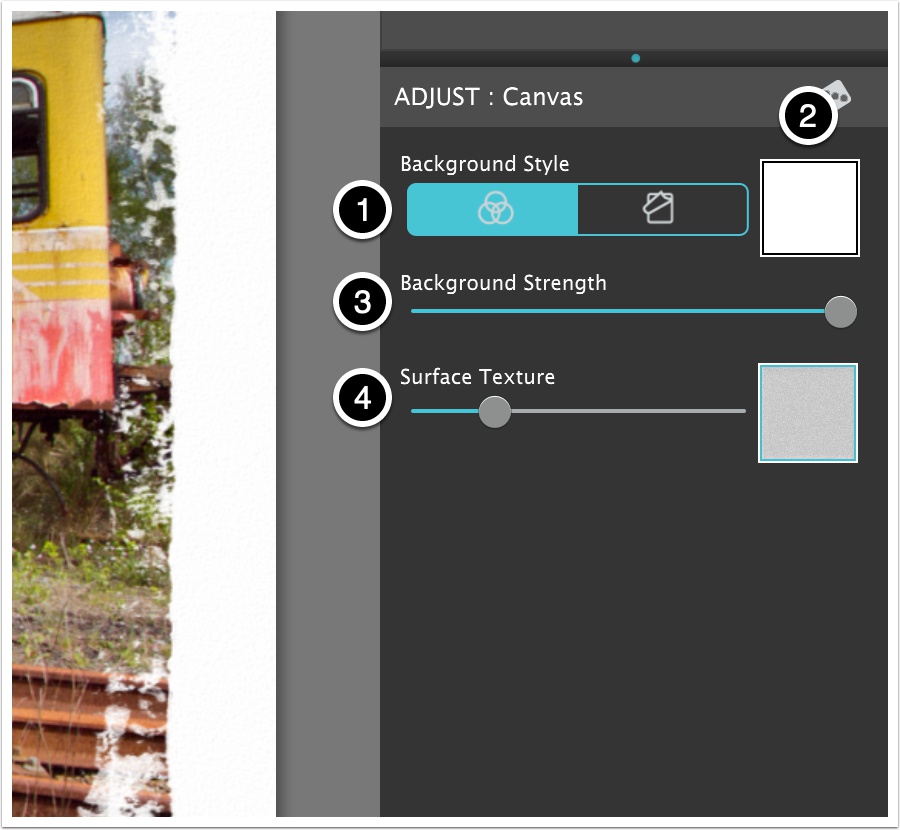
Canvas Layer
The canvas layer has two overall modes.
1) Canvas Style: This is the main 'style' of a canvas and controls how the canvas looks behind the photo. 'Color' mode is used to put solid color behind the photo. 'Edge' mode is used to generate a background canvas edge image that will go behind the photo.
2) Canvas Color: The color of the canvas.
3) Background Strength: The overall opacity of the canvas color. Values to the left are transparent (save with PNG or TIFF) and values to the right are opaque.
4) Surface Texture: To give the background paper a more realistic look you can add a 3D surface texture to the canvas.
Canvas Layer Edge Mode
When in 'Edge' mode the canvas will auto generate completely unique looks.
1) Canvas Style: This is the main 'style' of a canvas and controls how the canvas looks behind the photo. 'Color' mode is used to put solid color behind the photo. 'Edge' mode is used to generate a background canvas edge image that will go behind the photo.
2) Surface Texture: To give the background paper a more realistic look you can add a 3D surface texture to the canvas.
3) Edge Color/Strength: Controls the color and strength of the edge(s) that are applied to the canvas.
4) Texture Color/Strength: Controls the color and strength of the texture that is applied to the canvas.
5) Scratch Color/Strength: Controls the color and strength of the scratches that are applied to the canvas.
6) Generate New Background: Tapping this button will cause the Machine Learning part of Chromatic Edges to generate a completely unique background and apply it to your image.
7) Save Background: Tapping the '+' will save the currently generated background for later reuse. After it is saved a small thumbnail will show up in the list of preview list.
8) Delete Background: Tapping on this will delete the currently selected background in the list of preview list.
9) Preview Background List: This list shows all the thumbnails from the backgrounds that you have saved for future use (or JixiPix shipped with). Tapping one will cause the current canvas to change into the saved settings.